2003 T4R Floppy Shifter

I know I am late to this thread but mine in my 06 4runner sticks a little from D to 4. Would greasing this plastic piece help avoid it breaking?
 
I know I am late to this thread but mine in my 06 4runner sticks a little from D to 4. Would greasing this plastic piece help avoid it breaking?

It certainly wouldn't hurt anything. The problem seems to involve the metal pin etching a path and then having trouble jumping out into lesser-used gears.

See if nudging the shift forwards (towards the front of the car) ever so slightly as you shift into "4" (or "3" for our 4-speed friends) helps at all.

I have two broken shift assemblies here on my workbench and I was hoping to have figured out a solution by now. Stay tuned...
 
Shifter Maintenance

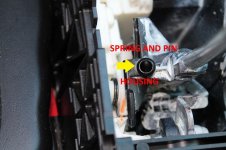
Bump to avoid a broken and wobbly shifter...Saw this thread and just went through mine due to hard shifts between 4-5 and very difficult going 3rd down to 2nd, resulting in a very loud plastic POP when forcing it. I use 1-2-3 a lot when off roading so I knew this needed to be looked into. Decided on a preventative measure. Took it apart and found the pin housing in good shape with no cracks. According to other posters this housing cracks and you lose all integrity of the shift pattern. Wobbly.....So I stopped forcing it, cause I'm so smart, and other people figured it out on here.
IMG_4199.jpg
P thru D are shifting fine so I decided not to cut a coil out of the spring. I did compress it with some pliers in hopes of relieving some pressure.
IMG_4201.JPG
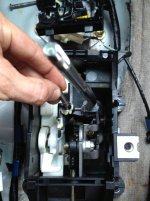
After checking out the path that the pin takes on the underside of the guidplate, I took my Dremel to it and removed a couple thousands of plastic in the sticky transition areas where the pin rides up over each ridge that locks the shifter in place. 4th - 5th shift great, 3rd going down to 2nd is much better but a little more Dremel might be needed.
IMG_4211.jpg
I also used some Super Lube I had left on the guide plate, to see if it doesn't get viscous and wont dry up over time. The old stuff was thick and full of grime. As stiff as it was shifting I'm glad I didn't try and force it into breakage and the Hobbly Wobbly shifter syndrome. Hope this helps any folks in the same shift challenged predicament.
 

Attachments

  • IMG_4199.jpg
    IMG_4199.jpg
    82.2 KB · Views: 804
  • IMG_4201.JPG
    IMG_4201.JPG
    124.2 KB · Views: 798
  • IMG_4211.jpg
    IMG_4211.jpg
    69.3 KB · Views: 821
OK -- so grinding it down helps with the "stuck spots?" That's good to know. Another user was kind enough to send me his old "ruined" unit, and I've been messing with that and trying to think of how to build UP the track a bit, like with some sort of 3D printed overlay to fit in there, or even cutting something out of thin metal.
 
This is certainly an old thread with new life! It looks like yous guys have gotten deep into the subject!

Let me just say that things are working fine with the simple solution I posted several years ago - the temporary elastic band tied to a washer. (see post and picture from 8-16-2013)

During normal driving around it always stays in D just fine, and only when towing do I use the elastic band to keep it in 4th (as recommended for towing).

But my hat's off to you guys for diving deep! :cowboy: :clap2:
 
Last edited:
This is certainly an old thread with new life! It looks like yous guys have gotten deep into the subject!

Let me just say that things are working fine with the simple solution I posted several years ago - the temporary elastic band tied to a washer. (see post and picture from 8-16-2013)

During normal driving around it always stays in D just fine, and only when towing do I use the elastic band to keep it in 4th (as recommended for towing).

But my hat's off to you guys for diving deep! :cowboy: :clap2:
I got lucky with my solution as mine had not broken yet. The broken pin housing is the real drag from what everyone else reported. My method has not been proven beyond a 100 miles, so we will see but now I know how to poke around in there. Toyota considering this a non serviceable component is Ka Ka as well. Way too expensive for how easy it is to work on. I was also lucky to stumble on this thread, with most of the leg work done for me, I dove right into prevent defense. Thank you to all you folks that contributed to this thread!
Love this Forum!!!
 
Shifter assembly Installation

Folks,

This thread is awesome-- I had the same problem arise with the shifter sticking from 4 to D, and fiddled once to hard and cracked the metal pin housing-- just like everyone else with a 2003 T4R seems to encounter. So-- I went online to ebay and bought a used assembly-- the first one I bought had the same problem, but the second one is intact and in good shape (for $79!!).

I can have my toyota guy-- excellent mech's-- install it but I thought I'd check on how difficult it is to do the replacement. I gather it's a matter of making sure it's in N or D before disassembling the linkage connections, but I gotta say that messing with the linkage and any adjustments that might come later is a bit scary to me. Any decent videos out there or tips to help me decide if I should go for it....or let the pro handle it? I do alot of my own work on cars and my boat, but messing with trannies has always been my mental block....and by "messing with trannies" I mean transmissions--- i'm not trying to get into the whole political stuff about which bathroom anyone can use!!
Thanks!
 
To anyone still dealing with a sticky shift but have not yet broken it...

1) I have gotten hold of two broken shifters and have somehow come up with a solution... stay tuned.

2) To prevent further damage (that is, going from sticky to floppy) when shifting to 4th and lower from D, push the shift upwards a bit towards Neutral before over to 4th. That will push the ball out of the groove it gets caught in and will help a bit.

WKelly -- It's not super hard to replace. I've had mine out a time or two and you'll see that essentially the component is just a large handle on a hinge. All the business end of things takes place in the transmission itself.

The process to remove it is pretty intuitive. you just have to take it apart in layers -- console, the surround, everything. You can give it a good cleaning while you're in there too. In the end, it's just one bolt holding the cable to the shifter assembly.
 
To anyone still dealing with a sticky shift but have not yet broken it...

1) I have gotten hold of two broken shifters and have somehow come up with a solution... stay tuned.

2) To prevent further damage (that is, going from sticky to floppy) when shifting to 4th and lower from D, push the shift upwards a bit towards Neutral before over to 4th. That will push the ball out of the groove it gets caught in and will help a bit.

WKelly -- It's not super hard to replace. I've had mine out a time or two and you'll see that essentially the component is just a large handle on a hinge. All the business end of things takes place in the transmission itself.


The process to remove it is pretty intuitive. you just have to take it apart in layers -- console, the surround, everything. You can give it a good cleaning while you're in there too. In the end, it's just one bolt holding the cable to the shifter assembly.

Hey Murph-- thanks beaucoup. I thought I had read on one of these threads that there was linkage adjustments involved but my guess is that if I mark where the connection currently is on the "shaft" that should keep it in the original place. I've taken apart the "new" assembly and did some cleaning and greasing with white lithium grease and it moves pretty nicely thru the gears. I appreciate the response and advice!
 
Shifter fastener torque spec?

Great thread and sadly I found this a little thread a bit too late; although my shifter lock assembly has 2 to 3 broken/missing bits....

I’m going to be installing a complete shifter lock assembly this weekend. I’m pretty sure I’ve figured out how to remove old shifter cable (move shifter to N and access shifter fastener bolt through hole on passenger side) from the assembly. However, I was hoping someone could let me know what the torque spec should be when tightening the shifter fastener bolt to the assembly. I don’t want it slipping, but I don’t want to over tighten either.

Thanks in advance.
 
Subscribed - mine is as stiff as a board when trying to get past anything but the D position. I can make parts out of metal here pretty easily - Murph can attest to that, I'm sure.
Not sure if he has the broken units laying around - but I'd be willing to dive into this and try to come up with a solution that is permanent and won't break.

Murph?

Sarge
 
Sarge, et al:

I'm actively working on a solution for this problem. I have three shift quadrants on my workbench, and I've narrowed the problem down to a single part, which then messes up the detent system. You know when you're driving through deep mud or snow, and you can't steer out of the tracks because your tires are stuck in the deep grooves? That's sort of what is happening here.

My project here has two prongs... 1) Come up with a replacement detent gate which allows the shift to move freely between D/4 or D/3, and 2) Repair the floppy shift situation once the damage is done.

I've been trying (miserably) to get in touch with someone at Aisin/Borg Warner who can possibly be a source for the detent gate.

In the meantime, one can "preserve" their situation by nudging the shift forward towards "N" ever so slightly while moving it to the lower gear gates. That helps push the detent shaft out of the track.

To repair the broken shift, we need some sort of thin-walled tubing to slide into the now-broken shaft and reinforce it. Maybe glued in with epoxy. The detent track is going to be tricky though.
 
Last edited:
Uh, I have a lathe here, just saying....as well as the 200 amp Miller Dynasty 200DX tig, lol.

Tubing/sleeves/bushings - no problem, whatever diameter you want up to 6", depending upon material needed (don't have any titanium, yet). I can work it into tolerances down to .0005", if necessary.

Hmm, got a nephew that works at Borg-Warner, got a part number? Not fully sure which division he works in, but could be a source. Smart kid, too.

If there are blank areas at each end/or off to the sides of the track area, we could cut and form brass to fit in there and secure it with a few small screws. That would stop the wear and its easy enough to form the stuff into a tighter radius bend. A slightly shorter pin at that point would probably be needed. I'd have to see the assembly first to get a better idea - staring at internet photos is tough with my eyesight. Hence, the whole gauge lamp irritation.

Yes, I still weld, much thanks to Optrel for making a hood that actually works for someone that is going blind. From Switzerland, go figure. 1/3 the cost of that rotten Miller Digital Elite - that's enough to irritate a guy.

Sarge
 
3D printer?

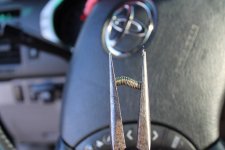
I'm afraid it might be difficult to machine the plastic part. It has the collar that rides on the shifter arm, and to the left the shaft/cavity that the metal spring-loaded rod lives within. Looks like the lubricant used for the rod may either be driven out over time or gums, leading to the rod 'sticking' in the fully raised position. If we had the 3D CAD drawings of the injection-molded plastic piece, we could use a 3D printer to create a replacement readily.

The lubrication lifetime would still be an issue, but with a weaker spring, maybe the rod wouldn't fight its up/down vector so much. That rod fully extended up offers too much of a moment arm when the shifter is moved laterally, allowing it to stress the plastic shaft's upper region.

My picture shows the rod in my fingers, and a failed attempt to relubricate the shaft.
 

Attachments

  • IMG_2212.jpg
    IMG_2212.jpg
    125.7 KB · Views: 2,678
Sarge, it looks like it may be time to have an old time workshop day. I think between the two of us, we may get this situation resolved.

Baddna -- if you look at the "track" where the detent pin rides back and forth, you will likely see (as I have in the 4 I've taken apart with Sticky Shift Syndrome) that the "drive" position has worn a deeper hole than the other positions. Although lack of lubrication might indeed contribute, this is where the pin gets stuck and forcing it out of that rut is what breaks the tube.
 
Do you think it's worn that way, or designed to be deeper? I can't tell from my unit.

That's a good question. I recently did get my hands on a good unit (not sticky) which I am going to disassemble and determine what is different and causes the stickyness.
 
Summary of Posts that worked best for me...:

For the specific problem in a V8 2003 T4R where shifting from D-4 and esp 3-2-3 becomes increasingly difficult, then floppy/too loose a different t4r.org and this thread had answers that allowed me to fix this with 3 different steps. 1st, the other thread is findable under this title - "Screwed up my auto shifter - loose and floppy". For the issue I've described, there are many very helpful photos and a couple very helpful posts. In any event, since it was a combo of about 5 different posts that I thought were the 'magic' that helped me fix this problem for $5 that I want to summarize what I felt worked best. Since there can be a couple causes to similar issues, if what you are experiencing doesn't match up exactly to what I'm writing, maybe you have too different a problem and need to look elsewhere.

First I think posters agree the root cause of this problem is POOR DESIGN. Over time there is a wearing in of a "groove" from where the spring loaded Pin rides on the underside of the black plastic shifter case box. This spring loaded Pin and the track it rides along is what provides the friction and stop points while shifting. But over time the plastic sleeve the pin rides in is too shallow and/or too weak to withstand the increasing forces from...take your pick; the 'groove' gets bore out too much in P-R-N-D, too much 'dirt/gunk' gets in the grease in the 'groove', you have too many pounding on the shifter to shift incidents, etc. This eventually leads to it to a cracking of the plastic hole and the pin is forced out of the hole going from D-4-D or 3-2-3.

The FixIt Job:
1) Remove the trim around the shifter until you get to the black plastic shifter case box the shift lever moves up/down in (with medium sided white depressible button near the top left of the top of the box).

2) Remove the sheet metal washer clip on the right side of the long pin at the rear of the black shifter case box. Once the long pin is removed, remove the top carefully (the white button has a long plastic arm that could be broken here). Flip over the black case lid to see where this pin rides. This short pin provides a drag on the shifter to keep it from flopping around, and moves around in peaks and valleys to determine the position of the shifter. On my 4Runner, the pin had worn a groove in the standard PRND pattern, but not into the 4321 pattern. The deeper groove in the D position puts extra stress when trying to slide over 4 but also something happens going from 3-2-3 that also puts lots of force on the pin. In any event, it seems the Pin traveling through these areas over time causes the wear in groove and the weakening of the plastic around the spring loaded short pin to crack and become loose in the shifter case. Oh, BTW, I had to remove the 4 bolts of the entire shifter case to lift it up a few inches to find my dang pin. It would not be found with a metal probe!

For steps 3-5 below, I did little bits of each, back and forth. In the many posts on many websites, some people had success with just 1 or 2 of these 3. But, I think doing all 3 may be required and maybe most indicated. Anyway, I would do some of 1 or 2 of these steps, then re-installing the black shifter case box lid and manually hold that lid in place while working the shifter through the gears to asses my progress (I used a screwdriver to gently depress what the white button on the shifter box lid depresses which is what allows you to shift w the car off - but also must be depressed to take keys out of the ignition as that is the 'park' position). Each time I'd use a lite amount of white grease to confirm where my pin was tracking and which areas seemed to be more problematic.

3) I think cutting down the spring under the 'pin' is crucial and helps with needing less epoxy in the next step but also should help prevent this from re-occurring. I did 2 coils on my 1st pass, then another coil, then another 1/2 coil before I liked the 'action' I was getting.

4) Only a person or 2 talked about this step, but I count it as the most important. Build up the plastic the spring loaded pin sits in! Use a quality epoxy that uses 'metal' in the word. And don't build up the epoxy thick at the base and tapering as you get just above the lip of the original hole (I did that and easily broke through my epoxy job). Really use a nice thick base of epoxy and keep it thick all the way to several mm above the original hole. I came up so that only about 40% of the pin was now showing, but not so much that a hard pressure on the pin caused the pin to drop below the level of the epoxy. Let’s say I build it up 5-6mm form original hole height. Obviously keep a well greased pin in the hole during this process! And, I found that though I had to clean up the grease btwn each attempt, I did 4 rounds of building up epoxy before I realized I build it up too much (started not allowing the pin to travel through its full motion needed). So, then I dremeled back a few mm.

5) Likely the most dangerous step as you can always get a new spring if you cut down too much, you can constantly add/subtract epoxy. But, you carve away too much plastic from where the pin tracks and you'll be part hunting I believe. So, Step 5 is dremel tool or sanding or carving away plastic from the track the pin runs through. Cleaning that track and good light/magnification and you should easily be able to see what shape your track is in and perhaps where some shaving away plastic could ease the pin's journey south... Again, though I wasn't having D-4-D stickiness myself, most were and it was easily the largest ledge for my pin to jump, so I ended up carving that down from a ledge to a ramp, and it didn't effect my outcome negatively (i.e. I had good D-4 shifting when all done, but surely the pin is putting less stress on my job over time going forward).

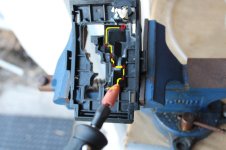
I also did not have issues with the white plastic switch guts. The weird tab/spring thing sticking out near Reverse position is a microswitch. This is intentional. Do not mess with that. It is not a spring hook or anything. You can see and hear it engage when you shift in/out of Park/Reverse.

In the end, I fixed the issue for the cost of the epoxy, and no new parts. Couple hours spread over a few days as I’m pretty picky and had time on my hands.

Work through steps 3-5 with caution esp on the plastic pin track Dremel or sand/carving work.
Disclaimer: I am not a Mechanic!
 
I'm new to the 4runner world. Three days or so and have the floppy shifter issue. I was thinking maybe it's possible to sleeve the pin hole? Drill the plastic hole slightly larger and slide in a piece of steel tubing covered in epoxy and then load the spring and pin back in?
From what I can tell from people talking about it the main cause is the top of the hole wearing out and the pin leaning then jamming, I may be wrong.
A sleeve would resist wear, especially if lightly greased and restore the diameter of the hole from top to bottom. This might even work if the plastic piece is cracked at the hole.
Any thoughts?
 

Members online

Forum statistics

Threads
278,310
Messages
3,554,080
Members
248,016
Latest member
Advally Service

Trending content

Back
Top