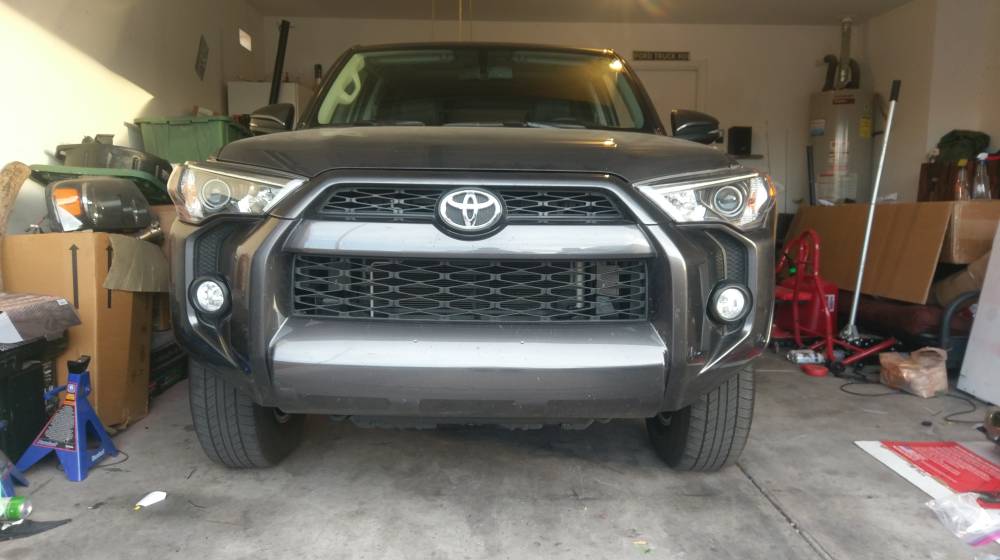
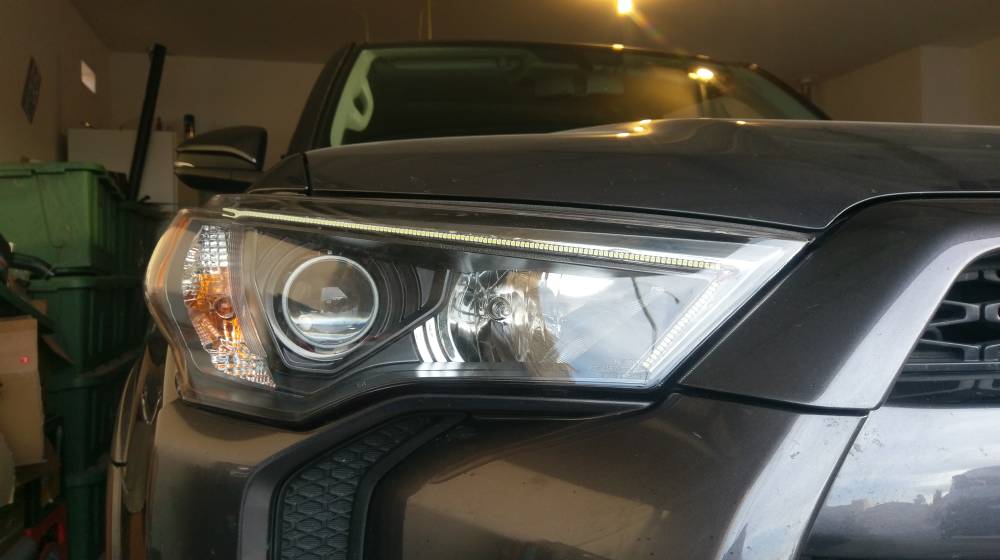
2015 T4R IS350 build

Awesome thread. Very cool to see someone tackling this project and documenting in detail. I recently purchased a 16' Trail but started addressing the lack of HID before I even bought the 4R. I originally wanted to do the retrofit myself but I know how time consuming these projects can be so I opted to pay someone to do them. I bought some TYC 4Runner headlights, sourced some IS projectors via ebay and then sent everything to Lightwerkz up in NJ. They did something very similar to what you're doing with hacking of the mount to adapt the IS projector. They also swapped the lens with STIR lenses. I had them black out the headlights and leave the chrome strip.

I havent had a chance to get nice closeups and still havent got any of the cutoff but its got the nice blue/purple cutoff like my Morimoto Mini D2S retrofit in my '14 Forester XT. Just not as sharp.


I will be making a build thread here really soon and will have more pics but here is at least one headon shot of my 4R frontend:
**edit: Lightwerkz has some closeups: 2016 Toyota 4Runner ? Black Out + HID Projector Conversion | Lightwerkz Gallery
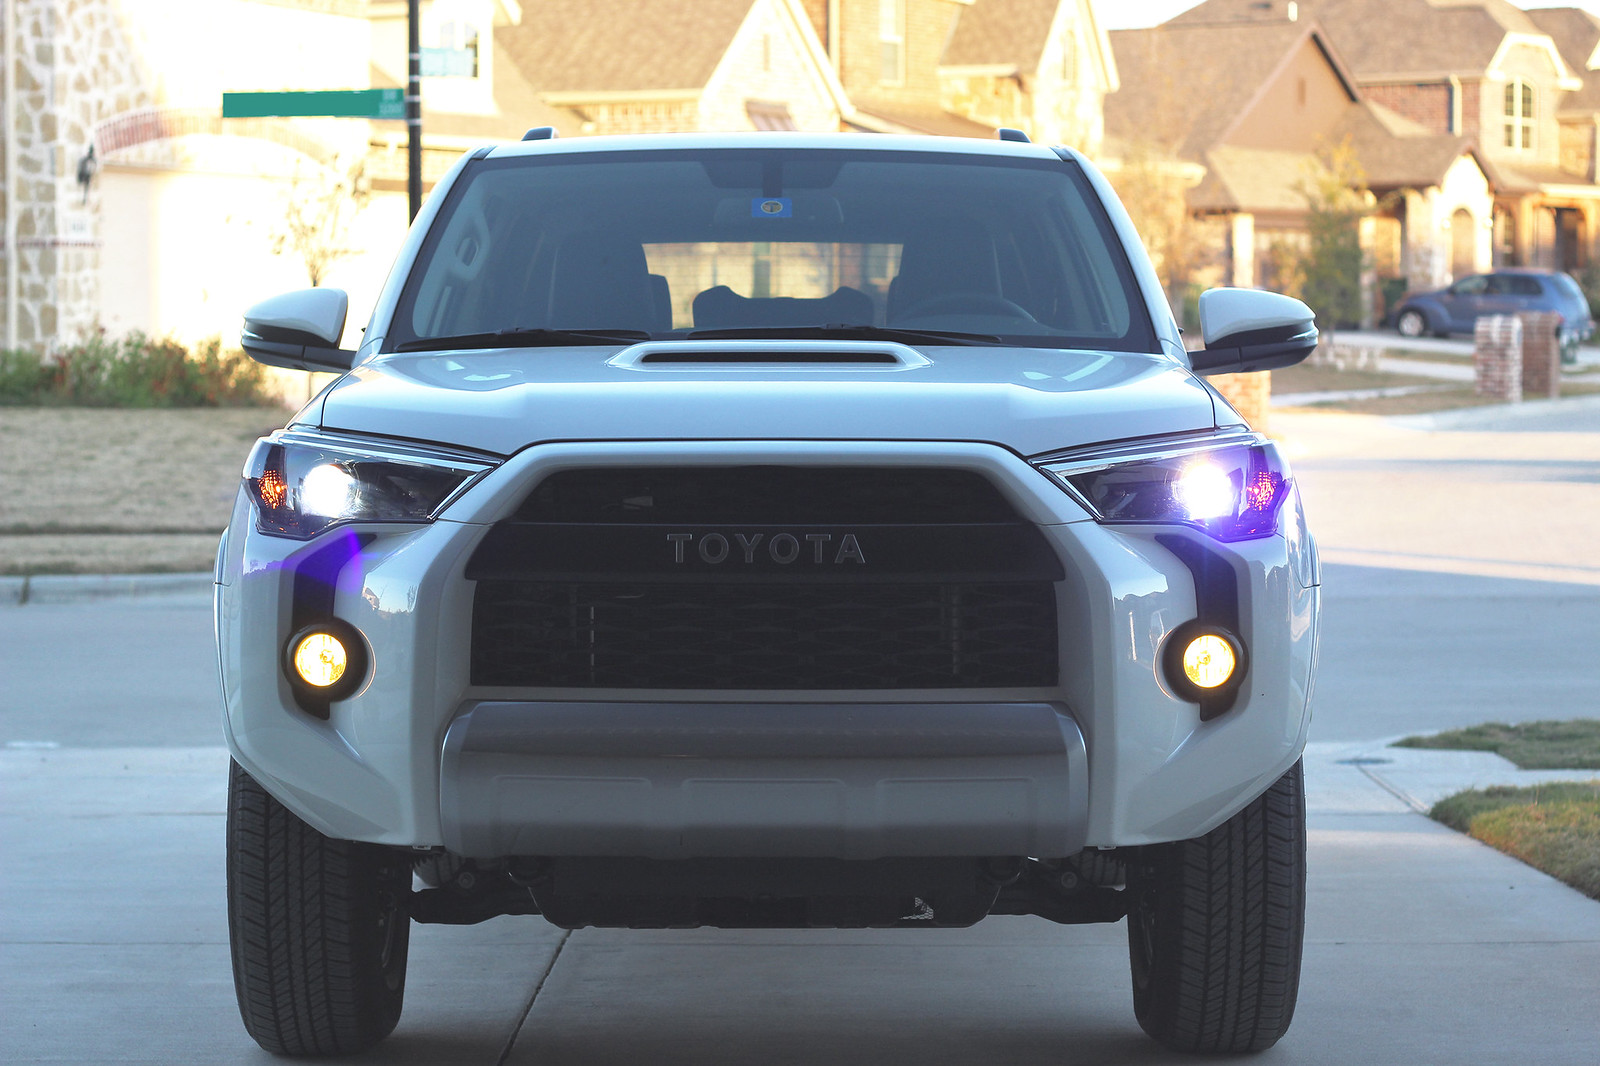


31424101385_6606140689_h.jpg

I did the same retrofit through El Stig here in LA. Added a diode halo as well. Night and day difference in light output, hotspot, and clarity.
 
They are considerably better. The IS pros are a HID specific projector. Making them far superior to the T4R OE pros. Just as a reference I found. Here is the IS pros with their stock lens. The second pic if of the clear lens from the STi-R lens.

Stock Lens

jakeko-albums-is350+projector++15+t4r-picture43223-stock-lens.jpg


STi-R Lens

jakeko-albums-is350+projector++15+t4r-picture43222-sti-r-lens.jpg


The pictures don't lie.

I wish you had the stock halogen projector to compare. People just dont understand what a difference this makes...
 
I have no problem with modding headlights. To each their own. My issue is when new guys come here right off the bat with disparaging remarks about things that are not even measurable. This guy, who doesn't even own the thing, is disappointed in the color of all things.

As far as the headlights, i've drove $25K rental vehicles with better headlights (better being subjective of course... to each their own) and a $70K vehicle rental i was in with LED headlights that were much worse than the stock 4Runner headlights. Again, my opinion.

Headlights and colors are subjective, just like seat comfort.

Headlight output is measurable. No question about it. Good headlights are like unicorns, rare and for some reason random ass cars have them.
 
[MENTION=144488]chzbrgr_masheen[/MENTION] you trying to hijack my thread!? haha just messin man. They look great and they did a great job. I contacted LightWerkx about this project because I saw the had done a few in the past. They helped me considerably. Along with The Retrofit Source.

What bulb temp did you go with? And are they 35w or 50w?

haha, sorry man. I have Osram 66240 CBI w/ Denso Slims so they are 35w.
 
Nice project!

I must say though, that IS output shot looks WAY better than the output I see every time I drive my wife's IS at night.
 
Nice project!

I must say though, that IS output shot looks WAY better than the output I see every time I drive my wife's IS at night.

Difference is 'tuning' - typically a new, clear, higher quality lens and spacers behind the lens to improve its focus. Not a small task - involves baking open the headlight to work on the projector, and resealing it. Even halogen projectors can be improved this way, but you'll retain the lower color temperature (yellow-ish) of halogen. TRS sells kits for this.
 
This is the thread I have been looking for!! Thanks for documenting it so well. Cant wait to see these finished!

I am surprised by the people that feel the need to post there opinion in this thread. If your happy with the output from your PNPs or stock then just move on. People with PNP kits always wanna justify blinding everyone on the road. Its retrofit or nothing for me I fell like blinding oncoming traffic is dangerous for everyone.
 
Also, she wants them on any time the vehicle is on. So I guess I can do the "DRL always on" [MENTION=65614]Antman[/MENTION] made and then find the wire under the hood to the fuse box, cut it and run that to the LED's. Still working on that. But I have time.

To be continued...

Do some more research on this first! Antman's 2010 uses the blinkers for the DRL's, but the 2014+ DRL's are the high beams. If those are wired "always on", you won't have low beams as your solenoid will always be energized.

Just one more step to consider. If you can cut and run the wire out to only the LED's, that should work. But I think you're better off disabling your DRL and wiring the LED's off of a ignition only fuse in the engine bay.

For disabling your DRL, you can:
let the dealership set this setting for free,
pick up a Carista ODB2 module
Or bend the pin on the relay - can't remember who did this (only option that not reversible - hey some people care about that option...)
 
Do some more research on this first! Antman's 2010 uses the blinkers for the DRL's, but the 2014+ DRL's are the high beams. If those are wired "always on", you won't have low beams as your solenoid will always be energized.

Just one more step to consider. If you can cut and run the wire out to only the LED's, that should work. But I think you're better off disabling your DRL and wiring the LED's off of a ignition only fuse in the engine bay.

For disabling your DRL, you can:
let the dealership set this setting for free,
pick up a Carista ODB2 module
Or bend the pin on the relay - can't remember who did this (only option that not reversible - hey some people care about that option...)

Hmmm...I'm guessing the wiring is not the same in all 5th gens? I know they changed the body somewhat in 2014+.

This is what I've found and what I plan on doing. This came from [MENTION=119516]jicko[/MENTION]

"In my post above (there is the diagram), if you disconnect the DRL signal(anywhere along the line, from pin37 of 2C or the LG/LightGreen wire inside the harness or pin17 of FA1 or the LG/LightGreen wire inside the Relay/Fuse Box/underneath the relays&fuses) from the Main ECU to the DRL Relay, you isolated the DRL from the high beam.

Now, you can take that DRL signal, and use it to drive something else..... probably should thru a relay tho.

I hoped that it is clear enough?"

jakeko-albums-is350+projector++15+t4r-picture43290-drls.jpg


Sorry it's so small. (that's what she said)
 
Another update. I got the Right headlight pretty much assembled. Just waiting on paint.

When I was bonding the back and front of the IS pro I broke a screw for the projector lens bracket. You can see it just to the left of the middle of the blue film. It actually doesn't seem to affect the output of the bulb. I guess time will tell. I may end up doing a quick epoxy job on that hole, but we will see how the alignment/test fit goes.

jakeko-albums-is350+projector++15+t4r-picture43293-i-broke-screw-projector-lens-bracket-you-can-see-just-left-middle-blue-film-actually-doesnt-seem-affect-output-bulb-i-guess-time-will-tell-i-may-end-up-doing-quick-epoxy-job-hole-but-we-will-see-how-alignment-test-fit-goes.jpg


This is the cutoff I found to be the best in my opinion. GF approved as well.

jakeko-albums-is350+projector++15+t4r-picture43294-heres-cut-off-i-found-best.jpg


Got the projector with the OE mounts installed in the headlight. Everything not in green will be Mag Gray. It's still taped off until I receive the paint.

jakeko-albums-is350+projector++15+t4r-picture43295-installed-headlight-assembly-brackets.jpg


Here's a close up of the bracket in it's respective holes. I eye-balled-it and it seems to be level as far as holding it. But installing it on the vehicle and adjusting it will be the pain. I hope they both line up and I don't need to take them out and adjust them.

jakeko-albums-is350+projector++15+t4r-picture43297-closer-up.jpg


Again...

Thanks for looking guys.

To be continued...
 
Last edited:
Well....I found something very unfortunate.

Here's the projector mounted inside the OE headlight shroud.

jakeko-albums-is350+projector++15+t4r-picture43309-well-i-found-something-unfortunate.jpg


And here is the unfortunate part. There is a huge crack that separates the halogen housing from the adjustable headlight portion. Which is a huge problem. It's just to the right of the top right screw on the projector.

jakeko-albums-is350+projector++15+t4r-picture43310-there-crack-here-you-can-kinda-see-im-going-epoxy-hope-holds-i-dont-have-%24-buy-new-headlight.jpg


Kind of a crappy quality/potato picture, but this is the projector warming up.

jakeko-albums-is350+projector++15+t4r-picture43311-warming-up.jpg


And this is it somewhat warmed up. This is the best I can do for now.

jakeko-albums-is350+projector++15+t4r-picture43312-kinda-warmed-up-i-think-cut-off-looks-great.jpg
 
Do some more research on this first! Antman's 2010 uses the blinkers for the DRL's, but the 2014+ DRL's are the high beams. If those are wired "always on", you won't have low beams as your solenoid will always be energized.

Just one more step to consider. If you can cut and run the wire out to only the LED's, that should work. But I think you're better off disabling your DRL and wiring the LED's off of a ignition only fuse in the engine bay.

For disabling your DRL, you can:
let the dealership set this setting for free,
pick up a Carista ODB2 module
Or bend the pin on the relay - can't remember who did this (only option that not reversible - hey some people care about that option...)

Following this thread as I find it fascinating. Thanks to the OP for sharing the process.....which I will never do out of fear. Haha!

I have a 2016 and my headlight stalk has the option to turn off the DRLs. (full off, DRLs only, markers, lights on) I'm just trying to understand this process not trying to knock ya sige, just making sure I'm understanding.
 
I have a 2016 and my headlight stalk has the option to turn off the DRLs. (full off, DRLs only, markers, lights on)

That's correct, but when you turn on the DRL's or markers, the DRL's are on.

The OP wants the following settings:
DRL's to not control the high beams, but the LED's he's adding and be on all with the ignition.
Solenoids wired to the high beams.

Since the high beams are used as DRL's, wiring the DRL's always on will always energize the solenoid, making the low beams of the Bi-Xenon projector not available.

[MENTION=149481]JakeKo[/MENTION] - I like the idea of moving the DRL signal wire to a different set of lights. I might eventually do that on my rig...
 
That's correct, but when you turn on the DRL's or markers, the DRL's are on.

The OP wants the following settings:
DRL's to not control the high beams, but the LED's he's adding and be on all with the ignition.
Solenoids wired to the high beams.

Since the high beams are used as DRL's, wiring the DRL's always on will always energize the solenoid, making the low beams of the Bi-Xenon projector not available.


[MENTION=149481]JakeKo[/MENTION] - I like the idea of moving the DRL signal wire to a different set of lights. I might eventually do that on my rig...

Okay, I think I figured out the LED wiring. I found in a post...http://www.toyota-4runner.org/5th-gen-t4rs/169979-drl-disable-but-keep-auto-headlights.html
In this post the they perform bending pin 2 in the headlight relay inside the engine compartment. I'm going to do this as well as connecting the LED's to the power block that is directly behind the fusebox inside the engine compartment where the headlight relay is located. I found on the last page that this power block comes on with ignition and disables 60 seconds after the ignition is off. Of course I'm going to double check this with a light tester to be sure. Here is what I'm talking about.

jakeko-albums-is350+projector++15+t4r-picture43365-power-block2.jpg


And here is the Power Block directly behind it.

jakeko-albums-is350+projector++15+t4r-picture43366-power-block.jpg


The user than found this has a Canadian vehicle. So I hope it's not different for some reason.
 
A slight update.

I got both projectors in their housing. I'm not happy with how the aesthetic shroud fits over the inner portion of the headlight but I'm not sure what I can do about that.
Here it is. It's not sealed yet, obviously. I need to install in her vehicle first to make sure the cutoff is level. It just looks a little cockeyed to me. Not the projector but the projector inside the shroud.

jakeko-albums-is350+projector++15+t4r-picture43371-imag0477.jpg


Also...I went a different direction cutting the other OE pro bracket off. This is what it came out looking like.

jakeko-albums-is350+projector++15+t4r-picture43372-imag0467.jpg


And here's another picture.

jakeko-albums-is350+projector++15+t4r-picture43373-imag0468.jpg


Honestly in the end...it didn't matter much because the entire bracket doesn't fit flat in between the IS pro. I had to trim. And when I was done, it pretty much looked like the first one I cut. HA. But I did find it easier, overall, to cut it that way. In this case, you can easily cut and trim to your needs. Plus the more metal that is there, the stronger and easier it will be to work with.
Here's the projectors mounted inside the shrouds. Along with my Epoxy job. Which seems to be holding up just fine.

jakeko-albums-is350+projector++15+t4r-picture43374-imag0472.jpg


jakeko-albums-is350+projector++15+t4r-picture43375-imag0473.jpg


Oh, BTW. I did have to trim some on the inside of the headlight shroud in order for it to fit properly and not rub. That's what all that white dust looking stuff is.

Left side.

jakeko-albums-is350+projector++15+t4r-picture43376-imag0474.jpg


jakeko-albums-is350+projector++15+t4r-picture43377-imag0475.jpg


This weekend the woman is out of town but I have access to her vehicle. Little does she know I'm going to be ripping her bumper off to install these to align them. I'll be sending her pictures though. She's not gonna be happy.

Wish me luck this weekend.
 
Last edited:
Big update...Kinda

I pulled the bumper, headlights and put the new headlights in temporarily. Overall, I'm happy, but the passenger headlight still needs work. It's the one I broke the lens screw on. I think I'm going to drill it out and worst case scenario, drill all the way through and use a bolt/nut to secure the lens. It needs adjusting and I know it can look better. Other than that, I think they look awesome so far!

Here's what I pulled off the truck.

jakeko-albums-is350+projector++15+t4r-picture43389-bumper-heads-belly-cover.jpg


This is the cutoff of the Halogen projectors. Front a distance, they're not bad. But wait for it.

jakeko-albums-is350+projector++15+t4r-picture43388-halogen-projector-reference.jpg


Here is the bumper off, old headlights out and new headlights in. They are bare and don't have the clear housing or aesthetic shroud around them. Strictly for fitment and analysis.

jakeko-albums-is350+projector++15+t4r-picture43390-bumper-off-new-heads.jpg


Warming up...

jakeko-albums-is350+projector++15+t4r-picture43391-warming-up.jpg


And.....BOOOM

jakeko-albums-is350+projector++15+t4r-picture43392-warmed-up.jpg


Like I said, the right/passenger side needs a little tuning. But damn and I'm happy so far.

Done for the night. Planning on removing these lights tomorrow, drilling out the broken screw in the lens bracket and hopefully tuning it accordingly and then I'll be ready to paint/install LEDs and be good.

To be continued...
 
Alright, I got them installed and they look great. Fitment is good and output is decent. This weekend I'm going to get some night shots for you guys.
BTW, these were fun to do. If any of you guys out there want a pair, let me know and I can hook it up. They won't be cheap unfortunately.

d31b1ee80b5e3bb1183eab2cb3a61ef7.jpg


7c35456e8600137ca43fb62c46fca0a8.jpg


2bba22a769815b4234d13e7f0c9a269e.jpg


d6219548c7f36bcd6e2d20760a03160f.jpg


c21cb127de645f98f74cac0e34b89b91.jpg


I used morimoto black sealant to seal these back up. 7 minutes in the oven at 250 did the trick. Time will tell if they are sealed properly. I am still waiting on a harness for the DRL LEDs to come in to properly wire them up. Also some male 9005 pigtails to hook into the high beam splitters. Other than that she finished :). She loves them. Just picked her up from the airport and she was cheezin.

Again, if anyone is interested in doing these or purchasing these. Let me know. This project was a lot of fun.

Thanks for looking!

Jake

Sent from my HTC 10 using Tapatalk
 

Members online

No members online now.

Forum statistics

Threads
278,316
Messages
3,554,112
Members
248,016
Latest member
Advally Service

Trending content

Back
Top