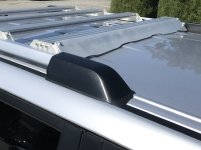
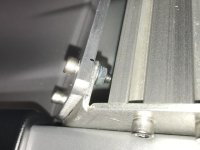
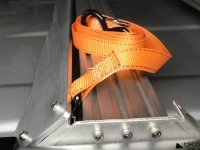
5th Gen Aluminum Roof Rack Using OEM Siderails: NiseRack

I've been looking for a a rack solution for my 2013 for a while. I was so glad to stumble across this thread! It has been entertaining and informational to read. Congrats on a fantastic solution! I hope you enjoy your week off.

I am really hoping to make this work for my 'pre 2014' 4Runner and will get some width measurements soon on the rails front to back. I imagine that the solution is a slightly different length crossbar from TNUTZ for the rear but won't know until I measure it.

Dan

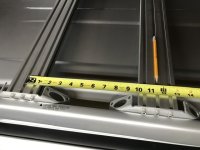
Dan, here’s some food for thought when measuring. For the 2014+ rails, which are the same front to back, the widths are 40 7/16 inches. The NiceRack bracket thickness is 1/8 inch. So 40 7/16 minus 1/8 minus 1/8 = 40 3/16. That’s the length to order from TNutz for a 2014+ 4Runner.

For your 2013 4R you might want to figure out how many bars you need, buy the brackets from NiseRack, install them on the rails and space them out evenly along the rails, then measure the crossbar width needed exactly at each location. That would be my OCD method, LOL.

But you could also just measure carefully with a good four foot ruler at your preferred bar locations. Maybe map it out every 6 inches along the length of the rails to see how much variation you get. Then place your TNutz bar order.
 
Last edited:
[MENTION=200736]ElectroBoy[/MENTION]

You are correct... mostly. On my original rack, I measured between the rails backed out the thickness of my brackets and used that distance for my bars. What I found is that it's a perfect fit. This means if I want to loosen the bars and slide them back and forth they're a bit "sticky" and hard to move. An additional 1/16" provides enough room for free movement if you choose to loosen them and slide them.

The crossbar bar should be Total distance between rails - 1/8" - 1/8" - 1/16".

Also I'm in posession of the rails for the destructive testing. Now I need to design the rig and test protocol.
 
Dan, here’s some food for thought when measuring. For the 2014+ rails, which are the same front to back, the widths are 40 7/16 inches. The NiceRack bracket thickness is 1/8 inch. So 40 7/16 minus 1/8 minus 1/8 = 40 3/16. That’s the length to order from TNutz for a 2014+ 4Runner.

For your 2013 4R you might want to figure out how many bars you need, buy the brackets from NiseRack, install them on the rails and space them out evenly along the rails, then measure the crossbar width needed exactly at each location. That would be my OCD method, LOL.

But you could also just measure carefully with a good four foot ruler at your preferred bar locations. Maybe map it out every 6 inches along the length of the rails to see how much variation you get. Then place your TNutz bar order.

Excellent thought! I will send in the order but won't get the brackets for a couple weeks, most likely, due to the week of vacation!

I will try to do some PRE measuring in the meantime. I should be able to identify where the brackets would go assuming I get 4 of them!

Dan
 
Quick Update:

2013 4Runner Limited with factory rails and crossbars (2).

The width from side to side in the front is 40 1/2" and tapers to 40 3/8" in the rear, so you only lose 1/8" front to rear. I also noticed that the factory crossbars slide from front to rear so that 1/8" can't be that big a deal is it?

Let me know if there is any other information that would be helpful.
 
Last edited:
Quick Update:

2013 4Runner Limited with factory rails and crossbars (2).

The width from side to side in the front is 40 1/2" and tapers to 40 3/8" in the rear, so you only lose 1/8" front to rear. I also noticed that the factory crossbars slide from front to rear to that 1/8" can't be that big a deal is it?

Let me know if there is any other information that would be helpful.

That’s interesting, it’s not a lot of difference. The design of the plastic OEM slot attachment system, the adjustment wheel, the two hex nuts at the bar ends, and the flexible bars themselves must accommodate that slight difference.

But I’d think you’ll need to allow for that shorter distance at least at the rear location so the NiseRack bars/brackets don’t bind as you slide them on the rails to make forward/backward adjustments. With your info Eitek1 will know what various bar lengths you should order to make this work.
 
Excellent thought! I will send in the order but won't get the brackets for a couple weeks, most likely, due to the week of vacation!

I will try to do some PRE measuring in the meantime. I should be able to identify where the brackets would go assuming I get 4 of them!

Dan

When you get your brackets, to space them out evenly along the rails, leave 1/8 inch between the end of the front bracket and the front plastic end cover. Also do the same at the back bracket to rear plastic end cap. Then space the brackets evenly. For me it worked out to be 11.5 inches center-to-center between each bracket.
 

Attachments

  • B2C25873-649C-4ACC-83CE-49234C8F9777.jpeg
    B2C25873-649C-4ACC-83CE-49234C8F9777.jpeg
    78.9 KB · Views: 824
Just wondering if Eitek1 is back from vacation and has resumed taking orders. Also, any new progress on the wind fairing?
 
Just wondering if Eitek1 is back from vacation and has resumed taking orders. Also, any new progress on the wind fairing?

Haven’t heard anything lately. He lives in the recent hurricane region, so hopefully all is well and he’ll respond soon.

BTW, I made my own wind fairing and I’m testing it out now. I started with a cardboard template of the roofline then cut out some 1/4 inch plywood. That worked well to block the wind noise. Then I transferred the pattern to a 1/4 inch 6061 aluminum plate 40x4 inches. I cut out the roof pattern shape with a jig saw. With a lot of fine tuning with the saw and filing and sanding work I got it to where it fit, and bolted it up to the leading angled bracket with stainless 1/4-20 x3/4 inch socket cap screws and 1/4-20 flange nuts. Even at 1/4 inch thick it flexes some so I put a rubber bumper between it and the crossbar mid span to damp any motion. It’s working well now.
There’s just enough gap between fairing and crossbar to slide in the hook of the ratchet straps I have.
I think [MENTION=176262]Eitek1[/MENTION] will have a more elegant solution.
 

Attachments

  • 5DFB120B-7F2C-499A-B92E-AB46F652FF68.jpeg
    5DFB120B-7F2C-499A-B92E-AB46F652FF68.jpeg
    82.8 KB · Views: 827
  • D69CBFA8-8743-41AE-BA42-008B1BE90664.jpeg
    D69CBFA8-8743-41AE-BA42-008B1BE90664.jpeg
    80.4 KB · Views: 793
  • DEBED488-20B1-413B-A661-52F997873CA9.jpeg
    DEBED488-20B1-413B-A661-52F997873CA9.jpeg
    83.6 KB · Views: 788
Didn’t know he lived down there. Guess I’ll wait till he checks in before placing my order. Great job on the fairing!!
 
Didn’t know he lived down there. Guess I’ll wait till he checks in before placing my order. Great job on the fairing!!

I'm checking in! Luckily I we dodged a bullet from the storm. I live in New Orleans and even with a really heavy rain it can get "interesting" down here.

If you place an order I can have it in the mail to you tomorrow.
[MENTION=200736]ElectroBoy[/MENTION] Nice job on the faring. That looks like what I'm working on with a slight variation. Glad to see the hook slid through the gap between the faring and the bar. That worked out really nice.
 
Short of whittling it down with a file I'm not sure of a good way to do it. I'm patient and like that kind of stuff and I'm not sure I'd want to undertake that.

I'll come up with something agreeable if folks want to swap theirs out. I just need to figure out what that is...

Any updates on this new version? If I order brackets will they be the new style or are you still shipping the original version?
 
Any updates on this new version? If I order brackets will they be the new style or are you still shipping the original version?

I’m currently shipping the original version. I’m getting ready to have a run of brackets done in the next two weeks. Those will have the new slot in them.
 
Nice work !!
If I may add my wish list :)
1. Add extension so the deflector is right at the front of the stock rubber cap.
2. Provision to add light bar to deflector
3. Same extension to the rear to mount lights.


Haven’t heard anything lately. He lives in the recent hurricane region, so hopefully all is well and he’ll respond soon.

BTW, I made my own wind fairing and I’m testing it out now. I started with a cardboard template of the roofline then cut out some 1/4 inch plywood. That worked well to block the wind noise. Then I transferred the pattern to a 1/4 inch 6061 aluminum plate 40x4 inches. I cut out the roof pattern shape with a jig saw. With a lot of fine tuning with the saw and filing and sanding work I got it to where it fit, and bolted it up to the leading angled bracket with stainless 1/4-20 x3/4 inch socket cap screws and 1/4-20 flange nuts. Even at 1/4 inch thick it flexes some so I put a rubber bumper between it and the crossbar mid span to damp any motion. It’s working well now.
There’s just enough gap between fairing and crossbar to slide in the hook of the ratchet straps I have.
I think [MENTION=176262]Eitek1[/MENTION] will have a more elegant solution.
 
I measured from the bottom of the bar to the very center of the roof and I had 1.25" of clearance. I checked between the two raised portions on the side and I had 1.5". Keep in mind the center line of the bars is above the rail by about an 1/8".

The dimensions of the bars are 1" X 3". Just eyeballing it, it looks like the clamps should work. They may not close completely around the back side of the bar but I can't tell 100% from the pictures.

Just wondering if anyone ever worked out the Yakima clamp question?
 
Finally got around to installing my Niserack brackets and crossbars that I ordered earlier in the summer.

l8dvOnT.jpg


Some comments:

  • I never wash the truck particularly the roof. So dirty.
  • Ordered the crosspieces from TNUTZ as recommended
  • TNutz actually seems to be a Canadian company that drop-ships from the US (just over the border in upstate NY) for US orders
  • ie, expect Tnutz aluminium prices to increase reflecting recent tariff action against cheap Quebec aluminium!
  • Did not get charged import fees for the Niserack order even though declared value was accurate
  • Only issue was two taps on one of the crosspieces were iffy...
  • Install was quick -- took longer to remove the old rack crosspieces since the channels were full of crud

Could you PM me your order or somehing? I could have sworn I was seeing much higher shipping charges to BC... don't know how you got it all $30 all-in!

SrgnN70.png


BTW if you look at TNutz website, I'm pretty sure they are a Canadian company shipping low cost Quebec Aluminium.

  • Their US address is small town middle of nowhere right over the US border south of Montreal
  • My Canadian TNutz order actually shipped via Purolator from St-Laurent, Qc
  • They probably do daily/frequent runs into the US to drop-ship for their US customers
 
Last edited:
As a heads up, due to another storm I have to evacuate AGAIN!. If you place an order, it will be delayed at least a few days.
 
Good luck and praying for you Eitek1 and all the others in Sally's path.

Subscribing to this thread. IMO, this is an awesome option and I think it looks really utilitarian. I have a '10 Runner so I'm kind of lurking here to see who pulls the trigger first with the 10-13 year and what size they ordered. I'm definitely in!!

Awesome work!
 
Good luck and praying for you Eitek1 and all the others in Sally's path.

Subscribing to this thread. IMO, this is an awesome option and I think it looks really utilitarian. I have a '10 Runner so I'm kind of lurking here to see who pulls the trigger first with the 10-13 year and what size they ordered. I'm definitely in!!

Awesome work!

You could calculate the crossbar length and allow for the narrower length at the end of the rack, but the best way will be to order the brackets, space them out evenly along the rack length, snug them down, then measure for the crossbar lengths you need. Measure to the nearest 1/16 inch. You’ll probably wind up with the two front bars at one length and the two rearmost ones at a shorter length.

Someone’s got to be the trailblazer. Go for it!
 
Just a heads up, I'm sure everyone knows this or can figure it out, but thought I'd mention it just in case. When test fitting the bolts in the T-Nutz crossbars, I found 6 of 24 holes appeared to not be threaded far enough. The problem was actually aluminum shavings clogging the holes and once cleaned out and a thread chaser run through, all was well.
 

Members online

Forum statistics

Threads
278,316
Messages
3,554,120
Members
248,016
Latest member
Advally Service

Trending content

Back
Top