5th Gen Aluminum Roof Rack Using OEM Siderails: NiseRack

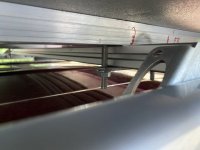
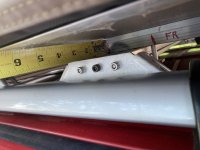
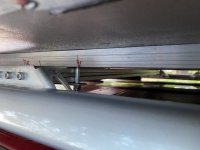
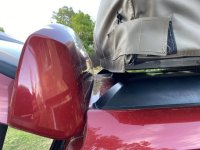
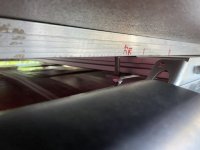
RTT just sits on the rack as pictured. 23Zero tents (and others, I assume) have a rail on the bottom that a bolt and bolt holder slide into. User slides in a bolt to the 'inside' if the crossbeam and one to the 'outside' of the crossbeam. A flat piece then is bolted to the bottom with 2 locking nuts. Sounds easy, and if you have lots of space under the tent (like I did with my last setup, with Yakima rack and bars) it goes pretty easy. The closer the rack is to the top of the truck, the more difficult it is to start the nut on the bottom. The NiseRack sits high enough that everything fits well, it is just a bit of a chore to get the 'inside' nut into place. Once on then getting it snug with a long ratchet wrench is pretty easy.
 

Attachments

  • DA9C1022-0463-4F8B-9E94-7662517370DB.jpeg
    DA9C1022-0463-4F8B-9E94-7662517370DB.jpeg
    73.9 KB · Views: 1,840
  • 387288DD-A726-40BE-A17F-261DD9FB31F9.jpeg
    387288DD-A726-40BE-A17F-261DD9FB31F9.jpeg
    87.1 KB · Views: 1,929
  • E76AAC46-F6B1-43AA-AB9D-EFC7D5609B1A.jpeg
    E76AAC46-F6B1-43AA-AB9D-EFC7D5609B1A.jpeg
    69.4 KB · Views: 2,223
  • 3E0151F5-7D81-41C0-8F4E-E511BDA42761.jpeg
    3E0151F5-7D81-41C0-8F4E-E511BDA42761.jpeg
    90.6 KB · Views: 1,836
  • F976151D-33DC-4436-A985-C17489F0CCDA.jpeg
    F976151D-33DC-4436-A985-C17489F0CCDA.jpeg
    71.7 KB · Views: 1,932
RTT just sits on the rack as pictured. 23Zero tents (and others, I assume) have a rail on the bottom that a bolt and bolt holder slide into. User slides in a bolt to the 'inside' if the crossbeam and one to the 'outside' of the crossbeam. A flat piece then is bolted to the bottom with 2 locking nuts. Sounds easy, and if you have lots of space under the tent (like I did with my last setup, with Yakima rack and bars) it goes pretty easy. The closer the rack is to the top of the truck, the more difficult it is to start the nut on the bottom. The NiseRack sits high enough that everything fits well, it is just a bit of a chore to get the 'inside' nut into place. Once on then getting it snug with a long ratchet wrench is pretty easy.


Thanks for explaining that. It looks like a good sturdy setup. I’m not ready to buy a RTT yet but I’m thinking about one for the future. I presume you will keep yours mounted permanently.
 
Last edited:
I noticed you can get black bars from tnutz - is there going to be an option for black brackets? Or would it all just scratch away in no time anyway (I don't know if their black is some basic coating or what)?

Also, am in Canada - tnutz charges a bunch for shipping here, and it's UPS and likely extra duty+brokerage. Anyone know a canadian source?
 
I noticed you can get black bars from tnutz - is there going to be an option for black brackets? Or would it all just scratch away in no time anyway (I don't know if their black is some basic coating or what)?

Also, am in Canada - tnutz charges a bunch for shipping here, and it's UPS and likely extra duty+brokerage. Anyone know a canadian source?

I’m not familiar with any Canadian sources for extruded aluminum. My order from TNutz was perfectly cut to length and the price in the US was the least expensive. [MENTION=176262]Eitek1[/MENTION] did extensive research for sourcing parts so he would know of alternate suppliers.

Looking at the TNutz site, there’s an option for black anodized.
EX-1030-BLACK – 1″ x 3″ BLACK Smooth T-Slotted Aluminum Extrusion | TNUTZ

On the NiseRack site FAQ section there’s a description of DIY painting the brackets black to match:
Frequently Asked Questions | NiseRack.com

For shipping costs from US to Canada trying contacting TNutz directly. They should know the proper procedure. They may also have an affiliate in Canada.
Their phone number and email are here:
CONTACT | TNUTZ

For shipping the NiseRack brackets, contact Eitek1. You could compare shipping cost of UPS versus the USPS Priority International mail through their websites. I’m thinking USPS will be about $50 US.
Good luck, it will be worth the effort to research this. Let us know your results.
 
Last edited:
Hey [MENTION=176262]Eitek1[/MENTION], any thoughts about adding reliefs above one or more of the mounting holes, to match the t-slots in the extrusion to allow for use of slide-in T-nuts?
 
Hey [MENTION=176262]Eitek1[/MENTION], any thoughts about adding reliefs above one or more of the mounting holes, to match the t-slots in the extrusion to allow for use of slide-in T-nuts?

You’re pretty clever. I was looking at my design and had a ‘Doh Homer Simpson moment a few weeks ago. I should have caught that before. I actually have it designed already and my next batch will feature that.

I was going to have all 3 cutouts available. Due to the fact that when you do that there is only a very little bracket material above the screw, it would be possible to damage the bracket with enough upward force. I’m going to add the cutout to the center channel and you should be able to slide the fasteners right in. The risk of damage from upward force will be mitigated also.

Also, how is it that no one else has figured this out yet?
[MENTION=200736]ElectroBoy[/MENTION] this was the change I was referring to LOL.
 
I noticed you can get black bars from tnutz - is there going to be an option for black brackets? Or would it all just scratch away in no time anyway (I don't know if their black is some basic coating or what)?

Also, am in Canada - tnutz charges a bunch for shipping here, and it's UPS and likely extra duty+brokerage. Anyone know a canadian source?

Don't know about your area but around Buffalo there are American warehouses that accept shipments for Canadians. Canadians then cross the border, pickup the packages and are able to save a lot in brokerage fees etc crossing themselves.
 
Don't know about your area but around Buffalo there are American warehouses that accept shipments for Canadians. Canadians then cross the border, pickup the packages and are able to save a lot in brokerage fees etc crossing themselves.

Yep, and I normally do that... but the border is currently closed because of covid...
 
You’re pretty clever. I was looking at my design and had a ‘Doh Homer Simpson moment a few weeks ago. I should have caught that before. I actually have it designed already and my next batch will feature that.

I was going to have all 3 cutouts available. Due to the fact that when you do that there is only a very little bracket material above the screw, it would be possible to damage the bracket with enough upward force. I’m going to add the cutout to the center channel and you should be able to slide the fasteners right in. The risk of damage from upward force will be mitigated also.

Also, how is it that no one else has figured this out yet?

[MENTION=200736]ElectroBoy[/MENTION] this was the change I was referring to LOL.

Ha! I was thinking about that last night but more along the lines of hogging out material on the end of the bars. Maybe with a router bit.
How would you suggest we rework the existing brackets?
 
[MENTION=456299]Jpilot[/MENTION] I thought I'd be able to get past it but I just can't. That one odd color bolt holding your crossbar on is driving me nuts. Its making my OCD twitch LOL.

If it's still that way let me know what length you need and I'll send you a bolt for it.
 
[MENTION=456299]Jpilot[/MENTION] I thought I'd be able to get past it but I just can't. That one odd color bolt holding your crossbar on is driving me nuts. Its making my OCD twitch LOL.

If it's still that way let me know what length you need and I'll send you a bolt for it.

I had a good laugh there! Ok, I will go and get a new bolt for ya.
:thumb3::tea:
 
Oh, BTW, I just ordered an awning. I think we’re going to have to engineer a bracket for the awning when you get a chance.:keyboard:
 
You’re pretty clever. I was looking at my design and had a ‘Doh Homer Simpson moment a few weeks ago. I should have caught that before. I actually have it designed already and my next batch will feature that.

I was going to have all 3 cutouts available. Due to the fact that when you do that there is only a very little bracket material above the screw, it would be possible to damage the bracket with enough upward force. I’m going to add the cutout to the center channel and you should be able to slide the fasteners right in. The risk of damage from upward force will be mitigated also.

Also, how is it that no one else has figured this out yet?

[MENTION=200736]ElectroBoy[/MENTION] this was the change I was referring to LOL.

Haha, I've built a lot of stuff out of 80/20, and I don't think I've ever managed to get all my slide-in connectors inserted without having to disassemble part of my project after forgetting them! The roll-in connectors solve the problem most of the time but some of the special connectors have to slide in.

FWIW, if you put the one cutout on either the left or right side, you'd have access to the front slot from one side of the rig, and access to the back from the other, although perhaps the desire for symmetry outweighs having access to two slots.

This is a great design BTW, I've been window shopping rack solutions for a while and this is looking like it might be the best fit for my needs.
 
Ordered a 4X and the associated extrusions from tnutz. Both have reasonable shipping to Canada so that's good.

Also, am in Canada - tnutz charges a bunch for shipping here, and it's UPS and likely extra duty+brokerage. Anyone know a canadian source?

I just ordered from TNutz and shipping to Canada (Toronto area) was very reasonable and USPS, only US$30 total for four crosspieces and a random bunch of hardware.
 
Last edited:
Ha! I was thinking about that last night but more along the lines of hogging out material on the end of the bars. Maybe with a router bit.
How would you suggest we rework the existing brackets?

Short of whittling it down with a file I'm not sure of a good way to do it. I'm patient and like that kind of stuff and I'm not sure I'd want to undertake that.

I'll come up with something agreeable if folks want to swap theirs out. I just need to figure out what that is...
 
I just wanted to give the thread a bit of an update....

I finally pulled my original rack apart after a year of service. I wanted to look for any issues that may have arisen due to fatigue, corrosion due to dissimilar metals or any other issues.

After a year of service I found no issues whatsoever. The one single thing that I could find that wasn't perfect was that the paint on the bracket was a little messed up where the 8020 bar was contacting the bracket. That makes sense due to the relative motion of the bar against the bracket under load. Since that was under the crossbar you couldn't see it.

That's it... After a year of service (30k miles) it looked like the day it was installed.

Also, I'm still working on the faring. My prototype didn't fit perfectly and I'm working on figuring out why. Either way it's an easy fix.

Also, for any orders that come in starting tomorrow they are going to be delayed by 7 days. I'm taking a few days off and will pick back up in a week.
 
Ordered a 4X and the associated extrusions from tnutz. Both have reasonable shipping to Canada so that's good.


I just ordered from TNutz and shipping to Canada (Toronto area) was very reasonable and USPS, only US$30 total for four crosspieces and a random bunch of hardware.

Could you PM me your order or somehing? I could have sworn I was seeing much higher shipping charges to BC... don't know how you got it all $30 all-in!
 
I just wanted to give the thread a bit of an update....

I finally pulled my original rack apart after a year of service. I wanted to look for any issues that may have arisen due to fatigue, corrosion due to dissimilar metals or any other issues.

After a year of service I found no issues whatsoever. The one single thing that I could find that wasn't perfect was that the paint on the bracket was a little messed up where the 8020 bar was contacting the bracket. That makes sense due to the relative motion of the bar against the bracket under load. Since that was under the crossbar you couldn't see it.

That's it... After a year of service (30k miles) it looked like the day it was installed.

Also, I'm still working on the faring. My prototype didn't fit perfectly and I'm working on figuring out why. Either way it's an easy fix.

Also, for any orders that come in starting tomorrow they are going to be delayed by 7 days. I'm taking a few days off and will pick back up in a week.

I've been looking for a a rack solution for my 2013 for a while. I was so glad to stumble across this thread! It has been entertaining and informational to read. Congrats on a fantastic solution! I hope you enjoy your week off.

I am really hoping to make this work for my 'pre 2014' 4Runner and will get some width measurements soon on the rails front to back. I imagine that the solution is a slightly different length crossbar from TNUTZ for the rear but won't know until I measure it.

Dan
 

Members online

No members online now.

Forum statistics

Threads
278,316
Messages
3,554,121
Members
248,016
Latest member
Advally Service

Trending content

Back
Top