Another Full-Length Roof Rack Option -PrinSu

It really is ridiculous that an issue like that wasn't caught before having the rack shipped out.

With that said, I just got a call from my local shop saying that my rack came in. I'm going to go pick it up in a few hours. I'm going to go ahead and open it up in the shop and make sure my powder coating looks alright. If not I'll just have the shop deal with CBI. Fingers crossed everything looks good though.

I would definitely make sure its good before you take it home. I did edit my OG post to say CBI has taken care of this issue and I am pleased.
 
Alright, well I picked up my rack tonight. Huge props go out to the guys at RSG Offroad in Lakewood, CO. They were really easy to work with and helped me out with a few other things while I was there.

Anyway, to the rack itself. I had the guys open the box for me and we did a quick one over of the rack itself. I'm happy to report that while I wouldn't consider the powder coat to be 100%, it's still more than acceptable in my book.

c6MvNp1.jpg


There's some excess paint in the inner cutouts but aside from that it was clean along the top and bottom.

67H6MMQ.jpg


I threw on the front fairing and most of the crossbars. Everything threaded up nicely. I am a little concerned with the included hardware. I'm assuming it'll rust out eventually but I'll cross that bridge when necessary.

Z7DifYQ.jpg


As for right now I have it mocked up for how I want to install everything. I have my knockoff maxtrax's and some fuelpax that i'd like to be able to put up there. The space on the left is going to be reserved for my Thule Roof box. I'll also need to mount my 2m/70cm antenna to the rack.

skrZBrJ.jpg


There was also an unexpected surprise in that they included the 1x1 bar with my order. I certainly wasn't expecting this but I'm glad it's there.

Also, I'm a little confused as to the purpose and quantity of some of the mounting hardware.

Looks like I may be missing some of the required hardware which is a bit of a bummer.
The thinner bolts are for the plusnuts, which they included an extra one of.

I'm obviously missing a ton of the thicker bolts and the appropriate lock washers/washers.

I also have no clue with the longer threaded nut is for.

I wish the instructions would have listed exactly what should be included.

Either way I'll be contacting CBI to see if they can rush some parts out to me.

Oos6J1B.jpg


Looks like I got 2 sets of spacers. 10 taller ones and 10 shorter ones. Again instructions don't really say what goes where.

5fkZLcc.jpg


So while I'm not 100% happy with everything, I know once I get the rack installed I'll be very happy with it. Hopefully CBI is fast to send me the appropriate stuff and I can get this thing installed by Sunday.

 
Alright, well I picked up my rack tonight. Huge props go out to the guys at RSG Offroad in Lakewood, CO. They were really easy to work with and helped me out with a few other things while I was there.

Anyway, to the rack itself. I had the guys open the box for me and we did a quick one over of the rack itself. I'm happy to report that while I wouldn't consider the powder coat to be 100%, it's still more than acceptable in my book.


There's some excess paint in the inner cutouts but aside from that it was clean along the top and bottom.


I threw on the front fairing and most of the crossbars. Everything threaded up nicely. I am a little concerned with the included hardware. I'm assuming it'll rust out eventually but I'll cross that bridge when necessary.


As for right now I have it mocked up for how I want to install everything. I have my knockoff maxtrax's and some fuelpax that i'd like to be able to put up there. The space on the left is going to be reserved for my Thule Roof box. I'll also need to mount my 2m/70cm antenna to the rack.


There was also an unexpected surprise in that they included the 1x1 bar with my order. I certainly wasn't expecting this but I'm glad it's there.

Also, I'm a little confused as to the purpose and quantity of some of the mounting hardware.

Looks like I may be missing some of the required hardware which is a bit of a bummer.
The thinner bolts are for the plusnuts, which they included an extra one of.

I'm obviously missing a ton of the thicker bolts and the appropriate lock washers/washers.

I also have no clue with the longer threaded nut is for.

I wish the instructions would have listed exactly what should be included.

Either way I'll be contacting CBI to see if they can rush some parts out to me.


Looks like I got 2 sets of spacers. 10 taller ones and 10 shorter ones. Again instructions don't really say what goes where.


So while I'm not 100% happy with everything, I know once I get the rack installed I'll be very happy with it. Hopefully CBI is fast to send me the appropriate stuff and I can get this thing installed by Sunday.

Longer threaded nut is installing the rivnuts or whatever. First one i did commit enough and it didn't ever compress. I ended up using my cordless impact (just a little baby dewalt one i use for remodeling, not a legit impact lol)

there should only be 8 bolts for the OEM holes and then 2 smaller ones for the new holes you drill. So yea, they shorted you by 5 lol. I wonder if the OEM bolts would work or if they're way too short.

I wish i got sent a 1x1 :ranger: thankfully a homie hooked it up and sent me one today

It's been said the taller spacers go in the middle and back, the short ones up front. I ended up doing that but also using a washer on top of the short ones up front. it gave more surface area and just enough space to make me comfortable with the wind fairing on the middle setting.
 
Cool, thanks for the heads up on the long nut (lol).

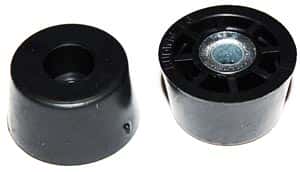
I'm still debating if I should drill the roof or not. I was thinking of using some rubber cabinet feet and cutting them to fit in the channel.

Something like this:

ACF107-rubber-screw-on-feet.jpg


I think that as long as I space them out correctly and make sure there is enough weight pressing down on them they should do relatively well. If not then I'll go ahead and drill.

It sucks about the bolts... again, it shouldn't be this hard to count out and include the correct hardware. Especially on a 900 dollar roof rack.

I'm also assuming the OEM bolts are going to be too short unfortunately.

I shot CBI an email last night so hopefully they send me a reply at some point today.

Glad you got your 1x1 bar man. That's what makes these forums so awesome.

But alright, I'll update when I hear back from CBI about my bolts.
 
My rack was ordered mid September with an estimated ship date of November 6th. Rack arrived at my house on November 6th!
Powder coating looked perfect, all parts were there, nothing missing.
No big deal drilling for the plus nuts...
Rack looks great! Exactly what I wanted.
 
I also painted the stand-offs black, haven’t seen anyone else do this, i think they look WAY better black than silver, especially since there is no chrome on my truck.
 
Alright!

So I finally got my rack installed this past weekend. It took CBI 2.5 weeks to reply to my initial email regarding the missing hardware. They confirmed that I was in fact missing stuff. I told them I had already purchased the hardware and they offered to give me a refund if I could provide them with receipts.... well I already threw those out... so whatever.

Anyway, on to the rack!

Naked Roof:

ikPjcCO.jpg


Rear Standoffs: I purchased rubber washers with a 3/8 inner diameter opening to place the stand offs on. I'm thinking it'll help dampen the rack a bit and also provide some extra sealing with the silicon. I used the shorter standoffs for both middle and rear.

sJBuAra.jpg


Middle Standoffs:

IwDYdiH.jpg


Front Standoffs: I purchased these from Amazon Link. Punched out the metal center and the hole was big enough for a 1/4inch bolt. Got the appropriate hardware and mounted it to the bottom of the rack. Immediately I realized they were a bit too tall so I ended up having to chop off some rubber from the bottom of them. I cut them down to where the middle of the rack wasn't quite resting on the standoffs. This way when I tightened the middle bolts down it would apply downward tension to the front rubber feet. So far so good! No rattles and everything feels very solid.

wTD1QJs.jpg


And here are the results:

FQxrIWF.jpg


iQMPyT6.jpg


dtCKggX.jpg


izZ71bZ.jpg


Q0mYMUZ.jpg


Wind noise is definitely a bit more noticeable. Nothing obscene but it's there. Haven't really had a chance to notice a change to my gas mileage yet. I'll update when I get a good feel for that.
 
Cool, thanks for the heads up on the long nut (lol).

I'm still debating if I should drill the roof or not. I was thinking of using some rubber cabinet feet and cutting them to fit in the channel.

Something like this:

ACF107-rubber-screw-on-feet.jpg


I think that as long as I space them out correctly and make sure there is enough weight pressing down on them they should do relatively well. If not then I'll go ahead and drill.

It sucks about the bolts... again, it shouldn't be this hard to count out and include the correct hardware. Especially on a 900 dollar roof rack.

I'm also assuming the OEM bolts are going to be too short unfortunately.

I shot CBI an email last night so hopefully they send me a reply at some point today.

Glad you got your 1x1 bar man. That's what makes these forums so awesome.

But alright, I'll update when I hear back from CBI about my bolts.

I mounted my rack with rubber cabinet feet very similar to those. It's been 9 months with absolutely no issues. I check them once in awhile and they don't seem to have moved at all. I haven't noticed any vibration or wind noise as a result either.
 
Man. This is the rack I want, but reading though all this, you guys have me concerned. Overall height is a big consideration for me because I park in parking garages at home and work. That’s why I was so interested in this rack with it being low profile. I hate seeing so many guys having several different issues with this rack.


Sent from my iPhone using Tapatalk
 
Would someone with the rack do me a favor? I'd like to know if there is at least 4 inches of clearance between the last cross bar and the rear hatch when it is fully opened.

Wanting to get a baja ladder and after speaking with the tech he mentioned you need that clearance. My rack doesn't get here till xmas(if I'm lucky).

Thanks
 
Would someone with the rack do me a favor? I'd like to know if there is at least 4 inches of clearance between the last cross bar and the rear hatch when it is fully opened.

Wanting to get a baja ladder and after speaking with the tech he mentioned you need that clearance. My rack doesn't get here till xmas(if I'm lucky).

Thanks
Negative. It's about 2.5" with a 1" bar at the back. The Gobi ladder will work. One of our local guys had a Prinsu rack and the Gobi ladder installed. No interference on his 16 Trail. Hope that helps!
95a53c1e8a24df49a99d38dafa10c857.jpg


Sent from my SM-N920V using Tapatalk
 
Negative. It's about 2.5" with a 1" bar at the back. The Gobi ladder will work. One of our local guys had a Prinsu rack and the Gobi ladder installed. No interference on his 16 Trail. Hope that helps!
95a53c1e8a24df49a99d38dafa10c857.jpg


Sent from my SM-N920V using Tapatalk

U da man!

Thank for doing that.
 
I know Gobi ladders will work for sure, read somewhere that Baja ladder will not work though.


Would someone with the rack do me a favor? I'd like to know if there is at least 4 inches of clearance between the last cross bar and the rear hatch when it is fully opened.

Wanting to get a baja ladder and after speaking with the tech he mentioned you need that clearance. My rack doesn't get here till xmas(if I'm lucky).

Thanks
 
Would someone with the rack do me a favor? I'd like to know if there is at least 4 inches of clearance between the last cross bar and the rear hatch when it is fully opened.

Wanting to get a baja ladder and after speaking with the tech he mentioned you need that clearance. My rack doesn't get here till xmas(if I'm lucky).

Thanks
post #245 he has the baja ladder with the prinsu rack
 
I will be instaling my prinsu rack and baja ladder tomorrow. I ordered both on september 16 and they both arrived last week but ive been out of town for work. I cant wait to get home this afternoon to unbox.
 
Just looked at that. Very interesting. I see the rear cross bar can be adjusted forward a bit. Perhaps that is why.

You don't have to run the rear bar if you don't want to. That's the advantage of this rack, it's modular and you can move bars wherever you want them to be.
 
I got mine in last week and finally found time to install only to find that the Powder Coat on mine was sub-par at best. Looks like it was tossed in for packaging was to soon. Both of the sides look like the pic throughout pretty annoyed and will be taking it down to a local shop to be redone.
Edit: I have been in contact with CBI not sure what they are going to say or do about this issue.

EDIT: CBI has taken responsibility for this and we have worked it out. I have to say the rack is awesome and hope to have it back from coating late next week.

I got mine about 6 or 7 months ago. After I got it on I noticed stress lines in the bends of the roof mounts. After a couple months of trying to get Prinsu to respond he finally said he would send me a new rack out. A few emails later he sent it out. When I opened the replacement rack I noticed that the both sides of the rack were warped. I was told it must have gotten bent in shipping (no damage to the box) and I would have to deal with UPS now. I finally got the CBI guys involved and was told I would get a 3rd rack in the mail to replace these. That was a month or so ago and I am still waiting. I love the way the rack looks and its functionality but if I would have know it was going to be this much of a pain I would have gotten a Gobi. Unfortunately Prinsu or CBI won't be getting anymore of my money.

However after saying all that...there is one big plus to this rack if you run a roof top tent that you can't do with most other racks. You can buy 2 extra crossbars and mount those to the bottom of your tent. When you go to put the tent on the rack all you have to do is line up the crossbars with the slots and install the screws through the side of the rack. It's a lot easier than trying to get between the rack and the roof to tighten mounting bolts
 
Last edited:

Members online

Forum statistics

Threads
278,316
Messages
3,554,124
Members
248,016
Latest member
Advally Service

Trending content

Back
Top