Apohl17's Iceberg Build Thread

Pretty impressive how much you have done so far. Really looks good!

Thanks. Appreciate it!

Nice rig man.
I'm thinking of getting the 4x innovation bumper. How was the install?

Right on. For the price, I truly think it is par none. To say it's beefy is an understatement, and it bolts up to 15 factory bolt locations, simple as that.

But, I'm biased, they are made in Platteville, WI and I got to check out the shop beforehand. :)
 
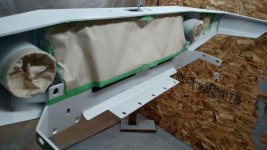
Happy New Year's Eve everybody! With the day off I made lots of progress on the 4xi bumper job. First step is to do a major clean on the bumper. Since I haven't come up with an ideal hanger system in my diy paint booth yet, I'm starting out by resting it on a small rung barrel.
dcb9b081b643d80de52008242c38dc3b.jpg

Acetone or a similar solvent is your best friend for wiping off all the shop grime and to prep the surface... I used dang near a half a roll of paper towel!
7b47588cfcbf10a0ff1e821a58979ff8.jpg

But, I went ahead and hit it with a tack cloth as well. Glad I did.
faa347192fb9d89ad6a9a095f1ae8d39.jpg

No matter how I am going to hang it, I want to make sure I have primer in all the nooks and crannies, so I went ahead and sprayed a self etching bare metal primer on the inside surface.
6744ea9ae39887863ee4a3b172c9bab3.jpg

Next, I'll be giving this ample time to dry and wait until I build a hanging system so get it fully coated with primer. I'll be topping that coat with a professional Gen purpose primer, followed by my base paint coat and a semi matte 2k clear.
674daa95de7fc520d11324cdbb18dd99.jpg

Progress!

Sent from my XT1254 using Tapatalk
 
Last edited:
Wow! Most would have passed on that Frame!

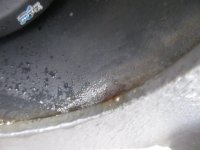
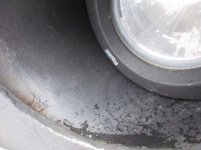
I figured I'd start a separate thread with details and way more pics of how I did this, as this is a common problem in the rust belt. Anyways, here are some pics of before and after, and one of a primed surface so you can see the extent of the new material.

All MIG welds and 3/16 cold roll plate , slow and low voltage (100/19) for good penetration without burning through.

Ask away!
da91ec00123d73a813921820851de714.jpg
ba6f905d53b934b263b5343a2c449789.jpg
1bdec95b881784d6f70910ed33b1d1b7.jpg
3a43059f1e9b2ac0a318cd2d6648de44.jpg
Nice job on the Frame. I've done some Trucks. Stronger now than Factory!
 
Right on. There's something satisfying about breathing new life into something on the verge of being out of commission. I'll definitely be keeping a keen eye on the rest of the frame, but after a basic rust proofing job, it's sitting pretty well. Some rust is starting to peek through the rear fenders now which I'll likely tackle when the weather gets better! Bumper comes first though... Haha
 
How are those ebay LEDs holding up? I need to get some new corner light LEDs in amber. I had spent the $20 for TRS LEDs a year ago and those barely even lasted a year.

So I started my speaker install tonight! Polk Audio Db6501 Components... Shiny.
Wow, I've always been a fan or Polk/Infinity sound. BTW even if you don't do sound dampening on the entire truck at least do the front doors because it is totally worth it and very cheap. Doing just the front doors will be a huge increase in overall audio quality (due to less noise) as well as an increase in speaker bass.

I am constantly running a coolant temp of roughly ~205 degrees.

Not sure if you solved this yet but it is almost always due to air in the system. For many trucks driving at 195 - 197 and then 202 at a stop light is totally normal. Perhaps that grill mod is blocking airflow? It looks more restrictive than the OEM grill and more so than most folks mods.

Lastly, Happy New Year! Your truck is looking great! I really like the classic Toyota colors and the new badass bumper.


:bat:
 
How are those ebay LEDs holding up? I need to get some new corner light LEDs in amber. I had spent the $20 for TRS LEDs a year ago and those barely even lasted a year.

On the coldest of the Wisco winter mornings (in the singles or teens), the corner marker LED's do flicker a bit, but after a short while, they snap out of it. I did have one initially fail entirely, but the replacement has been running strong since. For how cheap I purchased them, I cannot complain, they are bright and the white color temperature I wanted. As much as I tend to stick with the "you get what you pay for" crowd, for how easily accessible and replaceable these bulbs are, they are great, low-cost bulbs.
Wow, I've always been a fan or Polk/Infinity sound. BTW even if you don't do sound dampening on the entire truck at least do the front doors because it is totally worth it and very cheap. Doing just the front doors will be a huge increase in overall audio quality (due to less noise) as well as an increase in speaker bass.

Thanks for the insight. My plan for next summer was to purchase a respectable amount of deadening and keep some waves contained. It's completely noticeable how the sound amplitude and depth vanishes when I'm on the freeway vs sitting parked. Otherwise, I am very happy with my modest sound system!


Not sure if you solved this yet but it is almost always due to air in the system. For many trucks driving at 195 - 197 and then 202 at a stop light is totally normal. Perhaps that grill mod is blocking airflow? It looks more restrictive than the OEM grill and more so than most folks mods.

Again, appreciate the insight. My plan is to do a solid coolant flush, replace the thermostat and set the jiggle valve correctly, and if that doesn't drop temps 5-10 degrees, look at redesigning or opening up my grill.

Lastly, Happy New Year! Your truck is looking great! I really like the classic Toyota colors and the new badass bumper.

Right on! It wouldn't have got to this point without guys like you on the forum here documenting each and every one of your builds and experiences with these trucks. Can't wait to see what 2019 has in store for the forum!
 
Made some progress since the last post. First, got my bumper hung how I wanted--utilized a section of unistrut I had lying around, a section of 3/8 threaded rod, t-nut for fixing the rod on top and dual nuts below a HDPE idler pulley. The great thing is, the idler pulley has a captivated bearing allowing smooth, free rotating of the bumper in my paint booth, and it has minimal contact with the surface.
d945105372b358f2e4d26c5a36f0edee.jpg

34b461e820c652de7a94eb37ce90b454.jpg

Since I had it fully primed before hanging, all I'll need to do is touch up a few spots on the inside where the idler pulley contacts the inside, if I do desire.
c88dbadd32536e9b8733f2724b33bd5b.jpg

Just finished my white base coat on the inside of the bumper now. I'll give it a day or two before masking and going ahead with my next base coat. Yes, I am two-toning the heck out of it :)
5ab29620e21e550f7be579d6479dc879.jpg


Sent from my XT1254 using Tapatalk
 
Nice spray hanging method, I may try that on my next one. White paint is scary for upkeep on a plate bumper. I went with monstaliner with all the stones that fly at mine, and that gets beat up too, although the dark grey hides it.
 
The white should look cool. Great hanging method. I'm curious how well the white holds up to actual use. Seems like the only white plate bumpers I see are on 4runners that don't see much action.
 
Nice spray hanging method, I may try that on my next one. White paint is scary for upkeep on a plate bumper. I went with monstaliner with all the stones that fly at mine, and that gets beat up too, although the dark grey hides it.

Right on. That's what I heard. As much as I wanted to go white, I knew I'd be having to upkeep a lot more than a dark color like black. So... I decided to meet in the middle. You'll see what I thought up hopefully tomorrow when I get the black on! :beer: I'm just hoping it's as clean as your grey scheme!
 
The white should look cool. Great hanging method. I'm curious how well the white holds up to actual use. Seems like the only white plate bumpers I see are on 4runners that don't see much action.

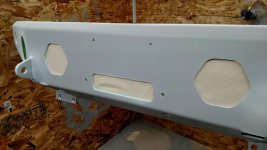
Oh boy, I'm throwing everyone for a loop! It's actually not going to be white on the front. My plan is this- black front, white inside. This includes the light buckets, winch mounting plate, everything you see inside of the fairlead and access holes (until I get a winch of course). And then white skid plate as before. I was too chicken to go fully white as any slight variances in OEM 056 Natutal White would look sketchy. But, a little bit of white will be a touch that separates mine from the rest. You'll be seeing what I mean soon!
 
Last edited:
Right on. That's what I heard. As much as I wanted to go white, I knew I'd be having to upkeep a lot more than a dark color like black. So... I decided to meet in the middle. You'll see what I thought up hopefully tomorrow when I get the black on! :beer: I'm just hoping it's as clean as your grey scheme!
Ok, yeah I painted my backside black and monstalinered the front. But here's something I'm sure you want to know. The light bucket welds will bleed out rust, they are spot tacked from the inside. Impossible to spray in crack fully. Here's mine. So on my future bumper touch up, after cleaning up the minor rust I'm caulking the joint with Quad OSI inside the bucket, that should help take care of the rust creeping. On white that rust would pop.
 

Attachments

  • light bucket rust (2).JPG
    light bucket rust (2).JPG
    108.6 KB · Views: 322
  • light bucket rust.JPG
    light bucket rust.JPG
    50.6 KB · Views: 309
Ok, yeah I painted my backside black and monstalinered the front. But here's something I'm sure you want to know. The light bucket welds will bleed out rust, they are spot tacked from the inside. Impossible to spray in crack fully. Here's mine. So on my future bumper touch up, after cleaning up the minor rust I'm caulking the joint with Quad OSI inside the bucket, that should help take care of the rust creeping. On white that rust would pop.

You know, I noticed how the light buckets were tacked like that, but never thought about that crack of exposed metal in there, and how it will eventually rust. I may throw some caulk in there as well. Thank you for that insight man!!!
 
Tapatalk isn't letting me view the forum right now (and that's how I upload all my pics) so you'll have to hang tight until I can post pictures of bumper progress! I will say, as of now, I am officially done with base black on the front and I think my two tone scheme is going to look great. Just waiting for my semi-matte 2k clear to come in the mail...

Also, my Chicago shackles came in today! Ebay for the win. I'll be painting them in the next few days as well. Stay tuned!:whoo:
 
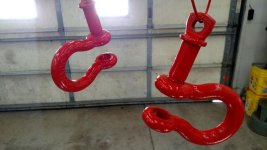
Let it be documented during today's 217,631 mile checkup, I rotated the tires, greased the driveshafts, got the 4xi bump clearcoated and my new Chicago shackles painted, and best of all, found a Sparton WCH-1 LO-tone horn laying around and wired it in parallel with the two stock horns. No more squeaky beeps!

Oh, and I am still struggling with pics. Chill out, I know, I'm working on it! :beer:
 
Thanks to the one and only [MENTION=125309]dogtail[/MENTION] I found a way to get my pics onboard with the forums again!

So jumping back a few days...
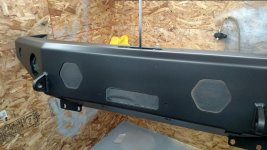
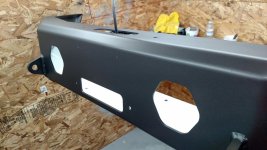
After I sprayed the white inside base coat with my trusty little HVLP touch up gun, I waited a full 24hours+ until masking off the areas I wanted to keep white. I wanted the all of the interior access and light bucket holes to be white as viewed when installed, then the rest a satin black.

So, with that, once I was happy masking off every little hole and edge, I sprayed black. Both of these colors are PPG auto paint given to me from a good friend who works at a body shop and were clearing out lines!
 

Attachments

  • 1546863235714.jpg
    1546863235714.jpg
    135.1 KB · Views: 274
  • 1546863241541.jpg
    1546863241541.jpg
    132 KB · Views: 282
  • 1546863233441.jpg
    1546863233441.jpg
    137.3 KB · Views: 279
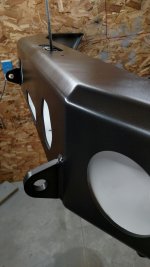
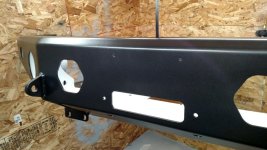
After another half day to let the base cure, I carefully peeled away the mask and was greeted by a real solid sight: (pic 1-2)

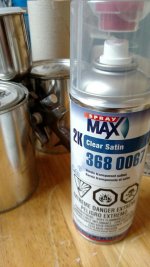
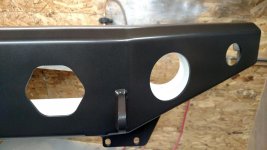
At this point, I was ready to shoot my clear. I opted to try out a product that I've always wanted to get my hands on for my bike frames I repair and paint: Spraymax Aerosol 2K Clear. What really got my attention on this project was the fact that I could get it in a satin (semi-matte,semi-gloss, etc.) finish. (pic 3)

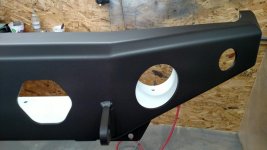
After a round with a CLEAN tack cloth to remove all dust and particulates, I activated the can and had just enough to do two coats on the front and one on the inside. Once activated, these cans have a potlife just as any 2-part (2K) clear coat that hardens, normally in 12-15 hours.

Here is what it turned out to look like: (pics 4-6)
 

Attachments

  • 1546863475099.jpg
    1546863475099.jpg
    135.6 KB · Views: 265
  • 1546863416710.jpg
    1546863416710.jpg
    130.7 KB · Views: 256
  • 1546863500155.jpg
    1546863500155.jpg
    83.1 KB · Views: 289
  • 1546863526166.jpg
    1546863526166.jpg
    128.1 KB · Views: 260
  • 1546863450018.jpg
    1546863450018.jpg
    130 KB · Views: 260
  • 1546863466910.jpg
    1546863466910.jpg
    134 KB · Views: 266
Last edited:
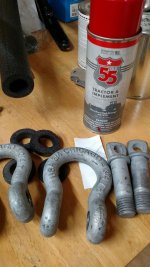
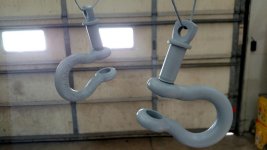
In between coats on the bumper, I had a couple other items to address: the next one being shackles. I had luckily found a real nice set of Chicago 3/4" D-Ring shackles off Ebay for $20, raw galvanized. I found a can of implement paint we used at the shop that would match the TRD yel-or-red colors, primed, and painted. I found it easiest to paint with the screw pin engaged reversely , and hung from the pin hole to both mask the threads and paint all showing surfaces on both pins and shackles. In the first pic you'll see some rubber and foam isolators I made/found from what I had laying around, keep reading to see what I eventually used on the install.
 

Attachments

  • 1546863438117.jpg
    1546863438117.jpg
    137.6 KB · Views: 269
  • 1546863423787.jpg
    1546863423787.jpg
    77.3 KB · Views: 255
  • 1546863389341.jpg
    1546863389341.jpg
    94.8 KB · Views: 259
Last edited:
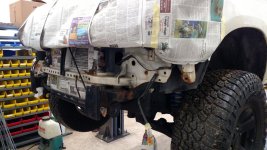
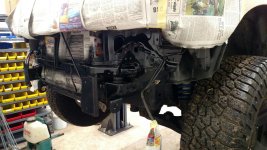
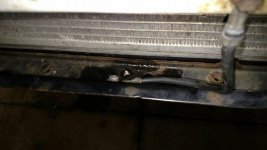
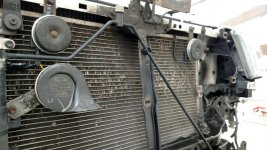
Next tweener step was to take off the stock fat lip bumper and clean up the front end. As you can see in the first two pics, the crossbar was kind of an unsightly white, and I wanted to make it a little less noticeable through the 4xi bumper. I masked off the radiator and everything I didnt want rust reformer and semi-gloss black rustoleum on... And threw a couple coats on. Major improvement, and a rust barrier. Win-win!

While I was here, I did have to relocate the stock ground running from the radiator support to the lower frame rail, since it occupied one of the skid plate bolts. I just drilled and tapped an adjacent hole and rebolted the ground there instead. Since the new bumper utilizes those holes, I wanted to use them all, not just 4 out of the 5.

Also, I just so happened to get my hands on a Spartech snail horn and wired it in parallel with the stock beeps. For a 30min bracket making, wiring, and testing job, I like it. For anyone doing this in the future, you shouldn't need to run a relay as you would with two Hellas or any other high powered aftermarket horn- I didn't blow a fuse with one extra.
 

Attachments

  • 1111111111111111111112.jpg
    1111111111111111111112.jpg
    142.9 KB · Views: 255
  • 1546863538022.jpg
    1546863538022.jpg
    142.9 KB · Views: 273
  • 1546863522511.jpg
    1546863522511.jpg
    140.2 KB · Views: 265
  • 1546863408862.jpg
    1546863408862.jpg
    70.7 KB · Views: 249
  • 1546863453968.jpg
    1546863453968.jpg
    134.4 KB · Views: 258
Last edited:
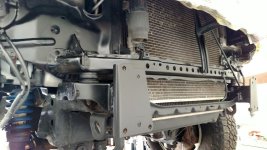
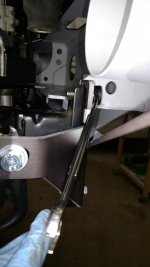
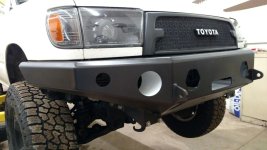
Time to mount it up. As per the 4xi insturctions, it was crucial to have two bolts preinstalled for hanging purposes. Although it wasn't the easiest set of holes to use, I went with the topmost bolt on the frame rail plate, threaded in from the back. Once the bumper was rested on those bolts, I hand tightened the 5 skid rail bolts on the bottom, followed by the 4 lower frame plate bolts, and 4 wing bolts on the sides. Once these were all on, I removed the first two hanging bolts and re-threaded them in the opposite (correct) way. These proved to be the hardest to get to, as they are the only two bolts not visible from the exterior of the bumper. See pic 1 for how I snuck in a 17mm wrench to torque them down to spec. I had virtually no adjustment to do: I simply hand tightened all of the 15 bolts and followed up with two rounds of tightening! Super easy. (pic 2)

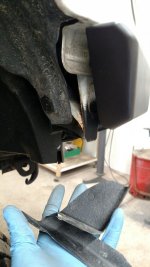
I then proceeded to trim some of the plastic molding on each side. I'll eventually trim both of the OEM bumper hanging brackets to improve aesthetics even more. (pic 3)

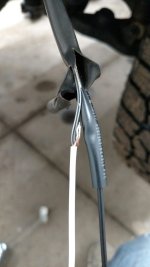
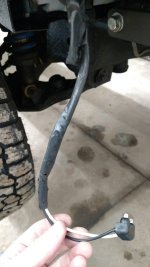
Also wired in my LED turn signals... Green/yellow wire on passenger side is positive, black/white wire is negative, and gray/black wire on driver side is positive, black/white is ground. Once soldered, I shrink wrapped, used the oem plastic housing, and electrical taped for triple coverage against the elements. (pics 4-5)
 

Attachments

  • 1546863530238.jpg
    1546863530238.jpg
    124.9 KB · Views: 265
  • 1546863542129.jpg
    1546863542129.jpg
    133.8 KB · Views: 261
  • 1546863518550.jpg
    1546863518550.jpg
    130.7 KB · Views: 252
  • 1546863479361.jpg
    1546863479361.jpg
    133 KB · Views: 263
  • 1546863483262.jpg
    1546863483262.jpg
    127.1 KB · Views: 253

Members online

Forum statistics

Threads
278,309
Messages
3,554,075
Members
248,016
Latest member
Advally Service

Trending content

Back
Top