automatic disconnecting differential actuator - Resistance Check

WMU53

New member
Have you used the resistance test on the ADD actuator?? Appreciate reading about your experience.

Current issue is with the flashing green 4X4 light.

I located a resistance test procedure for the 6 pin plug of the ADD actuator.
I used this test on the original unit to determine functionality. The ADD tested faulty. Missing connectivity to ground PIN 4 from Pins 5 and 6 regardless of actuator position described as connected or disconnected 4WD.

Purchased and installed a NEW ADD actuator. This did not resolve the issue. I removed the ADD and made a comparison resistance test. Both ADDs provide the same result. During the uninstall process of the NEW ADD while twisting fingers and hands to access the one of four bolts that is difficult to access the mud and debris rained down to expose the end of the short pigtail that plugs into the ADD. The connector to the ADD is in good condition but the end connector of this short pig tail has a green wire that is severed and therefore disconnected. Just one additional issue. Not certain when this occurred.

I've located test procedures for Tundra and Tacoma trucks where it is recommended to use the fuel pump relay in the test procedure as direct voltage to the ADD may cause damage. No information or circuit diagram about using a relay in the 4Runner manual.

Thoughts??
 
Register to hide this ad
Make sure both the 4wd selector and the 4wd ring coupler (or whatever its called) is in 2wd.

You can also run the 4wd selector with the actuator outside the diff to verify it works and at the same time make sure its in the proper position.

Either way it shouldn't matter, actuator should reposition itself based on what mode the 4wd selector is. Pulling them apart for proper cleaning is pretty much a maintenance routine for me, I wheel a lot and mud and water tend to get everywhere.

Would go the easy route before going the whole resistance test route which can escalate quickly, I fried a transfer actuator and it was not fun.
33b575ac6809b2c529b2047abe9d3c60.jpg
 
Make sure both the 4wd selector and the 4wd ring coupler (or whatever its called) is in 2wd.

You can also run the 4wd selector with the actuator outside the diff to verify it works and at the same time make sure its in the proper position.

Either way it shouldn't matter, actuator should reposition itself based on what mode the 4wd selector is. Pulling them apart for proper cleaning is pretty much a maintenance routine for me, I wheel a lot and mud and water tend to get everywhere.

Would go the easy route before going the whole resistance test route which can escalate quickly, I fried a transfer actuator and it was not fun.
33b575ac6809b2c529b2047abe9d3c60.jpg

Attachment provides the information used to identify the problem as the ADD actuator and not the actuator on the transfer case. Initially my thoughts were the Aisin transfer case was shot as the vent hose had rotted off the fitting on the actuator.

I did apply 12 Volts to pins 1 &2 of the new ADD to ensure the fork travelled as required side to side and installed the unit in 2WD position. No resistance check. The resistance check is passive, non destructive, only for checking continuity.

Laying on the floor under the vehicle is time I want reduced. Haha. Therefore I decided to plug in the NEW unit. Three bolts are easily accessed and the forth one, top left corner, I used a 1/2 inch drive socket and L handle that barely fit between the bolt head and cross member beam to break the bolt tension. Luckily I was able to use two contorted fingers to spin the bolt out. Cleaned the Toyota FIPG material off the diff mounting area with a razor blade and green coloured scotch brite pad.

Squeezed out the Toyota FPIG (Form In Place Gasket) material on the ADD. Recommend this product. No water etc. bypasses the seal provided. Installed the ADD. The green light remained on. Curses! Haha!

So! While removing the new ADD and accessing that fourth bolt I followed the pig tail connector from the ADD end to where it connects to the wire harness from the ECU, after all the debris from years of off road rained down. This electrical junction is located on top of the lower control arm area. The harness is attached to a stubby metal tang that is bolted onto the frame, fortunately, as the area is too tight for my hands and separating the two plugs required WD40 soaking and 40 psi of air to blow out the debris.
After removing the Add I used the resistance test to verify the contacts BUT the NEW unit is identical to the old unit in this matter. The old unit cycles the fork without a problem. Began searching on the web with results provided for Tacos and Tundra vehicles requiring a relay on the power contacts to ensure no damage occurs. At the moment I’m unsure of the manuals information provided for the resistance test.

So after my last 320K ride up and down the Saskatchewan River valley south of Lodgepole AB. Switching in and out of 4H Locked/4Low locked 2H to 4H etc. the unit failed on the last switch from 4H locked to 2H. LUCKY! The unit was intermittent for a few shifts after tapping on the Main transfer case while attempting to understand the issue while troubleshooting with the unit up on jack stands. Was the intermittent operation due to the electrical failure? HOPEFULLY! BUT there is no hope in hope. Haha.

I ordered a new pig tail connector from Toyota as I could not locate one on the used market place. Part arriving Tuesday and will test the ADD unit after installing this electrical pigtail prior to mounting ADD onto the diff.

How did you grenade the main transfer case or the actuator??
 

Attachments

Attachment provides the information used to identify the problem as the ADD actuator and not the actuator on the transfer case. Initially my thoughts were the Aisin transfer case was shot as the vent hose had rotted off the fitting on the actuator.

I did apply 12 Volts to pins 1 &2 of the new ADD to ensure the fork travelled as required side to side and installed the unit in 2WD position. No resistance check. The resistance check is passive, non destructive, only for checking continuity.

Laying on the floor under the vehicle is time I want reduced. Haha. Therefore I decided to plug in the NEW unit. Three bolts are easily accessed and the forth one, top left corner, I used a 1/2 inch drive socket and L handle that barely fit between the bolt head and cross member beam to break the bolt tension. Luckily I was able to use two contorted fingers to spin the bolt out. Cleaned the Toyota FIPG material off the diff mounting area with a razor blade and green coloured scotch brite pad.

Squeezed out the Toyota FPIG (Form In Place Gasket) material on the ADD. Recommend this product. No water etc. bypasses the seal provided. Installed the ADD. The green light remained on. Curses! Haha!

So! While removing the new ADD and accessing that fourth bolt I followed the pig tail connector from the ADD end to where it connects to the wire harness from the ECU, after all the debris from years of off road rained down. This electrical junction is located on top of the lower control arm area. The harness is attached to a stubby metal tang that is bolted onto the frame, fortunately, as the area is too tight for my hands and separating the two plugs required WD40 soaking and 40 psi of air to blow out the debris.
After removing the Add I used the resistance test to verify the contacts BUT the NEW unit is identical to the old unit in this matter. The old unit cycles the fork without a problem. Began searching on the web with results provided for Tacos and Tundra vehicles requiring a relay on the power contacts to ensure no damage occurs. At the moment I’m unsure of the manuals information provided for the resistance test.

So after my last 320K ride up and down the Saskatchewan River valley south of Lodgepole AB. Switching in and out of 4H Locked/4Low locked 2H to 4H etc. the unit failed on the last switch from 4H locked to 2H. LUCKY! The unit was intermittent for a few shifts after tapping on the Main transfer case while attempting to understand the issue while troubleshooting with the unit up on jack stands. Was the intermittent operation due to the electrical failure? HOPEFULLY! BUT there is no hope in hope. Haha.

I ordered a new pig tail connector from Toyota as I could not locate one on the used market place. Part arriving Tuesday and will test the ADD unit after installing this electrical pigtail prior to mounting ADD onto the diff.

How did you grenade the main transfer case or the actuator??

Can't really say what caused it, I had one of those long overdue to-do list (bearings, rebooting cvs, among other stuff) that was pending on the 4r so I was working on quite a few things.

All I remember when I got to the transfer case actuator I had some sort of short circuit (transfer actuator got really hot when cycling it and voltage dropped really low) So either I fried it when I started playing with the resistance or the damage was already done way before I got to it.

But it was a major pain :moon: sorting that out
 
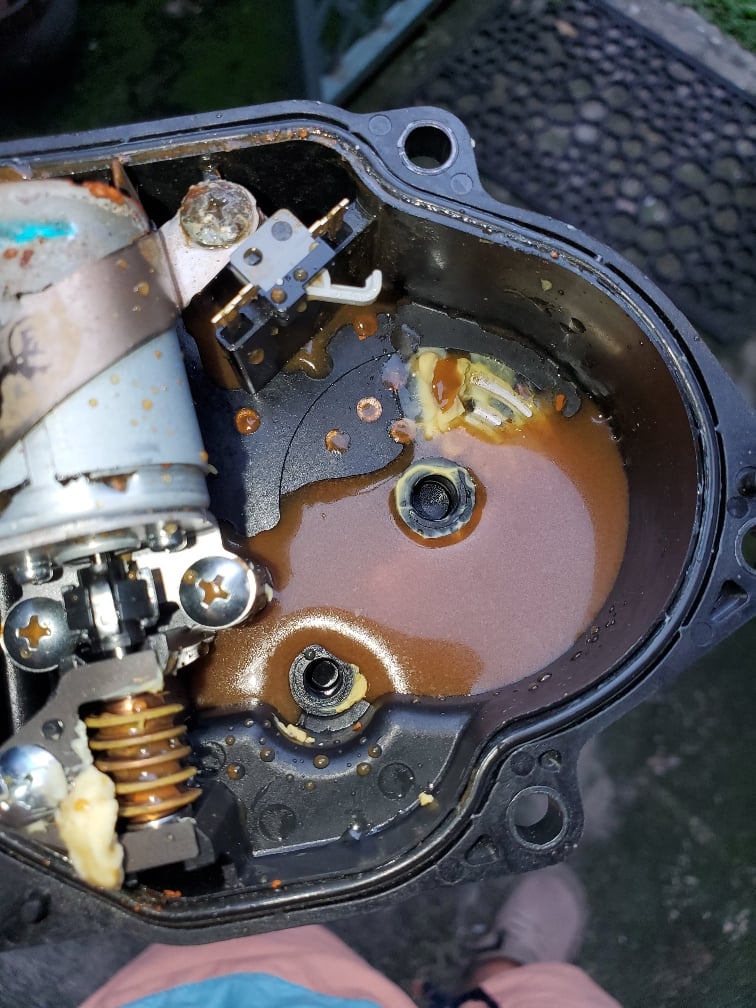
Opened up the old ADD actuator. Removed the 5 Philips screws and the cover required a hard rap to remove. Unfortunately the gears popped out. Been searching for a link to retime the gears without success. Any links or leads would be appreciated. The unit looks to be in good order except for being in 5 separate pieces. Haha. Could use a diagram or instructions.

Regarding the damaged electrical harness. Parts desk ordered the wrong unit. New part arriving Oct 15, hopefully.
 
The replacement ADD from Toyota was defective. A second unit ordered and installed. Wiring harness replacement installed.

Back to the hinterland.
 

Members online

No members online now.

Forum statistics

Threads
278,312
Messages
3,554,089
Members
248,016
Latest member
Advally Service

Trending content

Back
Top