Baja Ladder fit

rwrobs777

Member
Hi All,
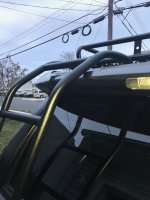
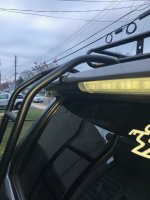
A question for any 5th Gen 4 Runner Baja Ladder owners...installed my ladder on my 2016 yesterday and followed the Mfr's instructions as far as where to position the ladder. It seems that the R/H downtube is contacting the hatch valence. I don't know if the tubing was bent incorrectly but fiddled with it and could not get any kind of gap...Did anyone have this issue ??...I'm waiting to hear back from Baja...what I can probably do is shim the ladder to hatch brackets. Thanks !!
 

Attachments

  • IMG_1964.jpg
    IMG_1964.jpg
    128.1 KB · Views: 2,002
  • IMG_1963.jpg
    IMG_1963.jpg
    125.7 KB · Views: 1,983
Register to hide this ad
Should’ve bought a Gobi......too soon?


Seriously, step one, two and three would be to contact the Mfg directly because that ain’t right.
 
Thanks !!...probably should have...still waiting to hear from the Mfr. !!

I could be completely wrong but it sounds like the top of the ladder is sitting too far to the right or the bottom is too far to the left? I guess you did say though that you followed the directions with positioning so I'm sure you've checked that a bunch of times. Hopefully it's an easy fix for you or the mfg gets a replacement out shortly. Those lead times are pretty long.

I have been having trouble with my installation but for other reasons.. I can't get the guide bolt to pull the ladder down after the bump in the hatch to meet up with the bottom clamp. Any suggestions?
 
Just got a call from Baja...they suggested I move the upper part of the ladder to 1 inch from the edge instead of 2...as far as getting the brackets together...EASY FIX....what I did was got one of my tie down straps and wrapped it around the left tie down ring underneath the bumper...wrap the strap around the left tube and with one hand push the ladder down while you tighten the strap with the other hand...I also opened up the hatch and propped it open a little with my 2 foot plastic step stool so I could install the hardware...worked like a champ !!...if you want I can post a pic of how I did it...also that shim they included in the kit is not needed...also instead of the 2 inches they recommend use the inch like they told me...let me know how it works...last week I installed a 20 inch Rigid LED lightbar...WOW, that thing really puts out some light...my last mod for a while !!
 
Last edited:
Just got a call from Baja...they suggested I move the upper part of the ladder to 1 inch from the edge instead of 2...as far as getting the brackets together...EASY FIX....what I did was got one of my tie down straps and wrapped it around the left tie down ring underneath the bumper...wrap the strap around the left tube and with one hand push the ladder down while you tighten the strap with the other hand...I also opened up the hatch and propped it open a little with my 2 foot plastic step stool so I could install the hardware...worked like a champ !!...if you want I can post a pic of how I did it...also that shim they included in the kit is not needed...also instead of the 2 inches they recommend use the inch like they told me...let me know how it works...last week I installed a 20 inch Rigid LED lightbar...WOW, that thing really puts out some light...my last mod for a while !!

Thanks Rob! I'm going to give that a try this weekend when I give it another go. Also, I'm glad to hear you don't need that shim as that thing seems to be more of a hindrance. With the shim off, did you still use those screws on the back side of the lower clamp? Or will the two bolts holding it to the ladder make it tight enough not to use them?
 
Baja Ladder install

The instructions can be a bit confusing. It was hard to tell what part of the top edge they were referring to with respect to the measurement. I eventually figured it out. It was the edge where the plastic cowling or spoiler support meets the metal door.

They provide a stick-on aluminum metal strip and tell you to attach it to the bottom bracket before tightening the lower bolts. The bolts act like pins to pinch the bottom edge of the door. The plate gets pushed off of the bracket as you tighten them. It works a lot better if you attach it to the metal door face where the bolts are going to contact it. Then tighten the pin-bolts so they pinch the door on the plate.

To connect the bottom bracket to the ladder with the nuts and bolts, I followed the instructions and had a slight wisp of a pretty woman (my wife) stand on the bottom rung. Then the ladder straightens out or elongates to meet the bracket and the bolts thread together easily.

More photos and higher res' photos would have made the instructions easier to follow. The little prints on the paper were too small too see any detail or what they were trying to show you.

In the end, I like the Baja Rack ladder mounting a lot better than the Gobi.
 
How did you position your ladder to get that gap on the r/h downtube ??I might have to resort to putting a 1/8 inch shim or two between the lower brackets to get the rack to sit up higher !!
 
Thanks Rob! I'm going to give that a try this weekend when I give it another go. Also, I'm glad to hear you don't need that shim as that thing seems to be more of a hindrance. With the shim off, did you still use those screws on the back side of the lower clamp? Or will the two bolts holding it to the ladder make it tight enough not to use them?
Yes, I still used those two setscrews...they probably just keep the ladder from moving horizontally...they don't really have to be "smoked" down though !!
 
The instructions can be a bit confusing. It was hard to tell what part of the top edge they were referring to with respect to the measurement. I eventually figured it out. It was the edge where the plastic cowling or spoiler support meets the metal door.

They provide a stick-on aluminum metal strip and tell you to attach it to the bottom bracket before tightening the lower bolts. The bolts act like pins to pinch the bottom edge of the door. The plate gets pushed off of the bracket as you tighten them. It works a lot better if you attach it to the metal door face where the bolts are going to contact it. Then tighten the pin-bolts so they pinch the door on the plate.

To connect the bottom bracket to the ladder with the nuts and bolts, I followed the instructions and had a slight wisp of a pretty woman (my wife) stand on the bottom rung. Then the ladder straightens out or elongates to meet the bracket and the bolts thread together easily.

More photos and higher res' photos would have made the instructions easier to follow. The little prints on the paper were too small too see any detail or what they were trying to show you.

In the end, I like the Baja Rack ladder mounting a lot better than the Gobi.
Great !!...thanks for the updated measurements and YES the directions and photos were not very clear...and yes, I like the Baja rack mounting...very SOLID !!...question...where did you get your 2nd recovery hook from ??...does it interfere with your exhaust ??...I believe that the L/H hook is more for securing the truck for shipping and not for recovery...I have a shackle for my tow hitch specifically for recovery...if I were to use the hooks I would probably use my Mig weld to the frame !!
 
Thanks Rob! I'm going to give that a try this weekend when I give it another go. Also, I'm glad to hear you don't need that shim as that thing seems to be more of a hindrance. With the shim off, did you still use those screws on the back side of the lower clamp? Or will the two bolts holding it to the ladder make it tight enough not to use them?
Oh, and BTW you might want to upgrade your hatch struts...I did because that extra weight of the ladder will cause the OEM struts to fail sooner...got mine from Lift Supports Depot...my P/N was PM1062N10 (for models with added weight)
 
I had issues with my BajaRack ladder contacting the area behind the upper valance where it hooked in on top. It was taking off paint and the extra friction actually blew out both upgraded lift struts on the back hatch.. that's when I realized it was touching underneath. Once I moved it to a spot where it didn't touch, I was good. They may not be Gobi, but the ladder and rack itself is solid, and I waited a total of maybe 10 days so it was worth it to me.
 
Yes, I still used those two setscrews...they probably just keep the ladder from moving horizontally...they don't really have to be "smoked" down though !!

Yeah I guess my only concern with using those setscrews without the shim would be that they'd rub through the paint eventually and cause it to rust.
 
Oh, and BTW you might want to upgrade your hatch struts...I did because that extra weight of the ladder will cause the OEM struts to fail sooner...got mine from Lift Supports Depot...my P/N was PM1062N10 (for models with added weight)

Thanks for the info! I'd been meaning to do that but hadn't taken the time to lookup the replacements. Just having the ladder resting on the hatch you can tell the OEM struts won't cut it haha.
 
2nd rear recovery hook

Great !!...thanks ...question...where did you get your 2nd recovery hook from ??...does it interfere with your exhaust ??...I believe that the L/H hook is more for securing the truck for shipping and not for recovery...I have a shackle for my tow hitch specifically for recovery...if I were to use the hooks I would probably use my Mig weld to the frame !!

The second recovery hook is the same part that's used on the left rear corner. I think you're right about it being a transportation hook. I bought it from Toyota along with the bolts. No, they're not as beefy as 1/2" thick recovery plates but I think they'll do fine for a static pull. Using a bridle between both recovery points reduces the stress. See my profile for a link to my DIY Bridle fabrication thread, or where to buy one. Look for my Recovery Gear thread for more info on how I installed that 2nd hook. I only have a few threads that I've started so it's easy to find these.

Alternately, you could weld and fabricate two recovery points and bolt and/or weld them on where the existing OEM hook is.

Yes, the 2nd recovery hook interferes with the exhaust. I had the tailpipe shortened to fit the hook but then hot exhaust eventually melted the plastic bumper. I discovered that when I got underneath to work on the lift. It's better to have the exhaust turned sideways behind the back wheel, which I eventually did.

The tow hitch is commonly used, but it is a weak element, being welded to a bar or beam between the frame rails, IMHO.
 
The second recovery hook is the same part that's used on the left rear corner. I think you're right about it being a transportation hook. I bought it from Toyota along with the bolts. No, they're not as beefy as 1/2" thick recovery plates but I think they'll do fine for a static pull. Using a bridle between both recovery points reduces the stress. See my profile for a link to my DIY Bridle fabrication thread, or where to buy one. Look for my Recovery Gear thread for more info on how I installed that 2nd hook. I only have a few threads that I've started so it's easy to find these.

Alternately, you could weld and fabricate two recovery points and bolt and/or weld them on where the existing OEM hook is.

Yes, the 2nd recovery hook interferes with the exhaust. I had the tailpipe shortened to fit the hook but then hot exhaust eventually melted the plastic bumper. I discovered that when I got underneath to work on the lift. It's better to have the exhaust turned sideways behind the back wheel, which I eventually did.

The tow hitch is commonly used, but it is a weak element, being welded to a bar or beam between the frame rails, IMHO.
WOW !!...thanks for the info !!..I'll probably not mess with the exhaust system for now but eventually I'll be getting a Borla system and installing that...then I can fabricate welding some steel plates to my frame rails and yes spreading the load reduces the stress...most of the recoveries I've done is just pulling out knuckleheads who get stuck on the beach !!
 
Welding recovery hooks to frame

WOW !!...thanks for the info !!..I'll probably not mess with the exhaust system for now but eventually I'll be getting a Borla system and installing that...then I can fabricate welding some steel plates to my frame rails and yes spreading the load reduces the stress...most of the recoveries I've done is just pulling out knuckleheads who get stuck on the beach !!

With the exhaust where it is you can't use the frame behind the right rear wheel for jacking or jack stands. Turning the exhaust gives you the flat, bottom side of the frame to use a cylinder jack, a jack stand or a floor jack. This could be critical if you're stuck and need to jack it up.

The frame is actually pretty thin material. I discovered this drilling holes for sheet metal and self-taping screws. It get's it's strength from the box shape. You have to be very careful about pre-heat if you're going to weld 1/2" plate to 12 gauge or whatever it is. Ideally both materials have the same thickness.

That's why I'd use the factory bolts in the existing threaded holes that match the left rear corner and weld a small line between frame and plate. Make the plate on whatever thickness base plate you want but weld it to the frame with a small, < 1/4" fillet weld.

Look at the OEM recovery/tie down hook. I seem to recall the base material is less than 1/4" and it's bolted and welded to the frame.

I'm just a structural engineer. I don't weld that well. But I know materials and weld strength.
 

Members online

No members online now.

Forum statistics

Threads
278,312
Messages
3,554,083
Members
248,016
Latest member
Advally Service

Trending content

Back
Top