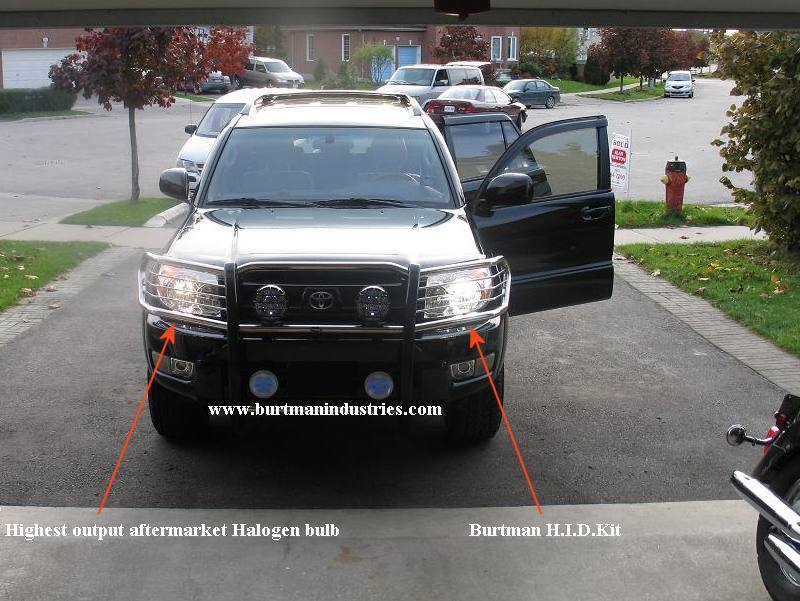
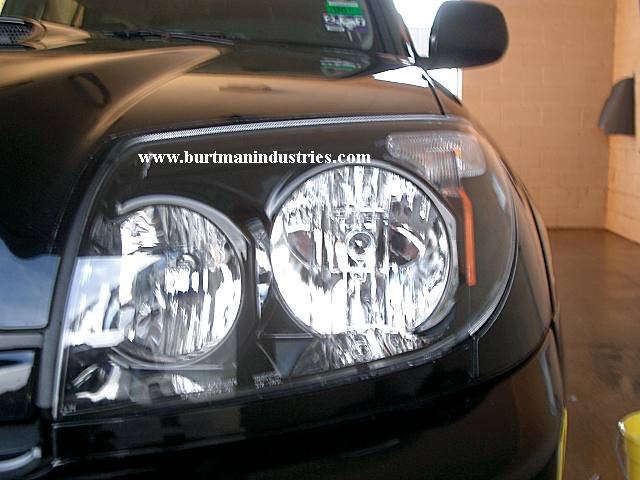
Black JDM Headlights......who all has them?

atomic punk said:
The ones Jason sells fit perfectly and that made for a VERY easy install. Alot of people with those love them and didn't notice any beam spread difference, but a couple of people, myself included, did notice a negative change.

Caviat: before purchasing the black set, I painted my original OEM housings black and noticed a difference then too.

Conclusion: although it doesn't appear to be this way, the shroud that is the blacked out portion is supposed to be reflective by design, to fill in and complete the beam spread.

Just my $.05 worth (inflation)

Interesting...thanks for the input. I guess I never considered that aspect. My plan was to replace the bulbs anyways with a 6,000k or so HID bi-xenon kit anyways so maybe that would compensate for the loss of the reflective housing...
 
tomhaney1 said:
Interesting...thanks for the input. I guess I never considered that aspect. My plan was to replace the bulbs anyways with a 6,000k or so HID bi-xenon kit anyways so maybe that would compensate for the loss of the reflective housing...

Definately paint them for HIDs, if you have the reflector housing. I have rebased bulbs on my Camry, SE trim, black housing from the factory and my friend says the cut off is better and less glare than his Camry XLE with chrome housings. I also have the wrong type of burners in mine, D2S instead D2R for reflector housings. D2S for projectors, D2R for reflectors.
 
atomic punk said:

I am not going to replace the headlights with HID ones because I don't want to see the hot spots getting brighter and the dark spots still dark. Any more contrast will drive me insane. I like the looks of the blacked-out ones that Burtman sells, but I wish they had the consistent beam spread of the OEM lights without the blacked out shrouds.

FYI..... in your case it might be different (or maybe you will just not care about it), but I don't want to take that gamble and spend all the money on HIDs only to be disappointed. If I had the cash, I would, however buy the projectors and then the HIDs. That would be ideal.
 
tomhaney1 said:
Interesting...thanks for the input. I guess I never considered that aspect. My plan was to replace the bulbs anyways with a 6,000k or so HID bi-xenon kit anyways so maybe that would compensate for the loss of the reflective housing...

Alex on the forum here did just that. I sold him a HID kit and he has the black JDM lights as well. If you are looking for a
great HID kit, see here, link.

These work great in the 4Runner housings. Also play the video at the bottom.

hid_stock_hid1.jpg
 
Jason B said:
Alex on the forum here did just that. I sold him a HID kit and he has the black JDM lights as well. If you are looking for a
great HID kit, see here, link.

These work great in the 4Runner housings. Also play the video at the bottom.

hid_stock_hid1.jpg

Anyone know Alex's handle sos I can try to hit him up for some pictures?? Are those the black headlights in the pictures?? I can't see sheit except for white lights...
 
I too have the Burtman Industry Blacked Out lights. I haven't updated my pictures for 8 months or so. I did notice the hazing that another member commented on. Its noticeable when looking at the headlights from an angle. It makes them look like you drove through the rain during traffic and let them dry. I also noticed that the passenger side leaked and got some water vapor inside. I can see from the way my hood closes that it probably broke the seal but my OEM lights were OK. I'm not sure about whether I would buy these again or buy the JDM ones. (not sure how much JDM lights cost).

As for the beam pattern others complained about I didn't notice anything different from stock. But I've had HIDs for a while and maybe because the housing is black the beam pattern is better than all chrome like UNEEK was saying.

Owners of the JDM lights do you notice a similar hazing on yours?
 
Doubledown said:
I too have the Burtman Industry Blacked Out lights. I haven't updated my pictures for 8 months or so. I did notice the hazing that another member commented on. Its noticeable when looking at the headlights from an angle. It makes them look like you drove through the rain during traffic and let them dry. I also noticed that the passenger side leaked and got some water vapor inside. I can see from the way my hood closes that it probably broke the seal but my OEM lights were OK. I'm not sure about whether I would buy these again or buy the JDM ones. (not sure how much JDM lights cost).

As for the beam pattern others complained about I didn't notice anything different from stock. But I've had HIDs for a while and maybe because the housing is black the beam pattern is better than all chrome like UNEEK was saying.

Owners of the JDM lights do you notice a similar hazing on yours?

That is why I am hesitant to buy them. I will save my pennies and buy the JDM ones before I have those headaches...
 
sorry guys... after seeing momo's truck I had to throw mine out there too. notice though... my "Toyota TRD Revo" has the blacked out headlights too.

jdm.jpg~original


Really though, I have a black runner with the black tails and I'm looking to get the black headlights as well. So far I see.

1. do'em yourself save money but takes time
2. replicas, save some money but has haze around the lens and light pattern is screwy (due to either inferior product or because the black doesn't reflect to enhance the spread pattern)
3. JDM... cost some money but no haze?

My questions...
1. I read one write up that you can remove the HeadLight with out removing the whole bumper assembly and another that said you needed to. Is it plausible to do it without removing the front bumper piece?
2. The guys who had "sore hands" from having to crank the beam into place. Does that mean that the replicas have a messed beam angle (direction) that needs to be corrected? or was this just an attempt to change the beam spread?
 
Jason B said:
I can get you either or, just the JDM's are much more. I've probably sold around 30+ pair of the replicas and they done pretty well. Be sure to check the other post on the forum about them. But, again, nothing can beat JDM, but it comes at a price.

What is your price for the JDM ones?
 
RevoRunner said:

My questions...
1. I read one write up that you can remove the HeadLight with out removing the whole bumper assembly and another that said you needed to. Is it plausible to do it without removing the front bumper piece?
2. The guys who had "sore hands" from having to crank the beam into place. Does that mean that the replicas have a messed beam angle (direction) that needs to be corrected? or was this just an attempt to change the beam spread?

1. You don't need to remove the bumper . I removed mine several times without removing the bumper, it's easy, but you just need to locate the bolt first, then be somewhat flexible with your arms/hands/body position. The first time is the toughest because the "hard to get to" bolt has been torqued tighter from the original build than it will be the 2nd time after you torque it back in there (I recommend retorquing it to just past hand tight in case you have to remove it again).

2. I didn't notice that the angle/direction was off. I was attempting to correct the spread's "dead spots". Didn't work - so I'll be buying some aftermarket driving or fogs to fill in the darker gaps in the beam spread.

Hope that helps.
 
Guys, I too have the JDM headlights. Here is a link to my thread to see them.

http://www.toyota-4runner.org/showthread.php?s=&threadid=23302

I bought these headlights before they started making the aftermarket headlights (with the orange reflectors instead of the clear). The price was right at $500 shipped from Japan but I was able to sell my old headlights to make about half of it back.

Anyway, I do recommend buying the JDM's for 2 main reasons....price not being one of them.

1) Sure deal...no leaking. From past experience, i have owned a couple pair of aftermarket lights but all of them leaked. Moisture built up inside the housing, causing them to fog on hot days. To combat this, I found that drilling 3-4 holes at the bottom of the headlight housing would alleviate a lot (if not most) of this problem.

2) Light output. Besides having to re-aim the headlights per JDM specs, they do keep a very high output level. My old aftermarket lights always seemed to have a very scattered and weak light output in the evenings, making it hard to see even with high beams on.

However, here is my disclaimer. I have never owned aftermarket 4runner headlights and it has been a couple years since I have owned my old ones. Industry standards very well may have changed since.
 
RevoRunner said:
My questions...
1. I read one write up that you can remove the HeadLight with out removing the whole bumper assembly and another that said you needed to. Is it plausible to do it without removing the front bumper piece?
2. The guys who had "sore hands" from having to crank the beam into place. Does that mean that the replicas have a messed beam angle (direction) that needs to be corrected? or was this just an attempt to change the beam spread? [/B]

Check this thread.....

http://www.toyota-4runner.org/showthread.php?s=&threadid=13367
 
CATman said:
I baked mine at 325-350 for about 5-7mins. Use EasyOff oven cleaner to strip the chrome off, only takes a few minutes. Scuff with steelwool and apply what ever color suits you. Krylon Fusion is what I used. Put them back together, put in the oven for another 3-5 minutes and press them tightly together. I used rope caulk around the seam to ensure that they are leak free without making a mess.

has anyone else used easy off for the chrome? please advise...i'm in the process of a DIY blackout and want to make sure I do it right...
 
HRunner said:

That might have been me with the sore fingers. I haven't looked at the forum recently, so sorry for a slow response.

I have the JDM replicas from Burtman. The beam did need a fair amount of adjusting since I think it's set for Japan. It's not difficult to do the adjustment, just takes a lot of turns on both the knobs. They can be stiff, so that's why it makes your fingertips sore. If I remember correctly, some of the knobs are very easy to get to, but others only let you get the thumb and index finger on them easily. I parked perpedicular to a wall on level ground and simply covered up one headlight with a floor mat. That way, I could see just the beam location and pattern from one light. Adjusted that light until I thought it look good, then repeated the process with the other light. Again, not hard, but mine did require a lot of turns on the little plastic wheels....and some sore fingers.
 
Iron Clad Lou said:
has anyone else used easy off for the chrome? please advise...i'm in the process of a DIY blackout and want to make sure I do it right...

Nope. Just scuffed the chrome with my bare hands. I mean, I used sandpaper and steel wool. Then used epoxy spray paint. About 7 thin coats. Worked well. Looked good.
 
atomic punk said:
Nope. Just scuffed the chrome with my bare hands. I mean, I used sandpaper and steel wool. Then used epoxy spray paint. About 7 thin coats. Worked well. Looked good.

well, let me rephrase, I'm re-doing a pair that have been done...the paint is chipping off b/c the surface was not prepped....I'd like to remove the paint..any suggestions?
 

Members online

Forum statistics

Threads
278,315
Messages
3,554,102
Members
248,016
Latest member
Advally Service

Trending content

Back
Top