volkinator
New member
Love everything you've done with this, been working on mine with yours as the inspiration and end goal! Curious what lights you used for the 'courtesy' lights when you swapped from running boards to sliders.


Love everything you've done with this, been working on mine with yours as the inspiration and end goal! Curious what lights you used for the 'courtesy' lights when you swapped from running boards to sliders.
Sure is a nice build! After all that work, why would you want to sell?
Thanks! I too used inspiration from this site HOJeepster's build from his earlier days was my background for a couple years, now I get to use my own. For the courtesy lights I first used 6" strip LEDs but they sucked so I went to knockoff rock lights, something like this: https://www.amazon.com/dp/B01ABPGAUC/ref=twister_B01ABPGAR0?_encoding=UTF8&psc=1
I've had fun and learned a lot building and testing it over the past 4.5 years. Camping and mild offroading will always be a hobby of mine but life changes constantly and its no longer my focus. Since I feel like we've hit a major goal of the 48 connected states it's a good milestone for me to mentally say we could be finished with this build. I'm also very guilty of getting bored and when "done" and moving to the next project as I've done with many vehicles over the years. This is by far the longest and most involved one I've done though.
I can understand that, priorities change in life and time to move on. Amazing work you have done and i'm sure the new owner will carry that tradition!

This is almost the perfect build to me, will definitely use this as inspiration for the 4th Gen build I'm embarking on.

So out of curiosity, did you find the lack of head room with the sleeping platform to be confining? I'm coming over from a conversion I built in a 2nd Gen Honda CR-V and was a bit bummed to see the rear cargo area in the 4th Gen 4Runner wasn't as high as the smaller CR-V. So I'm not quite sure on whether to do a sleeping platform inside the 4Runner or a RTT.
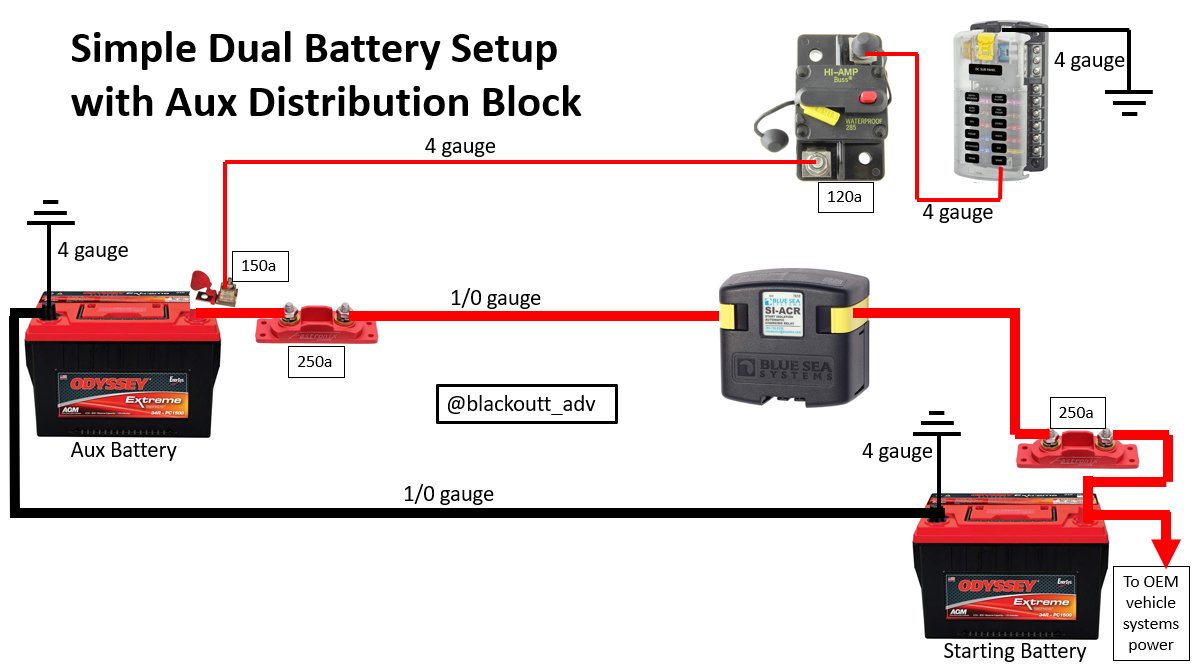
To expand on my "Power" section above, I've gotten multiple questions about how I laid out my dual battery setup and why. Here's an all inclusive list and description of what I chose and how it fits together. The goal of the system was cheap and effective. Had I known I wanted to add solar later on I would have forgone all of this for a more expensive DC-DC system with integrated solar charge controller BUT this fits my needs well at a cheaper entry price and is plenty expandable.
I'll start with the required parts that can vary by vehicle model or your power needs:
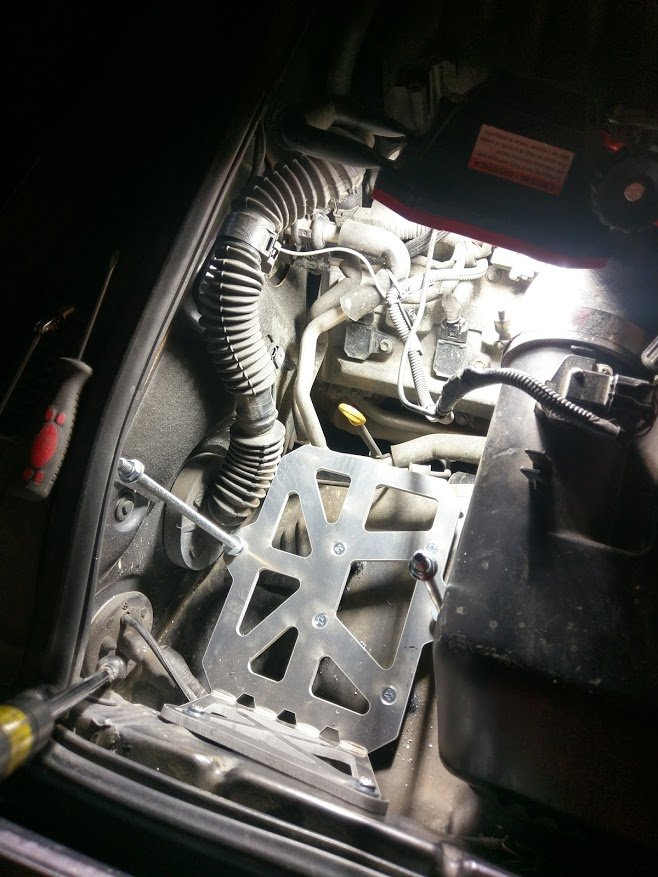
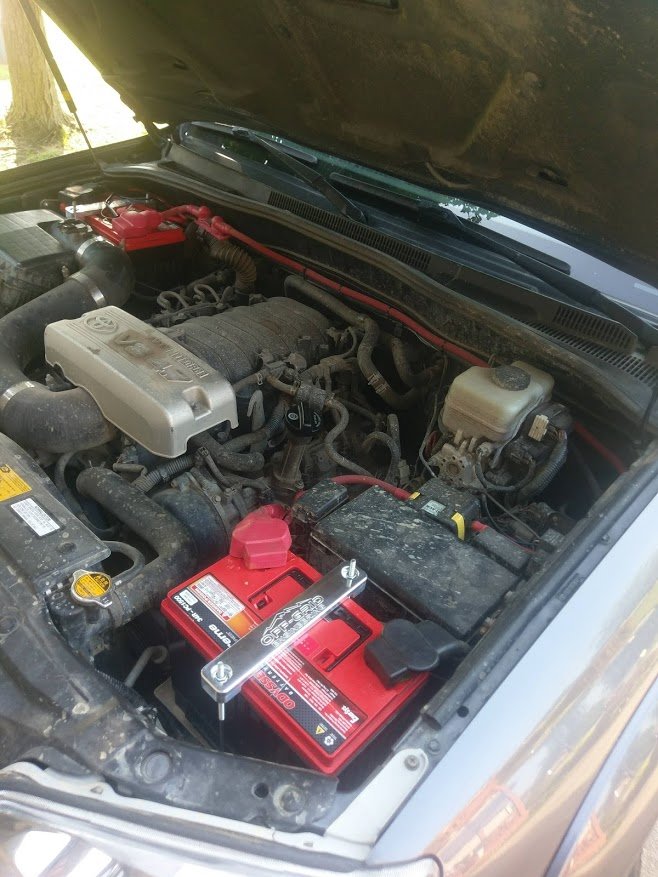
Off Grid Engineering aux battery tray - Although expensive, the cheapest bolt in option for passenger side fenderwell near firewall for 4th gen 4runner. Very well made and very strong!
Off Grid Engineering starter battery tie down - Bling piece to replace the factory corroded stamped part and match the passenger side, totally not required.
2x Odyssey Batteries 34R-PC1500T aux and starting battery. I wanted the largest I could fit, ~67 amp hrs, matching, AGM. If I were to do it again I'd avoid the AGM charging headache and get two silver or gold level autoparts store batteries, cheaper, readily available, and warranty in store across the country.
Starting battery spacer - For starting battery to make it "stock height" probably didn't need and could have cut Off Grid supplied J hooks shorter. I opted to leave them full length in case I ever went back to a stock sized battery at next replacement.
Diode in alt-s fuse to increase charging voltage - Ebay part that replaces a fuse in the underhood fuse box, the diode tricks the alternator into putting out a higher voltage better suited to top off AGM batteries, I see 14.1v warm charging now instead of 13.5v. I have since changed to a GM OEM part# 12135037 that fits like a factory fuse with some slight shaving of the sides, thanks for the tip Chitown 4x4! (theoretically less prone to failure maybe? although my ebay part never failed)
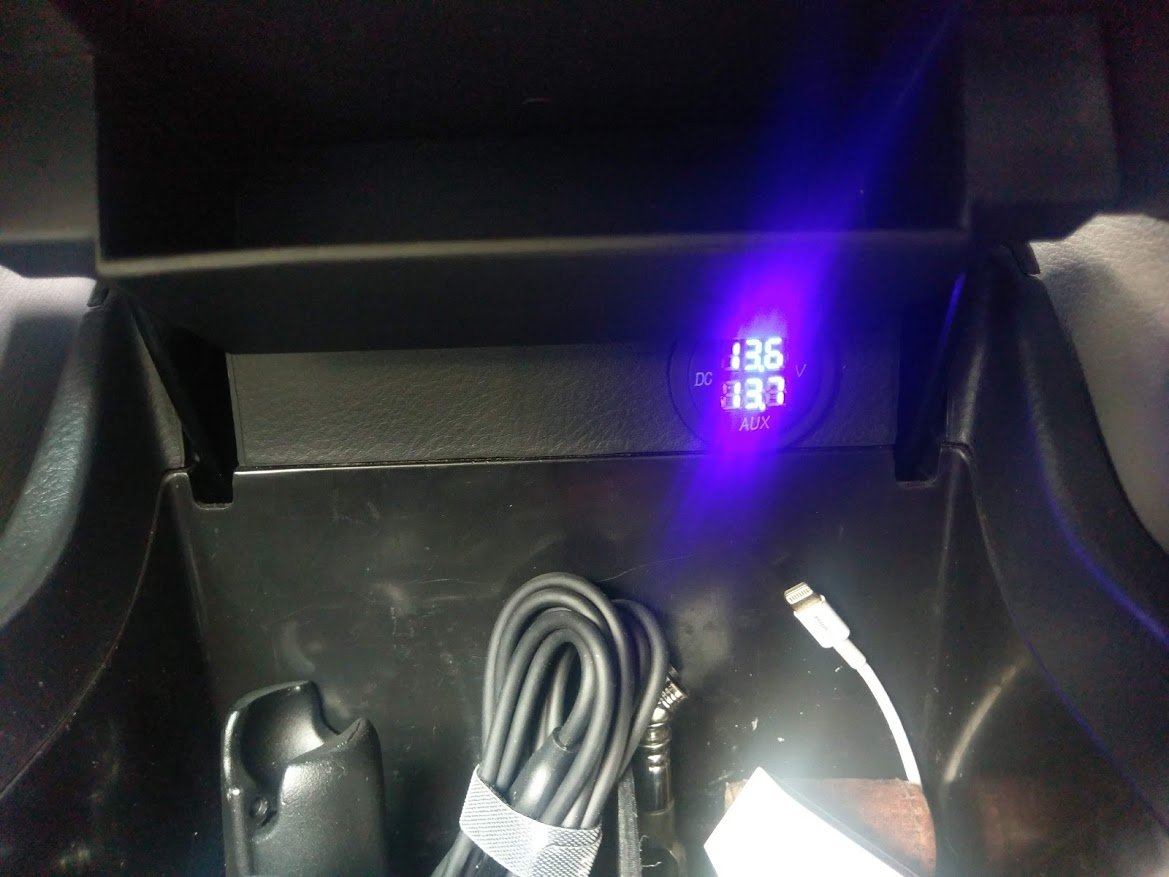
Dual battery voltage monitor in center console - kept hidden away because the light is bright and so I don't obsess over it but can look when needed. Very handy to have in some way to confirm your system is working as intended and also diagnose alternator issues.
Next up are the parts that could be pretty universal for any dual battery setup build:
Hydraulic Lug Crimping Tool - An extra expense but it made all this work super easy and clean, invest in one of these with your buddys and a cheap harbor freight heat gun. No other special tools required.
Blue Sea SI ACR - (Blue Sea specs here) The key to the whole system. Cheaper than the automatic charging relays ML-ACR with the manual switch that most people use in dual battery setups. I didn't feel this switch was necessary for an extra ~$100, I didn't want to mount the switch, and the automatic nature of "it just works" is nice to not think about when on the trail. If I want to jump start from aux battery I can simply install a short power jumper across this relay or use jumper cables between the two, but most likely I'd still use my backup lithium ion jumper pack from Antigravity for ease of use anyway.
2x Battery Terminals - "military style" 3/8" connection posts for easy attachment of the lug terminals. These are a positive/negative set that come with nice rubber covers too. They do require cutting off the puny factory battery connections but they won't be missed.
1/0 Gauge Cable between two batteries - This is what links two two power houses together, I chose 1/0 welding cable and 10ft was plenty to cleanly route around near the firewall to the passenger side. It also came with a few 3/8" hole lug terminals which is handy.
1/0 3/8" hole Lug terminals - Needed more of these to make all the battery and ACR connections.
1/0 5/16" hole Lug Terminals - Needed for the fuse connections, slightly smaller diameter poles.
Red 3/1 Heat Shrink - This is the good stuff with the glue inside big enough for the 1/0 cable.
Black 3/1 Heat Shrink - Same thing just for the ground sides.
2x Fastronix MEGA/AMG 250a Fuse - Probably the most overlooked item in a dual battery system are the safety components. Ideally you would fuse EVERY connection as close to the power source as possible to never create a live wire in the case of a short. In a dual battery setup this means adding one of these in the big 1/0 cable really close to BOTH batteries, utilizing the 5/16" hole lug terminals. These cover with rubber boot covers, fuses, and are easy to mount anywhere.
Lastly I'll cover the parts to the Aux power ports/Power distribution block/Fuse panel routed to the back of the vehicle since this is more of an option as well starting from the battery connection:
Blue Sea Battery Terminal Fuse Holder- Remember how I said Fuse EVERY connection closest to the power source, can't beat this little gem. The picture is deceiving, it doesn't come with a fuse.
150a Blue Sea Battery Terminal Fuse - Mounts on the above holder. I chose 150 amp to closely coincide with the power specs on the rear power distribution panel but this could vary based on your needs as well.
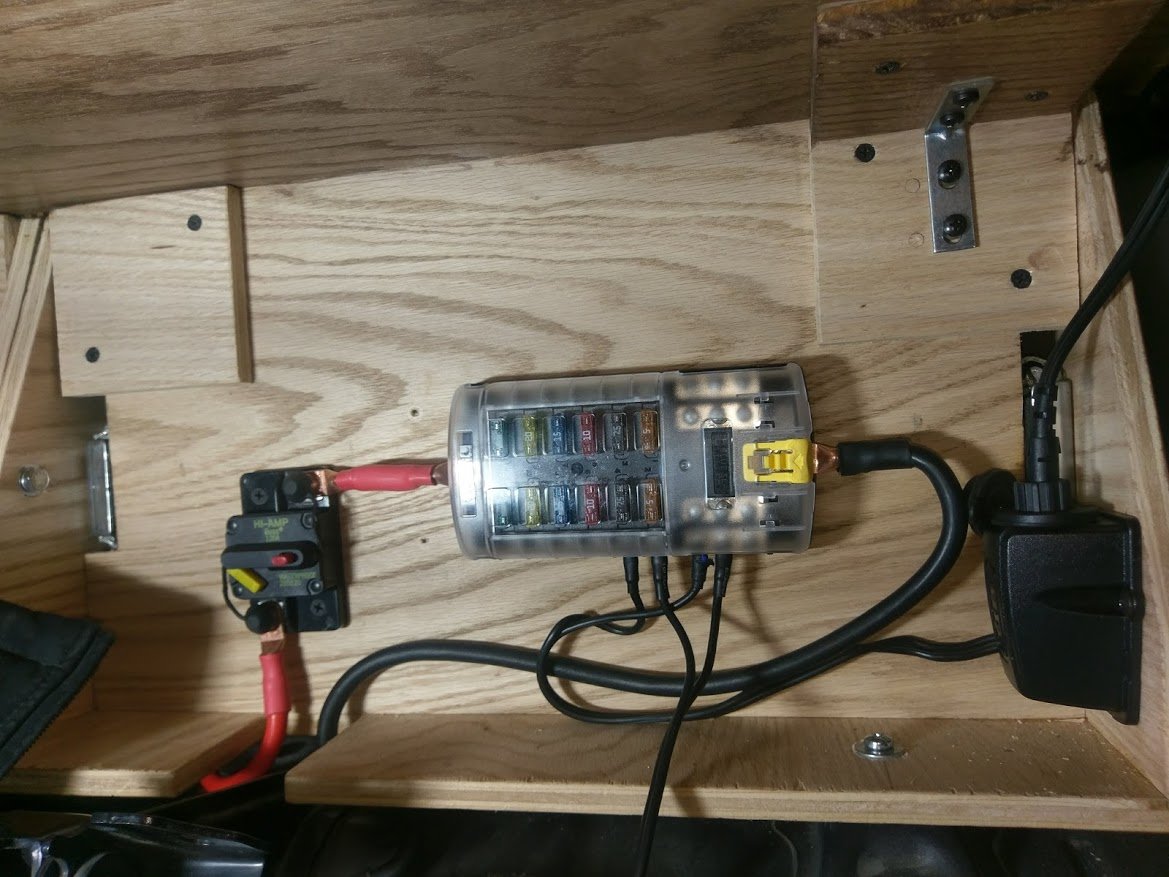
120a Bussman Circuit Breaker - Technically not required since this is a non-powered end of the wire but I like that it enables a quick shut off in the back seat area with the switch to kill all accessories in one flip and offers an extra level of protection. This is also sized appropriately to the fuse panel max requirements I selected. If I over draw the fuse panel for some reason I would rather trigger the circuit breaker here that I can flip the switch on than blow the expensive fuse at the battery end.
Blue Sea fuse panel on back of drawers - This is a big option depending on what your power needs are. I power the fridge, some USB outlets, a 12v cigarette lighter style outlet, the dual voltmeter, and some small LED lights off this so it is severely under utilized BUT I have room to expand later on.
4ga Cable Red/Black - The red runs between the 150a fuse on the aux battery, back to the circuit breaker in the rear seat area. The black I ended up with a lot left over since I only used small sections of to: ground the fuse panel in the back seat area, ground the aux battery nearby it, replace the factory starting battery ground.
4ga Lug Terminals for all aux connections - These have 1/4" stud size. I had to drill one out to 5/16" to fit on the fuse block at the battery.
1/2" marine heat shrink black - Used on some of these smaller connections.
0.31" marine heat shrink black - Used on some of these smaller connections.
Simple diagram
OGE Aux battery tray install
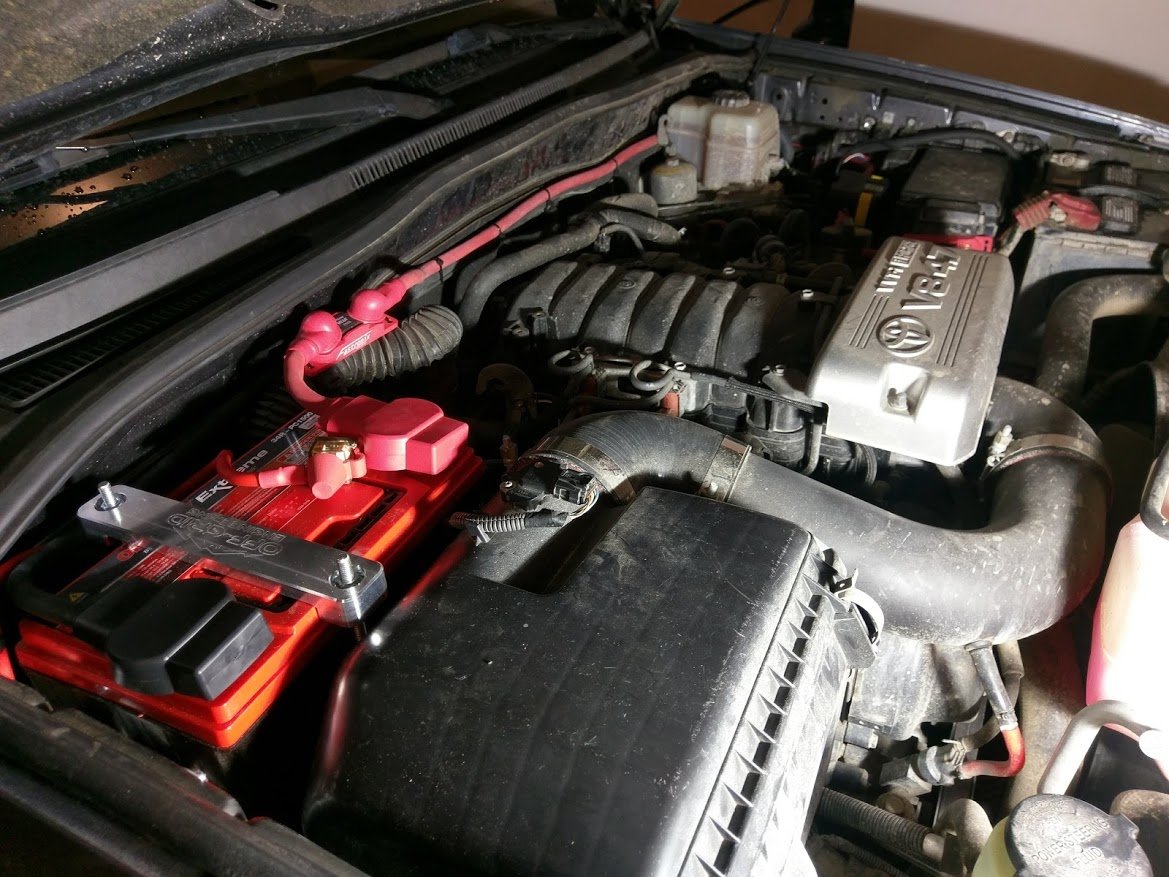
System view from passenger side
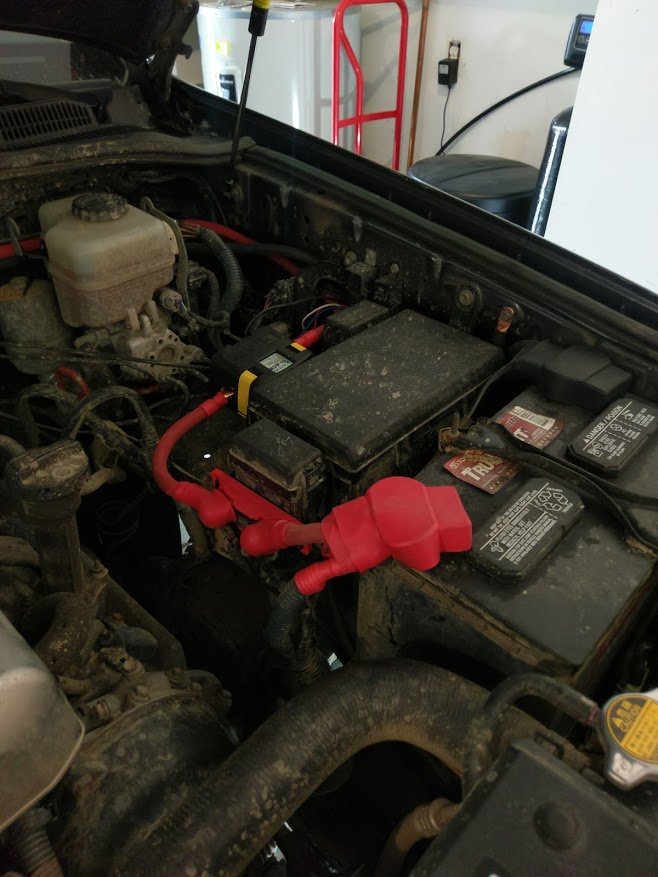
System view on driver side with stock battery and tie down
Driver side again with AGM battery and OGE tie down
Dual volt meter in center console cold before Alt-S diode
Rear seat circuit breaker and fuse block
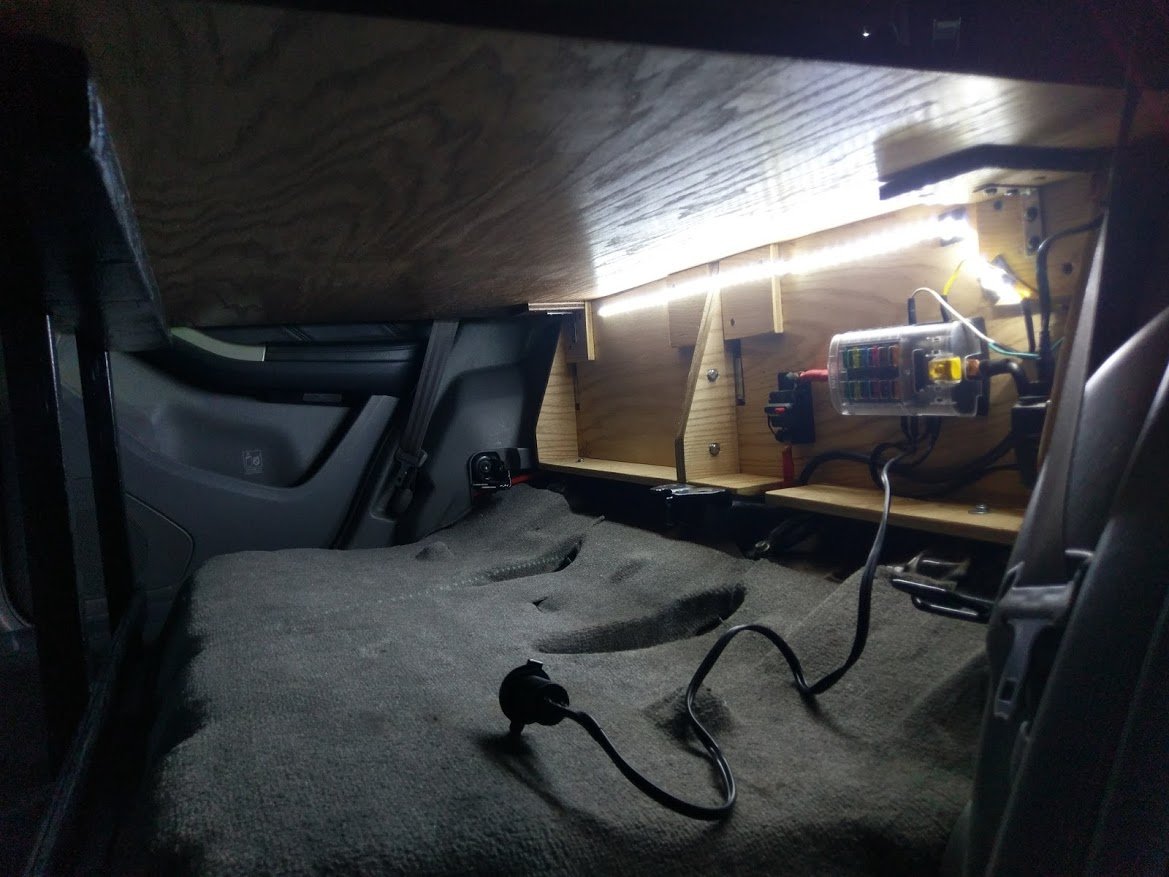
wow super sweet design, esp. of the rear seat circuit breaker area :cheer2:
To expand on my "Power" section above, I've gotten multiple questions about how I laid out my dual battery setup and why. Here's an all inclusive list and description of what I chose and how it fits together. The goal of the system was cheap and effective. Had I known I wanted to add solar later on I would have forgone all of this for a more expensive DC-DC system with integrated solar charge controller BUT this fits my needs well at a cheaper entry price and is plenty expandable.
I'll start with the required parts that can vary by vehicle model or your power needs:
Off Grid Engineering aux battery tray - Although expensive, the cheapest bolt in option for passenger side fenderwell near firewall for 4th gen 4runner. Very well made and very strong!
Off Grid Engineering starter battery tie down - Bling piece to replace the factory corroded stamped part and match the passenger side, totally not required.
2x Odyssey Batteries 34R-PC1500T aux and starting battery. I wanted the largest I could fit, ~67 amp hrs, matching, AGM. If I were to do it again I'd avoid the AGM charging headache and get two silver or gold level autoparts store batteries, cheaper, readily available, and warranty in store across the country.
Starting battery spacer - For starting battery to make it "stock height" probably didn't need and could have cut Off Grid supplied J hooks shorter. I opted to leave them full length in case I ever went back to a stock sized battery at next replacement.
Diode in alt-s fuse to increase charging voltage - Ebay part that replaces a fuse in the underhood fuse box, the diode tricks the alternator into putting out a higher voltage better suited to top off AGM batteries, I see 14.1v warm charging now instead of 13.5v. I have since changed to a GM OEM part# 12135037 that fits like a factory fuse with some slight shaving of the sides, thanks for the tip Chitown 4x4! (theoretically less prone to failure maybe? although my ebay part never failed)
Dual battery voltage monitor in center console - kept hidden away because the light is bright and so I don't obsess over it but can look when needed. Very handy to have in some way to confirm your system is working as intended and also diagnose alternator issues.
Next up are the parts that could be pretty universal for any dual battery setup build:
Hydraulic Lug Crimping Tool - An extra expense but it made all this work super easy and clean, invest in one of these with your buddys and a cheap harbor freight heat gun. No other special tools required.
Blue Sea SI ACR - (Blue Sea specs here) The key to the whole system. Cheaper than the automatic charging relays ML-ACR with the manual switch that most people use in dual battery setups. I didn't feel this switch was necessary for an extra ~$100, I didn't want to mount the switch, and the automatic nature of "it just works" is nice to not think about when on the trail. If I want to jump start from aux battery I can simply install a short power jumper across this relay or use jumper cables between the two, but most likely I'd still use my backup lithium ion jumper pack from Antigravity for ease of use anyway.
2x Battery Terminals - "military style" 3/8" connection posts for easy attachment of the lug terminals. These are a positive/negative set that come with nice rubber covers too. They do require cutting off the puny factory battery connections but they won't be missed.
1/0 Gauge Cable between two batteries - This is what links two two power houses together, I chose 1/0 welding cable and 10ft was plenty to cleanly route around near the firewall to the passenger side. It also came with a few 3/8" hole lug terminals which is handy.
1/0 3/8" hole Lug terminals - Needed more of these to make all the battery and ACR connections.
1/0 5/16" hole Lug Terminals - Needed for the fuse connections, slightly smaller diameter poles.
Red 3/1 Heat Shrink - This is the good stuff with the glue inside big enough for the 1/0 cable.
Black 3/1 Heat Shrink - Same thing just for the ground sides.
2x Fastronix MEGA/AMG 250a Fuse - Probably the most overlooked item in a dual battery system are the safety components. Ideally you would fuse EVERY connection as close to the power source as possible to never create a live wire in the case of a short. In a dual battery setup this means adding one of these in the big 1/0 cable really close to BOTH batteries, utilizing the 5/16" hole lug terminals. These cover with rubber boot covers, fuses, and are easy to mount anywhere.
Lastly I'll cover the parts to the Aux power ports/Power distribution block/Fuse panel routed to the back of the vehicle since this is more of an option as well starting from the battery connection:
Blue Sea Battery Terminal Fuse Holder- Remember how I said Fuse EVERY connection closest to the power source, can't beat this little gem. The picture is deceiving, it doesn't come with a fuse.
150a Blue Sea Battery Terminal Fuse - Mounts on the above holder. I chose 150 amp to closely coincide with the power specs on the rear power distribution panel but this could vary based on your needs as well.
120a Bussman Circuit Breaker - Technically not required since this is a non-powered end of the wire but I like that it enables a quick shut off in the back seat area with the switch to kill all accessories in one flip and offers an extra level of protection. This is also sized appropriately to the fuse panel max requirements I selected. If I over draw the fuse panel for some reason I would rather trigger the circuit breaker here that I can flip the switch on than blow the expensive fuse at the battery end.
Blue Sea fuse panel on back of drawers - This is a big option depending on what your power needs are. I power the fridge, some USB outlets, a 12v cigarette lighter style outlet, the dual voltmeter, and some small LED lights off this so it is severely under utilized BUT I have room to expand later on.
4ga Cable Red/Black - The red runs between the 150a fuse on the aux battery, back to the circuit breaker in the rear seat area. The black I ended up with a lot left over since I only used small sections of to: ground the fuse panel in the back seat area, ground the aux battery nearby it, replace the factory starting battery ground.
4ga Lug Terminals for all aux connections - These have 1/4" stud size. I had to drill one out to 5/16" to fit on the fuse block at the battery.
1/2" marine heat shrink black - Used on some of these smaller connections.
0.31" marine heat shrink black - Used on some of these smaller connections.
Simple diagram
OGE Aux battery tray install
System view from passenger side
System view on driver side with stock battery and tie down
Driver side again with AGM battery and OGE tie down
Dual volt meter in center console cold before Alt-S diode
Rear seat circuit breaker and fuse block
Super cool rear seat situation. Oh yeah, and dual battery setup. And write up. Props!


