
You are using an out of date browser. It may not display this or other websites correctly.
You should upgrade or use an alternative browser.
You should upgrade or use an alternative browser.
Bootown's Thread
- Thread starter bootown
- Start date


bootown
Member
Grille Removal
Use this guide at your own risk and double-check everything - procedure and specifications. The factory service manual can be a great help.
Tools & Supplies – you may not need everything listed:
- Flathead screwdriver
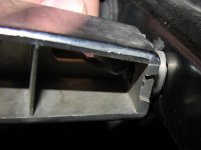
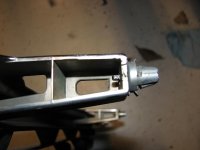
Releasing the clips. You can push the clip down from above but it is much more effective to come in from the side. There is a little black tab that sticks out and all you have to do is push it down with a screwdriver while pulling the grille away from the vehicle.

I am right-handed and so I start with the upper left clip. Come in from the side with your flathead screwdriver and push down the tab while pulling the grille outwards with your left hand.

It may seem like you didn’t fully release this clip and that’s O.K. Move over to the next upper clip just to the right and do the same thing. If you really released both clips the grille should pull out just slightly. Mess with those two clips until it seems like they released.
Once those are free release the last two on along the top. Now it should be pretty easy to reach the lower three clips.
Use this guide at your own risk and double-check everything - procedure and specifications. The factory service manual can be a great help.
Tools & Supplies – you may not need everything listed:
- Flathead screwdriver
Releasing the clips. You can push the clip down from above but it is much more effective to come in from the side. There is a little black tab that sticks out and all you have to do is push it down with a screwdriver while pulling the grille away from the vehicle.
I am right-handed and so I start with the upper left clip. Come in from the side with your flathead screwdriver and push down the tab while pulling the grille outwards with your left hand.
It may seem like you didn’t fully release this clip and that’s O.K. Move over to the next upper clip just to the right and do the same thing. If you really released both clips the grille should pull out just slightly. Mess with those two clips until it seems like they released.
Once those are free release the last two on along the top. Now it should be pretty easy to reach the lower three clips.
Attachments
Last edited:
bootown
Member
Radiator replacement
Use this guide at your own risk and double-check everything - procedure and specifications. The factory service manual can be a great help.
Tools & Supplies – you may not need everything listed:
- Factory Service Manual - Components diagram - Removal instructions
- Radiator
- Flathead screwdriver
- Toyota Red Coolant (Not the premixed stuff, I used slightly over 1 gallon)
- Distilled Water (I used steam distilled water, slightly over 1 gallon)
- Vice grips / Pliers
- Ratchet
- Ratchet extensions
- Torque wrench
- 10, 12, 14mm sockets
- Funnel
- 5/16" inside diameter tubing
1) Put your pets inside. Animals are attracted to ethylene glycol (your coolant) and will want to lick it up. A very small amount of coolant can kill an animal. If your pet does lick up any coolant you need to go to a veterinarian immediately and if you just drained your coolant you hopefully have an extra vehicle on hand. Don’t take any chances. If you are worried about the coolant in your vehicle you can use propylene glycol coolant. Toyota only recommends ethylene and I personally do not know how PG will affect your Toyota. PG is harder to find but can be special ordered at an auto parts store.
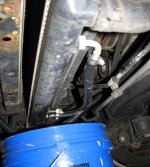
2) Disconnect your transmission cooler lines (if you still have them connected) and let the ATF drain. I had already bypassed the radiator as you can see.

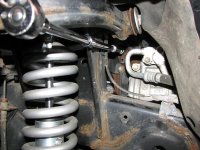
3) Remove two clips holding the front passenger wheel well splash guard in place. Now look through the wheel well to the engine and you can see the engine drain plug (5VZ-FE). Slide your 5/16" tubing over the drain and run it down to your bucket. With about 18" of extension bars and a 14mm socket you can reach the drain plug bolt located just above the drain. Loosen that up until you see coolant flowing through the tubing. If the socket is slipping off the bolt head push the extension bars up against the underside of the upper control arm. That's probably the straightest shot at the bolt head. This shows the tubing already in place and the bolt you need to loosen directly above

4) Spin the stopcock on the radiator and let the coolant flow into a bucket that can hold at least a few gallons.
5) Remove the grille
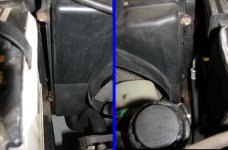
6) Remove the 4 bolts holding the fan shroud in place. Ratchet and 10 mm socket

7) Disconnect the line going to the radiator reservoir. See step 12 for picture
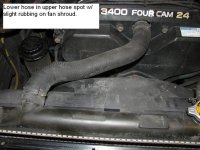
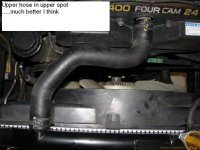
8) Completely disconnect the upper radiator hose (from the radiator and engine). Vice grips are great here or use a pliers. Squeeze the clips and slide them back. My mechanic put my hoses in the wrong spot and backwards when he did the timing belt. I think I have it right in step 14.

9) Completely disconnect the lower radiator hose (from the radiator and engine). Some coolant came out once disconnected from the radiator so have your bucket ready. Stuff a towel/cloth into the engine where the lower hose was connected. Coolant was slowly leaking out of there while I was working.
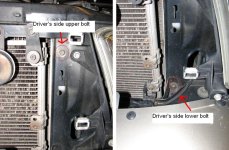
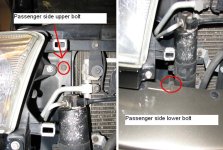
10) Remove the 4 bolts holding the radiator in place.


11) Remove the radiator and tip it over your bucket to get out any remaining coolant
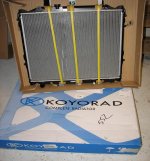
12) Install the new radiator. I bought mine on Amazon.com found here. Manufacturer listed was TYC but they shipped me a Koyo radiator. There is a tab near the top on each side of the radiator (just below the upper mounting bolts). These tabs will hook into the frame and hold the radiator in place while you put your four bolts back in. Tighten down the four bolts to 8.7ft/lbs

13) You might as well clean out the radiator reservoir (in front of the battery). Remove the bracket holding the battery in place (12mm socket). Then all you have to do is lift the reservoir directly up. Mine was locked into place pretty good and took some force to pop loose. Clean out the reservoir and also shoot some water through the hose line going from the radiator to the reservoir.

14) Put the reservoir back into place, hook the reservoir, atf, and coolant hoses back up. Bolt the fan shroud back into place (couldn’t find a torque spec on those). Put the grille back on.


15) A little over 2 gallons drained out of the old radiator. I went with a 50/50 water/coolant mix. Don’t pour too fast otherwise it will just spill over.
16) Start up the car (radiator cap off) and check for any leaks. Also watch the coolant level drop in the radiator. I added more of the leftover water while the car was running. After the level stops dropping and the radiator is full, turn off the car and then add 50/50 water/coolant to the radiator reservoir. Put the radiator cap back on. At this point everything should be back together unless I forgot something here.
17) After driving around recheck your reservoir and add more water/coolant if needed.
18) Put your old coolant into some closed containers and dispose of at a recycle center. Earth911.com
Use this guide at your own risk and double-check everything - procedure and specifications. The factory service manual can be a great help.
Tools & Supplies – you may not need everything listed:
- Factory Service Manual - Components diagram - Removal instructions
- Radiator
- Flathead screwdriver
- Toyota Red Coolant (Not the premixed stuff, I used slightly over 1 gallon)
- Distilled Water (I used steam distilled water, slightly over 1 gallon)
- Vice grips / Pliers
- Ratchet
- Ratchet extensions
- Torque wrench
- 10, 12, 14mm sockets
- Funnel
- 5/16" inside diameter tubing
1) Put your pets inside. Animals are attracted to ethylene glycol (your coolant) and will want to lick it up. A very small amount of coolant can kill an animal. If your pet does lick up any coolant you need to go to a veterinarian immediately and if you just drained your coolant you hopefully have an extra vehicle on hand. Don’t take any chances. If you are worried about the coolant in your vehicle you can use propylene glycol coolant. Toyota only recommends ethylene and I personally do not know how PG will affect your Toyota. PG is harder to find but can be special ordered at an auto parts store.
2) Disconnect your transmission cooler lines (if you still have them connected) and let the ATF drain. I had already bypassed the radiator as you can see.
3) Remove two clips holding the front passenger wheel well splash guard in place. Now look through the wheel well to the engine and you can see the engine drain plug (5VZ-FE). Slide your 5/16" tubing over the drain and run it down to your bucket. With about 18" of extension bars and a 14mm socket you can reach the drain plug bolt located just above the drain. Loosen that up until you see coolant flowing through the tubing. If the socket is slipping off the bolt head push the extension bars up against the underside of the upper control arm. That's probably the straightest shot at the bolt head. This shows the tubing already in place and the bolt you need to loosen directly above
4) Spin the stopcock on the radiator and let the coolant flow into a bucket that can hold at least a few gallons.
5) Remove the grille
6) Remove the 4 bolts holding the fan shroud in place. Ratchet and 10 mm socket
7) Disconnect the line going to the radiator reservoir. See step 12 for picture
8) Completely disconnect the upper radiator hose (from the radiator and engine). Vice grips are great here or use a pliers. Squeeze the clips and slide them back. My mechanic put my hoses in the wrong spot and backwards when he did the timing belt. I think I have it right in step 14.
9) Completely disconnect the lower radiator hose (from the radiator and engine). Some coolant came out once disconnected from the radiator so have your bucket ready. Stuff a towel/cloth into the engine where the lower hose was connected. Coolant was slowly leaking out of there while I was working.
10) Remove the 4 bolts holding the radiator in place.
11) Remove the radiator and tip it over your bucket to get out any remaining coolant
12) Install the new radiator. I bought mine on Amazon.com found here. Manufacturer listed was TYC but they shipped me a Koyo radiator. There is a tab near the top on each side of the radiator (just below the upper mounting bolts). These tabs will hook into the frame and hold the radiator in place while you put your four bolts back in. Tighten down the four bolts to 8.7ft/lbs
13) You might as well clean out the radiator reservoir (in front of the battery). Remove the bracket holding the battery in place (12mm socket). Then all you have to do is lift the reservoir directly up. Mine was locked into place pretty good and took some force to pop loose. Clean out the reservoir and also shoot some water through the hose line going from the radiator to the reservoir.
14) Put the reservoir back into place, hook the reservoir, atf, and coolant hoses back up. Bolt the fan shroud back into place (couldn’t find a torque spec on those). Put the grille back on.
15) A little over 2 gallons drained out of the old radiator. I went with a 50/50 water/coolant mix. Don’t pour too fast otherwise it will just spill over.
16) Start up the car (radiator cap off) and check for any leaks. Also watch the coolant level drop in the radiator. I added more of the leftover water while the car was running. After the level stops dropping and the radiator is full, turn off the car and then add 50/50 water/coolant to the radiator reservoir. Put the radiator cap back on. At this point everything should be back together unless I forgot something here.
17) After driving around recheck your reservoir and add more water/coolant if needed.
18) Put your old coolant into some closed containers and dispose of at a recycle center. Earth911.com
Attachments
-
 01 Transmission Lines.jpg60.6 KB · Views: 128
 -
 02 Drain Block.jpg76 KB · Views: 126
 -
 03 Fan Shroud.jpg50.5 KB · Views: 119
 -
 04 Upper Hose 1.jpg69 KB · Views: 125
 -
 04 Upper Hose 2.jpg52.2 KB · Views: 132
 -
 06 Radiator Bolts 1.jpg102.7 KB · Views: 128
 -
 06 Radiator Bolts 2.jpg87 KB · Views: 122
 -
 07 New Radiator.jpg52.5 KB · Views: 124
Last edited:
bootown
Member
Front Bumper Removal
Use this guide at your own risk and double-check everything - procedure and specifications. The factory service manual can be a great help.
Tools & Supplies – you may not need everything listed:
Factory Service Manual - Components diagram
- Ratchet
- Ratchet extension
- 12 or 13mm sockets (can’t remember which)
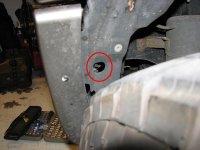
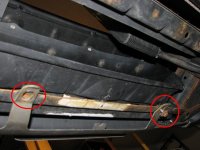
1) Remove a nut from each wheel well. You will need a deep socket and extension.

2) Remove the 2 bolts at the bottom of the bumper

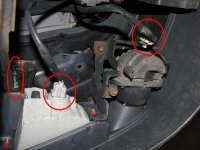
3) Disconnect your blinker and fog light connections and remove the 2 nuts on each side of the bumper above the blinker lights

5) Remove bumper
6) When you put the bumper back on make sure that the studs for the wheel well nuts are lined up correctly. You can get the 4 studs above the blinkers in place yet have the wheel well studs out of place. If the bumper has a big space between it and the fender that's where you went wrong.
Use this guide at your own risk and double-check everything - procedure and specifications. The factory service manual can be a great help.
Tools & Supplies – you may not need everything listed:
Factory Service Manual - Components diagram
- Ratchet
- Ratchet extension
- 12 or 13mm sockets (can’t remember which)
1) Remove a nut from each wheel well. You will need a deep socket and extension.
2) Remove the 2 bolts at the bottom of the bumper
3) Disconnect your blinker and fog light connections and remove the 2 nuts on each side of the bumper above the blinker lights
5) Remove bumper
6) When you put the bumper back on make sure that the studs for the wheel well nuts are lined up correctly. You can get the 4 studs above the blinkers in place yet have the wheel well studs out of place. If the bumper has a big space between it and the fender that's where you went wrong.
Attachments
Last edited:
bootown
Member
Gauge Cluster
Use this guide at your own risk and double-check everything - procedure and specifications. The factory service manual can be a great help.
Tools & Supplies – you may not need everything listed:
- Factory Service Manual – download here
- Ratchet
- Ratchet extension
- 10mm socket
- Phillips screwdriver
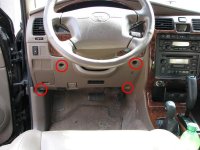
1) Remove the 4 bolts on the lower finish panel and let the panel hang

2) Pop out your rear/center differential lock button if you have one and disconnect the electrical connection in the back. Disconnect the connection for the interior light dimmer also.

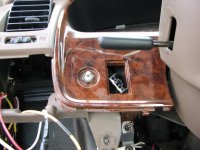
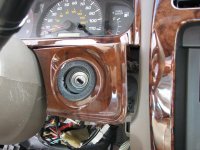
3) Pull the ignition key bezel out. There may be a screw there but I can’t remember

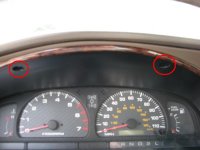
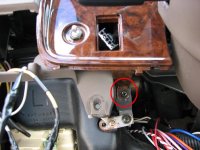
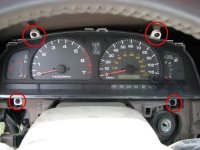
4) Remove the screw that was behind the ignition bezel, another one to the left of the steering wheel and the two above the gauge cluster.


5) Remove the 4 screws holding the gauge cluster in place

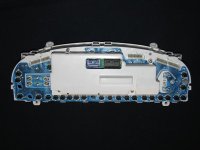
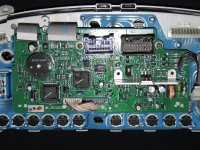
6) Start pulling out the electrical connections going into the back of the gauge cluster. Now you can remove the whole thing and change burned out bulbs, switch to leds, etc.


Use this guide at your own risk and double-check everything - procedure and specifications. The factory service manual can be a great help.
Tools & Supplies – you may not need everything listed:
- Factory Service Manual – download here
- Ratchet
- Ratchet extension
- 10mm socket
- Phillips screwdriver
1) Remove the 4 bolts on the lower finish panel and let the panel hang
2) Pop out your rear/center differential lock button if you have one and disconnect the electrical connection in the back. Disconnect the connection for the interior light dimmer also.
3) Pull the ignition key bezel out. There may be a screw there but I can’t remember
4) Remove the screw that was behind the ignition bezel, another one to the left of the steering wheel and the two above the gauge cluster.
5) Remove the 4 screws holding the gauge cluster in place
6) Start pulling out the electrical connections going into the back of the gauge cluster. Now you can remove the whole thing and change burned out bulbs, switch to leds, etc.
Attachments
Last edited:
bootown
Member
2002 LED Interior Light List
Shifter: 74
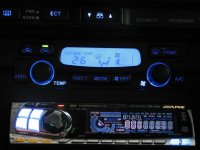
Digital Climate Control: 2 - neowedge type A (3mm), 2 - type B (4mm)
Defrost/ECT: neowedge type A
Rear window: neowedge type A
Ash Tray: 74
Key Ring: 74
Map Lights: 2 - Ba9
Domes: 2 - Festoons
Glove box: 74
Vanity: 2 - 31mm fuse bulb
Not positive on the following but pretty sure:
Gauge Illumination: 3 - 24's
4WD: 3 - neowedge Type B
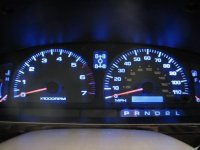
All other gauge lights: 74's
Blinkers: 2 - 74
A note on the digital climate control: There are one (probably two) lights that I didn't try to get to. They are soldered. One light is the fresh/recycle air button and I believe there is another similar button on the upper right.
Power window, security, passenger seatbelt lights are all soldered.


Shifter: 74
Digital Climate Control: 2 - neowedge type A (3mm), 2 - type B (4mm)
Defrost/ECT: neowedge type A
Rear window: neowedge type A
Ash Tray: 74
Key Ring: 74
Map Lights: 2 - Ba9
Domes: 2 - Festoons
Glove box: 74
Vanity: 2 - 31mm fuse bulb
Not positive on the following but pretty sure:
Gauge Illumination: 3 - 24's
4WD: 3 - neowedge Type B
All other gauge lights: 74's
Blinkers: 2 - 74
A note on the digital climate control: There are one (probably two) lights that I didn't try to get to. They are soldered. One light is the fresh/recycle air button and I believe there is another similar button on the upper right.
Power window, security, passenger seatbelt lights are all soldered.
Attachments
Last edited:

BrianSD_42
New member
You Sir have good taste in head units.
I am rocking a Alpine-9835. These classic Alpines are better than 90% of the consumer head units out there today.
:beer:
I am rocking a Alpine-9835. These classic Alpines are better than 90% of the consumer head units out there today.
:beer:
BrianSD_42
New member
Love the thread man. Some of your older pics have been taken down. I don't like photobucket because they always do this type of BS.
Have you ever tried ImageShack.us ?
Have you ever tried ImageShack.us ?
bootown
Member
You Sir have good taste in head units.
I am rocking a Alpine-9835. These classic Alpines are better than 90% of the consumer head units out there today.
:beer:
Thanks and no kidding. I bought a brand new Alpine (for the other 4runner) a couple months ago that sounded like crap and the user interface was unbearable...also kept freezing up my ipod. Returned it. Glad I take care of my stuff. I think I bought this one in 2005...still rocks.
bootown
Member
Love the thread man. Some of your older pics have been taken down. I don't like photobucket because they always do this type of BS.
Have you ever tried ImageShack.us ?
Photobucket changed their privacy policy so I closed the account. Looked into imageshack but wasn't sure about that site. I think they had 100MB limit and the first write-up I uploaded was 13MB of photos. Went back to photobucket. Trying to find all the pictures now. Think I'm only missing a few on the second page at this point.
bootown
Member
Thanks for saving me some headaches removing those grille clips the next time...I knew there had to be a better way around it.
Glad I can help out the 4Runner I'm most jealous of

http://www.toyota-4runner.org/general-discussions/112074-t4rotm-april-nominations.html

blcktpgsr
New member
Glad I can help out the 4Runner I'm most jealous of
http://www.toyota-4runner.org/general-discussions/112074-t4rotm-april-nominations.html
lol........oh yah also almost forgot to say thanks for the mention. So Thanks man.
bootown
Member
Fender Removal
Use this guide at your own risk and double-check everything - procedure and specifications. The factory service manual can be a great help.
Tools & Supplies – you may not need everything listed:
- Sorry, no list on this one. Took these pictures a long time ago and I am just going by memory.
I’ll try to get up some more pictures sometime in the future
1) Remove grille, front bumper, running board, and headlight filler. If you are doing the passenger side remove the antenna nut and collar too.
2) Remove splash guard clips. Some you can access from the engine bay and push out through the fender. There is at least 1 closer to the cabin that you might as well break.

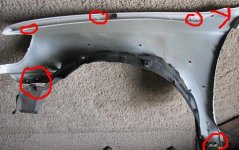
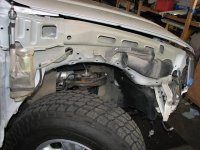
3) Remove bolts. Most, if not all, are located where the circles are in the picture below.
- 3 bolts along the top of the fender
- 1 that was hidden behind the headlight filler (not pictured)
- 1 or two somewhere down and to the left of the headlight filler bolt
- 2 that were hidden behind the running board (good luck not breaking those)
- 1 below the side mirror (you can see it if you open the front door) Special note: The tab that this bolt goes into wants to rub up against the front door when you pull it off. Wrap that area of the front door with blue painter’s tape and then duct tape over that to be safe. I also put some tape over the lower outside corner of the headlight too.


4) Carefully remove the fender
Use this guide at your own risk and double-check everything - procedure and specifications. The factory service manual can be a great help.
Tools & Supplies – you may not need everything listed:
- Sorry, no list on this one. Took these pictures a long time ago and I am just going by memory.
I’ll try to get up some more pictures sometime in the future
1) Remove grille, front bumper, running board, and headlight filler. If you are doing the passenger side remove the antenna nut and collar too.
2) Remove splash guard clips. Some you can access from the engine bay and push out through the fender. There is at least 1 closer to the cabin that you might as well break.
3) Remove bolts. Most, if not all, are located where the circles are in the picture below.
- 3 bolts along the top of the fender
- 1 that was hidden behind the headlight filler (not pictured)
- 1 or two somewhere down and to the left of the headlight filler bolt
- 2 that were hidden behind the running board (good luck not breaking those)
- 1 below the side mirror (you can see it if you open the front door) Special note: The tab that this bolt goes into wants to rub up against the front door when you pull it off. Wrap that area of the front door with blue painter’s tape and then duct tape over that to be safe. I also put some tape over the lower outside corner of the headlight too.
4) Carefully remove the fender
Attachments
Last edited:
bootown
Member
Coolant “Flush”
Use this guide at your own risk and double-check everything - procedure and specifications. The factory service manual can be a great help.
This is not a real coolant flush but it’s good enough for me.
Tools & Supplies – you may not need everything listed:
- Coolant (if you get premixed stuff just remember not to add water)
- Distilled Water (at least 6 gallons)
- Ratchet
- Ratchet extensions
- 10, 12mm sockets
- Funnel
- 5/16” inside diameter tubing
- 5 gallon bucket
1) Put your pets inside. Animals are attracted to ethylene glycol (your coolant) and will want to lick it up. A very small amount of coolant can kill an animal. If your pet does lick up any coolant you need to go to a veterinarian immediately and if you just drained your coolant you hopefully have an extra vehicle on hand. Don’t take any chances. If you are worried about the coolant in your vehicle you can use propylene glycol coolant. Toyota only recommends ethylene and I personally do not know how PG will affect your Toyota. PG is harder to find but can be special ordered at an auto parts store.
Edit - forgot a step. Remove your skid plates. There are 9 bolts to remove.
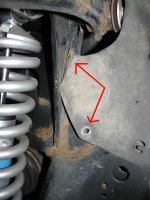
2) Remove 2 clips from the passenger side wheel well splash guard so you can access the engine drain.

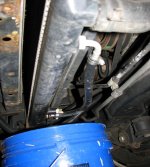
3) Directly through the opening is the drain. Slip your 5/16” I.D. tubing over the drain hole and down to a 5 gallon bucket. Place the bucket right under the radiator stopcock.
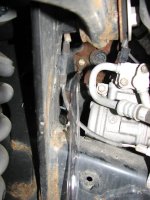
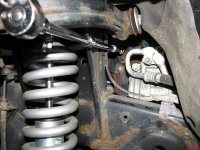
4) Use a 12mm deep socket, about 18” of extension bars and a ratchet to loosen up the drain bolt. If your socket is slipping off make sure the extensions are pretty much pushed up against the underside of the upper control arm to give you the best angle. Loosen the bolt until coolant flows through the tubing (tubing is not in place in this picture). Another option is to skip to step 5 first and the reservoir will drain itself through the radiator. Once the reservoir has been sucked dry, open up the engine drain in addition to the radiator drain.

5) Spin the stopcock on the radiator and let the coolant flow into your bucket (now both drains are open at the same time).
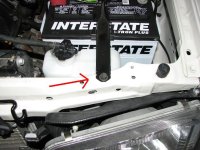
6) Time to clean out the coolant reservoir (in front of the battery). Remove the bracket holding the battery in place (12mm socket).

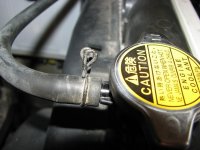
7) Disconnect the hose attaching the reservoir to the radiator. Now pull the reservoir directly up and out. May take some force. Clean out the reservoir.

8) The coolant is probably finished draining out. Reinstall the coolant reservoir. Hook the reservoir hose back up to the radiator. Close the radiator stopcock. Tighten the engine drain bolt but leave your 5/16” tubing in place for now.
9) Remove radiator cap. Fill the radiator with distilled water (about 2 gallons). Leave the radiator cap off and fire up the engine. Turn the heater on hot and high, including the rear heater if so equipped. The level in the radiator will drop so top off if you want. Let the engine run for 5 minutes or so. Turn off the engine.
10) Probably let the engine cool for a while so you’re not draining out really hot water. Open both drain plugs again and drain all the coolant. Close the drain plugs.
11) Repeat steps 9 and 10 one more time. What drained out after the second water fill/drain was a very, very light pink. One more water fill would have been good but I felt it was good enough. Keep doing steps 8 & 9 until the water looks good enough for you.
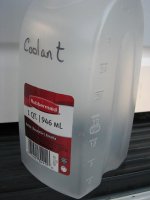
12) The coolant capacity is 9.5 quarts with the rear heater, 8.5 quarts w/o rear heat. I went with a 50/50 water/coolant mix. Add 1 gallon of coolant to the radiator. Add almost 1 gallon of distilled water to top off the radiator. The reservoir takes about 24 ounces to go from empty to F. I used a 1 quart container to make a small 50/50 mix to fill the reservoir. Fill the reservoir to the F line. Now mix up a quart of 50/50 to have on standby. I like this container made by Rubbermaid that has markings every 4 ounces for easy mixing.

13) Start up the car (radiator cap off) and check for any leaks. Also watch the coolant level drop in the radiator. Took me almost exactly 1 quart of the coolant/water to top off the radiator after starting the engine. Put the radiator cap back on. At this point everything should be back together unless I forgot something here.
14) After driving around recheck your reservoir and add more water/coolant if needed.
15) Put your old coolant into some closed containers and dispose of at a recycle center. Earth911.com
Use this guide at your own risk and double-check everything - procedure and specifications. The factory service manual can be a great help.
This is not a real coolant flush but it’s good enough for me.
Tools & Supplies – you may not need everything listed:
- Coolant (if you get premixed stuff just remember not to add water)
- Distilled Water (at least 6 gallons)
- Ratchet
- Ratchet extensions
- 10, 12mm sockets
- Funnel
- 5/16” inside diameter tubing
- 5 gallon bucket
1) Put your pets inside. Animals are attracted to ethylene glycol (your coolant) and will want to lick it up. A very small amount of coolant can kill an animal. If your pet does lick up any coolant you need to go to a veterinarian immediately and if you just drained your coolant you hopefully have an extra vehicle on hand. Don’t take any chances. If you are worried about the coolant in your vehicle you can use propylene glycol coolant. Toyota only recommends ethylene and I personally do not know how PG will affect your Toyota. PG is harder to find but can be special ordered at an auto parts store.
Edit - forgot a step. Remove your skid plates. There are 9 bolts to remove.
2) Remove 2 clips from the passenger side wheel well splash guard so you can access the engine drain.
3) Directly through the opening is the drain. Slip your 5/16” I.D. tubing over the drain hole and down to a 5 gallon bucket. Place the bucket right under the radiator stopcock.
4) Use a 12mm deep socket, about 18” of extension bars and a ratchet to loosen up the drain bolt. If your socket is slipping off make sure the extensions are pretty much pushed up against the underside of the upper control arm to give you the best angle. Loosen the bolt until coolant flows through the tubing (tubing is not in place in this picture). Another option is to skip to step 5 first and the reservoir will drain itself through the radiator. Once the reservoir has been sucked dry, open up the engine drain in addition to the radiator drain.
5) Spin the stopcock on the radiator and let the coolant flow into your bucket (now both drains are open at the same time).
6) Time to clean out the coolant reservoir (in front of the battery). Remove the bracket holding the battery in place (12mm socket).
7) Disconnect the hose attaching the reservoir to the radiator. Now pull the reservoir directly up and out. May take some force. Clean out the reservoir.
8) The coolant is probably finished draining out. Reinstall the coolant reservoir. Hook the reservoir hose back up to the radiator. Close the radiator stopcock. Tighten the engine drain bolt but leave your 5/16” tubing in place for now.
9) Remove radiator cap. Fill the radiator with distilled water (about 2 gallons). Leave the radiator cap off and fire up the engine. Turn the heater on hot and high, including the rear heater if so equipped. The level in the radiator will drop so top off if you want. Let the engine run for 5 minutes or so. Turn off the engine.
10) Probably let the engine cool for a while so you’re not draining out really hot water. Open both drain plugs again and drain all the coolant. Close the drain plugs.
11) Repeat steps 9 and 10 one more time. What drained out after the second water fill/drain was a very, very light pink. One more water fill would have been good but I felt it was good enough. Keep doing steps 8 & 9 until the water looks good enough for you.
12) The coolant capacity is 9.5 quarts with the rear heater, 8.5 quarts w/o rear heat. I went with a 50/50 water/coolant mix. Add 1 gallon of coolant to the radiator. Add almost 1 gallon of distilled water to top off the radiator. The reservoir takes about 24 ounces to go from empty to F. I used a 1 quart container to make a small 50/50 mix to fill the reservoir. Fill the reservoir to the F line. Now mix up a quart of 50/50 to have on standby. I like this container made by Rubbermaid that has markings every 4 ounces for easy mixing.
13) Start up the car (radiator cap off) and check for any leaks. Also watch the coolant level drop in the radiator. Took me almost exactly 1 quart of the coolant/water to top off the radiator after starting the engine. Put the radiator cap back on. At this point everything should be back together unless I forgot something here.
14) After driving around recheck your reservoir and add more water/coolant if needed.
15) Put your old coolant into some closed containers and dispose of at a recycle center. Earth911.com
Attachments
Last edited:

PitbullRescuer
New member
Great looking 4Runners and very well written how to's. Good work.
bootown
Member
You can remove the cap earlier in the process like you said, but the coolant in the reservoir won't get pulled into the radiator while that's draining. If you leave the cap on, the reservoir will empty itself out through the radiator. Either way works fine, just comes down to personal preference.

TheDurk
Elite Member
You can remove the cap earlier in the process like you said, but the coolant in the reservoir won't get pulled into the radiator while that's draining. If you leave the cap on, the reservoir will empty itself out through the radiator. Either way works fine, just comes down to personal preference.
Honestly, I didn't know that trick. But in your write-up as it stands the cap is never removed. The only reference is where you say to 'leave the cap off' in Step 9. At least, I've read it twice and that's all I saw. Is that what you meant? If it is supposed to stay on until then, I think you should state that earlier on just to be clear.
Last edited:

fightman80
New member
Great Thread! I vote for it to be stickied! 
Similar threads

- Replies
- 0
- Views
- 4K
- Replies
- 4
- Views
- 709

- Replies
- 2
- Views
- 3K

- Replies
- 2
- Views
- 2K


- Replies
- 0
- Views
- 3K


