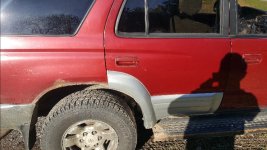
Brillos Builds

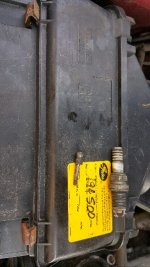
This is the spark plug that broke the electrode at 215K. It was misfiring when I first bought Tetanus 1 several years ago. Its also why they should be replaced as a section of that electrode is stuck in the piston of the cylinder its in.
 

Attachments

  • Tetanus 1 spark plug_RS.jpg
    Tetanus 1 spark plug_RS.jpg
    59.4 KB · Views: 1,271
Pulled the bumper and built the back fender bracket. Removed the driver side fender and while I had it off I wire wheeled the inner fender and painted it with rustoleum. Looking better . :) Hoping to install tommorrow and get the passenger side done :)
1fca3771d0ef3c3a3d44cdc55d4cd18c.jpg
9487374c49415a9f210ec24f2f9eec9f.jpg
29bcf9041a912bb839b782cc498c241d.jpg
3b50cace981e0ed7e586d47b087c08d3.jpg


Sent from my SM-J337V using Tapatalk
 
Pulled the bumper and built the back fender bracket. Removed the driver side fender and while I had it off I wire wheeled the inner fender and painted it with rustoleum. Looking better . :) Hoping to install tommorrow and get the passenger side done :)
1fca3771d0ef3c3a3d44cdc55d4cd18c.jpg
9487374c49415a9f210ec24f2f9eec9f.jpg
29bcf9041a912bb839b782cc498c241d.jpg
3b50cace981e0ed7e586d47b087c08d3.jpg


Sent from my SM-J337V using Tapatalk
You are one dedicated dude, must sleep in that garage.
Been following you along on your journey of removing the rusty bits and replacing with good clean metal.
You certainly seem to enjoy the work. I like to check in and watch your progress as i’m sure others do as well.
Keep it up, nice job:thumb3:
 
You are one dedicated dude, must sleep in that garage.
Been following you along on your journey of removing the rusty bits and replacing with good clean metal.
You certainly seem to enjoy the work. I like to check in and watch your progress as i’m sure others do as well.
Keep it up, nice job:thumb3:

Thanks Sarki. I am just documenting so other users can do the same thing if they choose to. With the Replacement fenders project in the rust built. 4 bolts may give you grief and snap. The 2 under the fender and the 2 in the front side of the fender as they both are way too close to the wheel and rust just can really seize them up

On the Front bumper if never removed in the rust belt. Your 2 corner nuts will be seized and probably going to have to buy new brackets. I have had mine off several times in the last few years and its under fluid film so it comes right off.

The homemade bracket was made out of half of a 2 x2 square tube i just cut in half and to fit. I tacked to hold in place and marked so I could drill and weld nut in the inside. Once I had the nut welded on I painted and welded the bracket into place. So now i have my 2 bottom holes back for my fender to be held in place. :-)
 
Well I did had to drill and retap 4 bolts but I got her back together. The passenger side I welded the bottom nuts to the metal I had there then bondo over top. How did the fenders turn out?

This is an sr5 with the limited cladding and doors. I wanted to switch it because my fenders were done and my rear fender wells were rebuilt. I even rebuilt the lower back fenders last winter. I show the photos of that project in a few days. :D
dfeefb950e9b730c42507b5487ab3f7c.jpg
4622da251a1e108ec18b445f24e7af2a.jpg
0185c76a0e2aa73c98f852acd493e79b.jpg
3091152f1f87a5c67a1e93acef615f37.jpg
2cac5c8c76a2f74fc79d428487bf7a2b.jpg


Sent from my SM-J337V using Tapatalk
 
Well I got the front drivers side how I wanted it and gave her a coat of paint. Not too bad. I suspect it will look better after the 2nd coat. I see a little bit a puddy dust was still there. No biggie though. Keep in mind that paint was brushed on too..;)
d15e2780bcb5ecd1119629cf472750e4.jpg


Sent from my SM-J337V using Tapatalk
 
Last edited:
this thread makes me want to go out and buy a nice welder and start resurrecting 3rd gens, mine could use some work on the rockers too but I don't think my old stick welder is up to the task
 
this thread makes me want to go out and buy a nice welder and start resurrecting 3rd gens, mine could use some work on the rockers too but I don't think my old stick welder is up to the task

Well, I wasn't very good with the stick welders and I have one the corner. I seem to do better with the mig and gas welding. The 20 gauge steel isn't easy to weld because of its thickness. I mostly do a drill and fill on it but you can weld it too. Its more practice makes perfect skill anyhow. I have outgrown mine 110volt mig welder but I just cant pull the trigger on a Lincoln 210mp for its replacement.

Its my hobby. I rebuild 3rd gen 4 runners. We have a pile of great build threads on here and the users did great jobs with their rigs. I just didn't see any threads dealing with complete frame restorations and rusted chassis repairs. We did have many frame rot threads but none focusing on plating the inside of the frames instead of the outside. So Being a pile of us live in the rust belt. I figured that is what I would make my builds about...:D
 
Well January of this year, I had to replace my bumper and repair my rear fender wells on Tetanus 1. The bumper was done from the rust belt and my driver side rear behind the wheel well was getting holy for the PA chrome. I swapped my door first then removed the Sr5 fender strip on the passenger side.
 

Attachments

  • 1998_Toyota_4_Runner_PS_Rear_Door _Swap_RS.jpg
    1998_Toyota_4_Runner_PS_Rear_Door _Swap_RS.jpg
    113.2 KB · Views: 1,125
What are you using for replacement bumpers? My rear bumper is perforated with rust and I’m not quite ready to build or buy a plate bumper, and the oem replacements even used are at least a few hundred dollars, any experience with the sub $100 replacements from eBay or rock auto?
 
What are you using for replacement bumpers? My rear bumper is perforated with rust and I’m not quite ready to build or buy a plate bumper, and the oem replacements even used are at least a few hundred dollars, any experience with the sub $100 replacements from eBay or rock auto?

Look under my profile on the Tetanus 1 picture album. That is a rock auto limited bumper and sides. you may have to tweak it a little but it was affordable. I painted the inside with gloss black Rust-Oleum and played super soaker with FF. So you can see the Rock Auto rear limited Bumpers looks like. :-)
 
Been busy with family projects the last few weeks. However, bought some new headlights for my 98 set Tetanus 1. It still had the original 2 light bulbs in it. Not bad for 21 years. Anyways this is what my low beams looked like before the change.
f6fd33f95d5f1d84c27bdb9a4f931697.jpg


Sent from my SM-J337V using Tapatalk
 
Then I changed one the passenger side with headlights from super bright LEDs.

You can see that the LED are quite a bit brighter.
bd93a3daa0129961fb29d3e1bd472665.jpg


Sent from my SM-J337V using Tapatalk
 
After I quick drive. I realized I had to adjust the headlights down so I didn't blind other drivers. So I just adjusted down and all is well. Basically just aimed them at the bottom panel which sets my headlights about 25 ft out on front of me and I made the drivers a few clicks towards the passenger light. Very pleased with the lights.

H4 LED Fanless Headlight/Fog Light Conversion Kit with Adjustable Color Temperature and Compact Heat Sink - 5,000 Lumens/Set | Super Bright LEDs

Sent from my SM-J337V using Tapatalk
 
Last edited:

Members online

No members online now.

Forum statistics

Threads
278,310
Messages
3,554,078
Members
248,016
Latest member
Advally Service

Trending content

Back
Top