>BUILD THREAD< The4kbeast's 3rd-Gen 2000 T4R SR5 (Highlander Edition) 4x4 Build

Like my build? (NOTE: 50% of the time the answer is C on multi-choice questions)


  • Total voters
    72
Rear suspension rethink, Part I

The 906s settled into a 21.5 inch measurement after about a month, which was a 2" lift from my starting point. They are just too stiff for me with the Silverado rears, especially since I usually don't have weight in the back.
04681111-7D8D-4BA8-95F4-85C78AEDA4A2-10862-00000D2057DEEDEF.jpg~original


Installed some 890s I ordered from ToyTech on Black Friday. Amazing how fast the spring swap goes now that I've done a few lifts. Hoping the 40-50 lb lighter springs are a better match to my setup.
35B50767-61D4-461E-997A-FAB192C32E47-10100-00000C1D7024F99C.jpg~original


I also modified the bump stops, and made a few ebrake line spacers for me and a few buddies. Don't do this unless you're replacing your stock bump stops on the frame:
88A2FC89-61E9-4AA3-BC49-B7F591F94A55-10862-00000D2076029190.jpg~original

BF24964D-D899-458E-AFC0-1BD8A247EE02-10862-00000D20C3209BF2.jpg~original


Here are some tips for swapping out the rear springs quickly:
- Be sure to disconnect the lateral rod x axle:
7FB09591-5CFB-4825-9C2F-034D1A7B28E9-10862-00000D20A3B24F79.jpg~original

- Disconnect the ebrake bracket or it will hold up your droop beyond when your shock extends past 21"...
25B9D1D8-BA67-49E4-8D99-9FCC26C94A08-10862-00000D20AD412C74.jpg~original

- When your rear shocks extend to 23", your rear hydraulic brake line is dangerously tensioned. When it gets to 23.5... Don't drive it without a longer line... Or it will be your limiting strap. Not. Good.
961F1796-0654-434A-AAFD-E165CDE8D170-10862-00000D20B74899F2.jpg~original


Did some other measuring. Amazing that you could run a 23.5" extended length shock and the 890 spring would still be seated. I'll take that into consideration if I ever want to swap my setup out again. That Land Cruiser setup would be ideal.
 
Last edited:
OME 906 vs versus 890

TRD double cab front
OME 906 rears:
1446503A-7151-4DB7-A85C-8972DF8E202B-5161-0000063F5BEF75C3.jpg~original


TRD double cab front
OME 890 rears:
C1CD4068-3F99-4203-B203-3DB4C6DB9D32-10862-00000D20E2958B60.jpg~original

35B50767-61D4-461E-997A-FAB192C32E47-10100-00000C1D7024F99C.jpg~original
 
Last edited:
Holy shiat. I'll admit, I don't look at 75% of the new build threads popping up. It's hard to keep up with them all with the 3rd gen 4Runner's getting older and seeing more use as a "project" or "toy". Well I'm glad I finally opened this thread up and had a read. Awesome info. and thought patterns going on here. You seem to really research your stuff and documenting it is great for others to benefit from all the time you've put in.

I LOVE my Tundra TRD/Bilstein setup. It has served me well in all kinds of environments. I wheel my truck fairly often (slow and technical), it's seen a fair amount of logging road and washboard, as well as lots of highway miles. For the money, this setup rules. Sure Icon's would have more fade resistance if I were spending days upon days trying to go fast on bumpy roads, but I don't. I also like my rubber shock bushings, no-maintenance, and the reliability.

I'm particularly interested in your bump stop information. I have not properly bump'ed my truck yet.... I'm not too concerned with the fronts as I've stuffed them very hard and the front bump stops seem to be doing their duty before shock bottoming. It's the rear I'm worried about. Have you talked to Steve about his rear bumpstop "adapters"? I think the Daystar rear bumpstops he sells are a shorter in height than the factory bumpstops. I'm wondering how much his "adapters" space them out from the frame. I make contact with the underside of my rear wheel wells upon FULL articulation and I'm trying to find the right numbers to get the bumpstops to fully engage before the tire starts to eat fender. I guess I could get out and measure but I can't find a good ramp to flex on in my town for the life of me....

Looking forward to reading your thoughts.

Cheers and now fully subscribed!
 
Tundra 5100s, bump stops, etc

Holy shiat. I'll admit, I don't look at 75% of the new build threads popping up. It's hard to keep up with them all with the 3rd gen 4Runner's getting older and seeing more use as a "project" or "toy". Well I'm glad I finally opened this thread up and had a read. Awesome info. and thought patterns going on here. You seem to really research your stuff and documenting it is great for others to benefit from all the time you've put in.

I'll have to admit the same, there are a growing number of threads on here and every time I read someone else's thread the Mrs cringes with another one of my projects. I wanted to try running a setup that was... Unconventional, or at least well thought out. There are way too many people on here that run setups without thinking of their setups globally. I learned a lot here on the forum, so I hope if nothing else other people plan out their setups, too. Thanks for the kind words. You've got yourself an epic build. In fact, my brother decided to pick up a non-flared 4R after seeing your build thread.

I LOVE my Tundra TRD/Bilstein setup. It has served me well in all kinds of environments. I wheel my truck fairly often (slow and technical), it's seen a fair amount of logging road and washboard, as well as lots of highway miles. For the money, this setup rules. Sure Icon's would have more fade resistance if I were spending days upon days trying to go fast on bumpy roads, but I don't. I also like my rubber shock bushings, no-maintenance, and the reliability.

I'd imagine the front setup works great with weight, like a plate front bumper. But I wouldn't recommend it to someone with no weight up front unless you like a firm ride. Keep in mind i have the Double Cab fronts and 99% of people here are running access cab fronts. I haven't romped it SUPER hard at high speeds yet, but the dampening definitely opens up when you hit stuff. But the small bump compliance is crap since i have no weight up front, making the slow and technical stuff rough. Rubber bushings are definitely lower tech, but lower maintenance. I'm right there with you on the emphasis on reliability. Although Icon produces some AMAZINGLY nice stuff. The guys I spoke to at SEMA knew their stuff, and raced their own rigs. It was refreshing to see.

I disconnected the front sway bar and it takes offset bumps and corners better, but the straight on bumps are still harsh. I'd like to build a system that has firm enough springs to run without sways off road with confidence, yet low enough that I'm using all of my travel. For the total one of these setups are to build, they are very affordable. The rubber bump stops would be the best low cost option, but I'm very intrigued by hydraulic jounce shocks. With all of the work I'm going to have to do to get this setup where I want it, jounce shocks are the least of my worries. I need a fast, cheap solution, which will most likely be in the form of rubbers. Lol, sounds gross.

I'm particularly interested in your bump stop information. I have not properly bump'ed my truck yet.... I'm not too concerned with the fronts as I've stuffed them very hard and the front bump stops seem to be doing their duty before shock bottoming. It's the rear I'm worried about. Have you talked to Steve about his rear bumpstop "adapters"? I think the Daystar rear bumpstops he sells are a shorter in height than the factory bumpstops. I'm wondering how much his "adapters" space them out from the frame. I make contact with the underside of my rear wheel wells upon FULL articulation and I'm trying to find the right numbers to get the bumpstops to fully engage before the tire starts to eat fender. I guess I could get out and measure but I can't find a good ramp to flex on in my town for the life of me....

Looking forward to reading your thoughts.

Cheers and now fully subscribed!

Bump stops are coming up soon on my list. For the front, I can't imagine the two small hardened rubber nubs are good for much more than avoiding metal on metal contact. I need to install a front strut with no spring some time and articulate a corner to measure the distance at which e stop bump stops come in to play. Being that the front shocks have a longer compressed length than the stock setup by just under two inches, there is danger of metal to metal bottoming... I need to run the numbers to see how the geometry works out. At the very least, it would be good to mount a bump stop on the strut shaft itself in combination with some larger rubber bump stops. It's be great to get some smaller Timbren stops for the lower arm and pick a progressive rubber rate that would help dissipate energy with the strut bump stop. Sounds like you haven't had issues yet, which is a positive sign.

I've spoken to Steve about his rear stops. From my measurements and the data on Daystars, they are the same dimensionally as our stock stops, but the thread pitch is wrong so they won't just bolt in. I read one guy just popped his bolt out and used a nylon locking nut. With a lifted suspension and longer shock body that has a longer compressed length than stock, I think he offers the best off the shelf option available that I've seen. The only draw back is that it is a generic kit. He's designed it to ensure the rear shocks he specs in his kit won't bottom out. So if it works for a long ass Land Crusher shock it should work for just about anything. I'm of the opinion that a bump stop should be designed for the vehicle it is going on. If you're buying one of Steve's kits (which are some of the best thought out budget kits I've come across), the bump stops are almost no brainer. The way they are overbuilt means they won't bend. But I'd rather do the math myself and make sure I'm getting every last inch out of the suspension setup I'm getting.

To your question thought, an off the shelf bump stop is challenging to sell to everyone since some of the mad men on here are running 35s. Being that I'm only running 32s, I won't have to take into account the rub considerations they would. That's one of the reasons I chose to start with 32s. The thought of trying to figure out how to properly stuff a 33 was too much for my mind to handle, lol. Maybe the best thing to do to inspect what max stuff looks like is to pull one of the rear springs and then set the 4R down slowly on all fours, supporting the frame on the way down little by little so you don't drop the tire on a fender. I'd recommend an adjustable lateral rod, but it looks from your build that you welded in a drop mount. If everything is centered, I'd say your next step is pulling a coil or finding a local spot you could stuff it. You know what I would do.

Thanks for tuning in. It won't always be on topic, and I can't guarantee it will always make sense, but my build will definitely test the limits for characters allowed per post! : D

 
I havent been on the forum in a long time but I did finally take the measurements I promised you a month ago...
They are hub to fender 2000 Highlander flares, Tundra 5100's Tundra access cab springs, and OME 906's with a half tank of gas, surf board wetsuit and some other junk in the car:
Front: 22" on both sides?? this really threw me off
Rear: 22" on Passanger and 22.25" on Driver
Still trying to decide what to do about the rear springs and shocks, oddly my used 906's are giving me a higher ride hight than your new ones?
Were you running the stock rubber bump stop insert thing?
I dont have a panhard bar drop or extension but the one on the truck is brand new. Also I am running "oem spec (4runner not fj80)" KYB Gas-A-Justs.
 
^Thanks for your reply!

That's interesting that Steve's Daystar bumps and adapters are the same size as our factory stops. When my truck is loaded down with camping gear and I go wheeling, I've stopped to look at the rear bump stops a couple of times under absolute MAX tire stuff. My factory bumps in the rear NEVER engage. They need to be spaced down ~1.5" (my no-measuring tape estimate). My rear tire making contact with the underside of the wheel well is definitely my limiting factor ATM. No, it's not a good thing. I've only survived this long because I don't do any of the crazy fast and jump stuff. If I did, I'm sure I would have ran into some more serious problems. I was hoping that Steve's bumpstops would get me down that extra little bit. I might just buy them, try them, and fab up a small spacer if it deems necessary.

Great... another project. hahah

PS - your brother made a good choice on the flareless... hahah:biggrin2:
 
I havent been on the forum in a long time but I did finally take the measurements I promised you a month ago...
They are hub to fender 2000 Highlander flares, Tundra 5100's Tundra access cab springs, and OME 906's with a half tank of gas, surf board wetsuit and some other junk in the car:
Front: 22" on both sides?? this really threw me off
Rear: 22" on Passanger and 22.25" on Driver
Still trying to decide what to do about the rear springs and shocks, oddly my used 906's are giving me a higher ride hight than your new ones?
Were you running the stock rubber bump stop insert thing?
I dont have a panhard bar drop or extension but the one on the truck is brand new. Also I am running "oem spec (4runner not fj80)" KYB Gas-A-Justs.

Sup Yoter, thanks for following up. those measurements match what I got out of Tundra Double Cab front springs and 906 rears with around 50 lbs in back. I am running the stock bump stop in the spring. How is the small bump compliance with your Tundra access cab fronts? I'm trying some of the OEM Tokico LC80 rear shocks next, will be here Friday. Won't work with your 906s due to their shorter length...

^Thanks for your reply!

That's interesting that Steve's Daystar bumps and adapters are the same size as our factory stops. When my truck is loaded down with camping gear and I go wheeling, I've stopped to look at the rear bump stops a couple of times under absolute MAX tire stuff. My factory bumps in the rear NEVER engage. They need to be spaced down ~1.5" (my no-measuring tape estimate). My rear tire making contact with the underside of the wheel well is definitely my limiting factor ATM. No, it's not a good thing. I've only survived this long because I don't do any of the crazy fast and jump stuff. If I did, I'm sure I would have ran into some more serious problems. I was hoping that Steve's bumpstops would get me down that extra little bit. I might just buy them, try them, and fab up a small spacer if it deems necessary.

Great... another project. hahah

PS - your brother made a good choice on the flareless... hahah:biggrin2:

No, that wasn't what I meant. The Daystar bumps are the same dimensions as the OEM bumps, but that does NOT include Steve's adapters. I'm guessing Steve's adaptors would add at least 2" so you have enough room to sneak a bolt/nut in to mount them. More than enough for your use, allowing you to bolt it up and create ANOTHER, different project to take up your time and money.

My brothers truck is rubbish, lol. Damn lousy-awesome Icon crap!
 
Last edited:
Revisiting my rear shocks

So... I've swapped out my 906s, in favor of 890s, thinking they were what was causing my ride to be harsh out back. Turns out it is the dang Silverado rears. The compression dampening is so firm that the digressive valving won't open up. What it feels like? Like the rear rubber bump stops before I put the lift on. Except its instantly firm... not solid as a rock, but too firm for a stock weighing truck. Maybe things would be different with an aftermarket bumper, armor, and payload. Since that's not in my near future, I guess the hunt is on for replacement shocks for the rear... but first, I need to try to learn from my mistake:

I'll pull some info from a past thread to reference for:
-How Bilstein measures and rates them
-We'll check out ToyTechs valving for their rears
-See what the Silverado valving is
... and see how it compares to OEM Land Cruiser rear Tokico shocks

IN ORDER TO UNDERSTAND VALVING RATINGS, READ THESE EXAMPLES: -> FIRST # rebound | SECOND # compression. Higher #=firmer dampening, lower #=softer
> 360/80: Used on heavier trucks, industrial applications, etc
> 255/70: Highway hauling shock, or in front of truck b/c that's where the weight is. <<<<<<<<
> 170/60: Usually used in the rear.
- If not happy with valving, Bilstein can re-valve the shocks for $75 ea; takes 6 weeks
__________
__________

REAR SHOCK OPTIONS:

4Runner Bilstein HD (BE5-2451):
Compressed 322.5mm (12.7")/Extended 513mm (20.2"), Travel: 7.5"
179/79 rebound/compression
_________

ToyTec Rear shock - Is eyelet to eyelet, needs adapter.
Bilstein P/N: 0711123 33-185590 H5
255 rebound 70 compression valving Unless they're running custom valving
__________

1999 - 2006 CHEVROLET SILVERADO 1500 Base, LS, LT
24-151627 Monotube Shock Absorber, Supercedes: F4-BE5-F162-H0
Rebound 298 Compression 94
__________

I have no intention of buying the Bilstein LC shocks. The cost is too high vs OEM replacements. But I can use it as a measuring stick to see how the two vehicles relate in terms of dampening on Bilstein's scale. Besides, Sonoran swears by them over the 5100s and I'm not in need of spending 2 times the money for matching casings.

Bilstein B46-1478, Land Cruiser
1991-1997 FJ-80
Compressed 380mm (14.96") Extended 591mm (23.27")
386/54 rebound/compression

HOLY COW! Rebound dampening is stiffer. The difference between my buddy's ToyTech Billys and the Silverados is 255 vs 298. The Land Cruiser is rated at 386?! It's off the scale considering the Billy HD replacement has 179 reound dampenong. In fact, it is so far off the scale that I wonder if we're working on a difference scale than the 5100s, lol. But the interesting thing is that compression dampening goes the other direction. The HD replacements have 79 compression dampening... the ToyTech compression setup starts at 70 vs the Silverados 94... And the Cruiser is 54. That would seem to fix my compression dampening issue, but the extreme rebound dampening is way at the top of the scale Bilstein told me.

So for this setup, I'm guessing the compression will feel nice and soft, but we'll have to see if the rebound kills the deal. On paper, the loss of up travel and potential damage to the multilink arms and upper shock mount mean this setup isn't the "ideal setup" at least on paper.

Stock 1995 Toyota FZJ-80 Land Cruiser rear Tokico shock (1991-1997 FJ-80)
Compressed 14.5" Extended 23.5
Valving info?

So does all of this translate over to a different brands setup? Not at all. It definitely gives me something to think about in terms of how the different setups relate to one another. We'll find out tomorrow!
 
Last edited:
Research on Land Cruiser rear OEM Tokico setup: equipment/items to think about

Digging through archived posts from ultimateyota.com for any tribal knowledge from ownership experience with the LC80 rear shocks. Found an article referencing Rancho P/Ns (not interested) and the info I was looking at from Sonoran Steel.

Link: 4runner max extended rear shock options

On page two, there is a good quote
SNIP: "troyboy162:
I really need to get under the truck and measure if you are maxing at 14". I'm pretty sure my cone bump stops inside the coils are no longer in play but the stock frame bump is keeping the 35's just lightly rubbing in the wells with the 1" body lift. My current 13" compressed shocks are probably no factor. The Sorenson info on 14.5 max and my friends with the 14.5" GE4095 shocks are all the info I have to go off of web wheeling. I would hate to compromise much if any up travel for the sake of droop. Low center of gravity has become even more important to me after the roll lol

I'm guessing over compression during crawling will be ok, but a sharp crack in the whoops will pop one. All the guys I know running 14.5" shocks right now are all IFS crawlers on the same terrain I would be on

One thing I have noticed is guys are breaking upper links if they wheel hard with ~24" shocks. So my crusty old junk will probably need upgrades.
"

I know that the rear shock length when the rear axle engages the frame bump stops is 14", so I will need to space my bumps down AT LEAST an inch (more is ideal) so the shock length is 15" when the axle engages the bumps. I'm not happy about giving up the up travel as troyboy162 stated. I don't trust the measurements so I'll double check them before doing anything.

Probably wasn't the best idea to cut down the inner coil bump support... But it wouldn't help before the rear shock bottomed out in its travel.

Another quote:
"troyboy162:
Got the shocks in today. They are perfect dimensions. I eye balled them against a ruler and I believe the 14.5-24.7 claimed. Also found a surprize under the truck. I guess you cant expect the sway bar to live forever if you are flexing the rear end all the time."

So to run the Lc80 rear shock, you will need:
-AT LEAST an 890 for a long enough spring to stay seated and contained
-Bump stop spacer that is at least 1-2"... Might as well replace bumps stops with aftermarket at the same time since OEM are bricks by now
-Limit straps: Guys running this setup report that the last inch of travel isn't usable. A 23.5" extended shock is a bit overkill, but it does give you a nice pad to limit travel to 22.5" and install limiting straps. If you ran Tundra 5100 22.5" extended length shocks, you would still need straps and would be running right up to the limit of where usable travel is. The angles created by the 23.5" shock are also such that there is a tip hazard on offset hills... you shouldn't have to rely on your sway bar to create bind and help resist your flexing. You also may see driveshaft interference with the gas tank.
-Need to monitor the upper and lower arms, as the torsional loads put through the bushings are definitely transmitted into the chassis and links. Not ideal unless you are going to make helm links and reinforce your mount locations a la jmoney: http://www.toyota-4runner.org/3rd-gen-t4rs/86616-j-money-build-thread-12.html#post1054702

So is it worth it?
 
Last edited:
95-97 Land Cruiser (80 Series) OEM Tokico Replacement specs:

Picked up some FZJ80 rear OEM shocks to see if I could try them out without modifying my truck...
81527DE2-BED0-4EB5-92C4-B20CD7184C96-19709-000010624A996DF8.jpg~original

245447BB-7175-4E8B-8E2E-9FF2FDBA113B-19709-000010622FEB1B3C.jpg~original


95-97 Land Cruiser (80 Series) OEM Tokico Replacement specs:
Toyota Part Number: 48531-69417
Part Number on component: 48531-60430 (weird, must supersede the other?)
14.5625 compressed and 22.875 (22 7/8) extended.
8.3075" travel shock
No valving information

86F9F5AE-C547-4895-B8D7-65153B20FA61-19709-00001062397BD7C2.jpg~original


Upper mounting stud 14mm (stock is 10mm; requires no drilling, the metal bushings need some playing around). <---
Lower bushing ID 20mm on both LC80 and 4Runner

Sonoran swears by these things and says they run better than the 5100s, but it sounds like they are happier with more weight in the back of the truck then what I run with. It would require a lower bump stop (would recommend the 95-05 Blazer rear bump stop for those looking into this mod - search the site for additional information - I think the thread was something about cheap junkyard bump stops.
 
Last edited:
This is some great info and analysis! I sorely need to replace my stock suspension with something taller and smoother offroad, but I don't want to want to be swapping parts 3 or 4 times to get it right. I look forward to seeing where you go with your build!
 
I've been following the rear suspension part of your build pretty closely. I picked up some 2012 FJ Cruiser Tokiko shocks brand new from the local Toyota dealership a couple months ago for $30. I couldn't pass them up at that price! They measure 23.5" extended, but I knew from Sonoran Steel's website if they exceeded 14.5" compressed that I'd have issues. I can't find info on the compressed length, and am not sure how you figure that out without knowing the exact travel of the shock. It should be a 8-8.5" travel length I'm guessing?

I was thinking of running them with my 99 talls + a 1.5" Daystar spacer so I could keep my stock cone bumpstops and travel specs and have less chance of maxing out my shocks when compressed. I have also been concerned about the diameter of the shock end in regards to where it mounts up top and needing to drill out the mounting hole. Now that I have some info on the stock size from your last post, I have a micrometer at work that I could use to answer that question...

I also thought of running the 890's, but then it opens up a whole other can of worms with bumpstops.

Keep the info coming!
 
I've been following the rear suspension part of your build pretty closely. I picked up some 2012 FJ Cruiser Tokiko shocks brand new from the local Toyota dealership a couple months ago for $30. I couldn't pass them up at that price! They measure 23.5" extended, but I knew from Sonoran Steel's website if they exceeded 14.5" compressed that I'd have issues. I can't find info on the compressed length, and am not sure how you figure that out without knowing the exact travel of the shock. It should be a 8-8.5" travel length I'm guessing?

I was thinking of running them with my 99 talls + a 1.5" Daystar spacer so I could keep my stock cone bumpstops and travel specs and have less chance of maxing out my shocks when compressed. I have also been concerned about the diameter of the shock end in regards to where it mounts up top and needing to drill out the mounting hole. Now that I have some info on the stock size from your last post, I have a micrometer at work that I could use to answer that question...

I also thought of running the 890's, but then it opens up a whole other can of worms with bumpstops.

Keep the info coming!

Sup DesertRunner,
I'd recommend a 13.5" compressed height, not 14.5". The stock frame bump stops start working when the shock is collapsed to 14", so you need shock capacity beyond that our the rear shocks won't be protected. If you are spacing the rear bumps down at least an inch, then a 14.5" shock would be ok, just keep in mind that the bumpstop only has an inch to work with before your shock bottoms out.

I tend to not trust numbers online, even if they're from a reputable source, like Sonoran. To measure compressed height, I lean on the shock and fully compress it, then get a measurement from the ground to the upper mount. I find it is easier with a rigid yard stick then a flexible tape measure. Then, let it expand and measure from the bottom of the shock to the center of the lower bushing. Subtract this amount from your first number and you should have your compressed measurement. To get a number for total shock travel, subtract your compressed total from your extended number.
 
This is some great info and analysis! I sorely need to replace my stock suspension with something taller and smoother offroad, but I don't want to want to be swapping parts 3 or 4 times to get it right. I look forward to seeing where you go with your build!

Thanks MtnBkr! There are plenty of well sorted systems out there that are relatively inexpensive. The big question you have to ask yourself is what your mix of driving will be. I thought I had planned my build out fairly well for 90% street use, and it would have been nice if I towed more or was willing to make due with a stiffer suspension, but I've realized that I'm ok with a softer suspension on the street if it means that the ride and suspension setup will make use of all its travel off road. With the setup I had initially made, I would really have to hammer on it to get it to use its travel. Long story short, the better job you do being realistic with yourself about ow you'll use your rig, the better your chances you have of building a setup that is right the first time. I don't want to say I'm going back to the drawing board entirely, but my approach is going to change if I can't find the ride I'm looking for. It might be cheaper to get some suspension components that would allow me to rebuild and revalve.

Hmm...
 
Sonoran Steel diff drop install, Part 1

I'm way overdue for installing m diff drop. Originally, this was going to be a 2" lift that was borderline... meaning that some don't do the DD with only 2". I wanted to over my bases and play it safe. I ended up with a 2.5" lift total, so I need to sacrifice one weekend wheeling night and do the install.

I'm starting late, so I better start by hammering out the front skid mounting reinforcements. The Sonoran kit supposedly doesn't require you to space down the plate to get you CVs at a less stressful angle. I'm going to see if i can just hammer the reinforcement/mounting ribs instead of cutting the, out like a few others have done. These things are soft enough when hit without compromising their backbone.
 
Summary of day

Debadged the rear a bit, got carried away on the right side. May take 4Runner off, too. Maybe next time:
B9D9FC84-7CF1-48EA-A106-1A7F76640E03-19709-0000106251D4B0F7.jpg~original


Installed some trunk Dynamat in the drivers door, and tried to narrow down why the window motor is groaning every time I put the window down. Also checked out the tC speaker swap... And decided not to attack it today.

Installed Sonoran diff drop kit:
Hot tip - when you are going back together with the tapered spacers, be sure to go back and forth between bolts tightening so the spacers will rotate the correct way with the dots facing forward. Mine actually overtightened and started move past straight forward. If you only do one all of the way tight, you increase the chance of tightening it off axis. Installed:
37C036B2-FE91-434C-B733-DA88D8223D17-19709-0000106490CF8342.jpg~original


Should prob do a limited write up from the pics I snapped...
 
Skid plate mod to clear diff drop

Diff drop install
It's been we'll documented, but is an easy job. I'm going to cover my mod to the front OEM skid plate to clear the lower diff

The plan:
1BED1E6B-AB19-4DBA-AE2E-0B4301BC9145-19709-000010A8C418EA88.jpg~original


Rough cut:
2DB4120E-9977-43FD-B77D-A2B71194AB54-19709-00001066752D3485.jpg~original

99E97E25-BF54-41F3-A70E-417A5539C884-19709-000010667E714AF0.jpg~original


Pounding center rib, still need to grind the rough cut edge (no pic):
22809095-2132-48E6-AB37-EE5C2E04FB9E-19709-000010668548FB85.jpg~original


Finished pounding flat with ball peen hammer, cleaned prepped, and painted:
48427887-AEC9-4F08-9636-D7D09649B01D-19709-00001066C00E8A93.jpg~original

268A0FA8-5D7B-41B7-94EC-229B0115CAF2-19709-00001066CCF47907.jpg~original

121DFBA9-2FF8-4ED4-8168-BB467E491318-19709-00001066DFFD2B17.jpg~original


Completed. Very happy with the Sonoran kit versus some of the other kits I've installed. The taper on the spacer and new bolts for the skid make the difference!
4BBA6614-DBFE-450D-9F92-70596A7C9278-19709-00001066E935B8C4.jpg~original


The Toyota sticker started as an impulse job since I had a bunch of Toyota sponsorship sticker for my Starlet and Solo 2. Was thinking it would get trashed quickly and then I'd take it off. Yet, it's still there.
 
Last edited:
Radical Radflo Research

Reached out to Radflo to offer up a test vehicle to develop a system for the 3rd gens since it doesn't list it on their site. Thought I remembered someone talking about them when I was first poking around for suspension goodies, but it might have been either a Overland Warehouse thing, or eve for a 4th or 5th gen.

Regardless, I heard back, and they do offer two different setups for the third gen.

Subject: Radflo Options for 1996-2002 Toyota 4Runner?

<<SNIP>>
Jeff,
Thanks for the inquiry. We do manufacture both front coil-overs and rear shocks for the 3rd generation 4runner and have done so for many years. Unfortunately, they were not included in the initial development of our web site. The web site was created and is maintained by a third party and we are in the process of bringing that back in house so we can easily update it.
We make our coil-overs and shocks in both 2.0" and 2.5" diameters. Up front I would definitely recommend going with the 2.5" diameter shocks as they offer the best ride quality and performance. The have a larger piston and allow for more oil flow. With less weight in the rear our 2.0" shocks are a perfect upgrade from the traditional Chinese made OME twin tubes. I have listed the various part numbers and pricing below. All of these are real race style shocks that are fully re-buildable and are valved specifically for the 3rd gen.

6CT 004 00 2.5" Front Coil-Over Pair $1134.00
5CT 004 00 2.0" Front Coil-Over Pair $872.00
5ST 009 0E 2.0" Rear Shock $230.00 per shock
6ST 009 0E 2.5" Rear Shock $300.00 per shock


Please let me know if you need any other information.

18375 Bandilier Circle | Fountain Valley, CA 92708 | W: Radflo Suspension Technology
<<SNIP>>

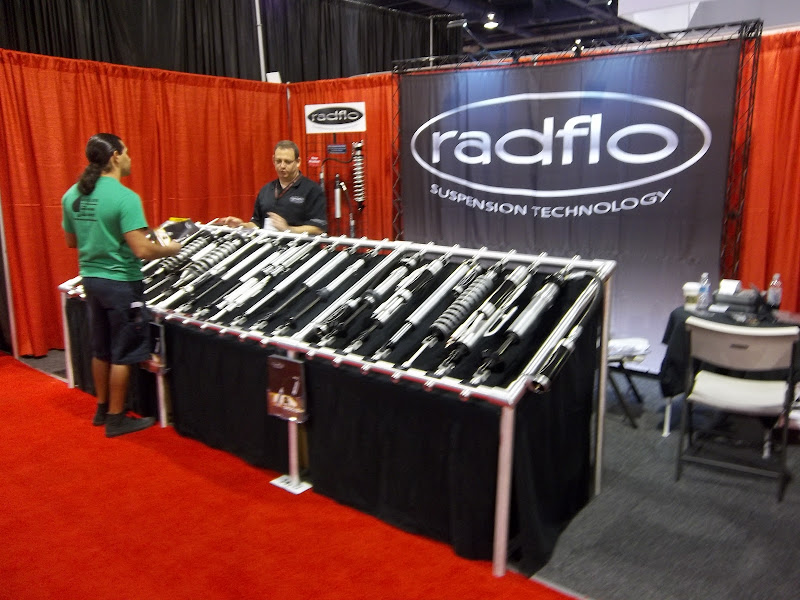
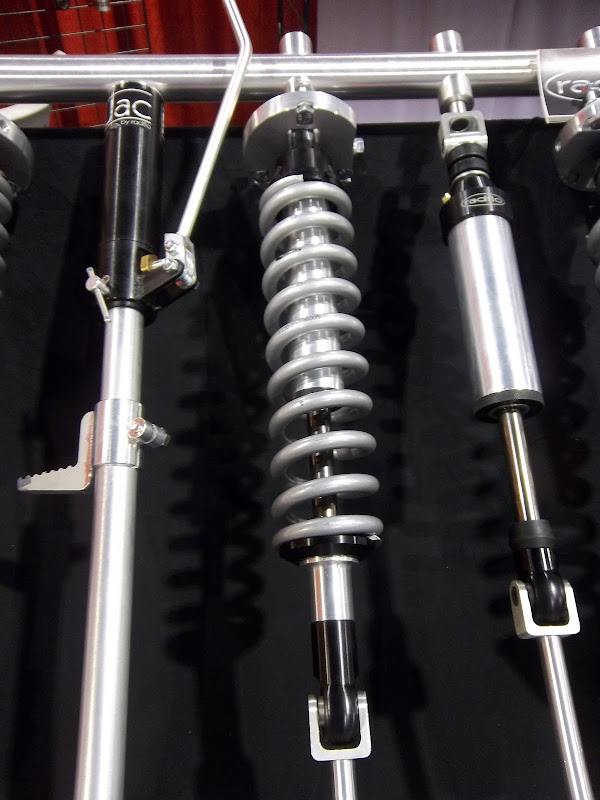
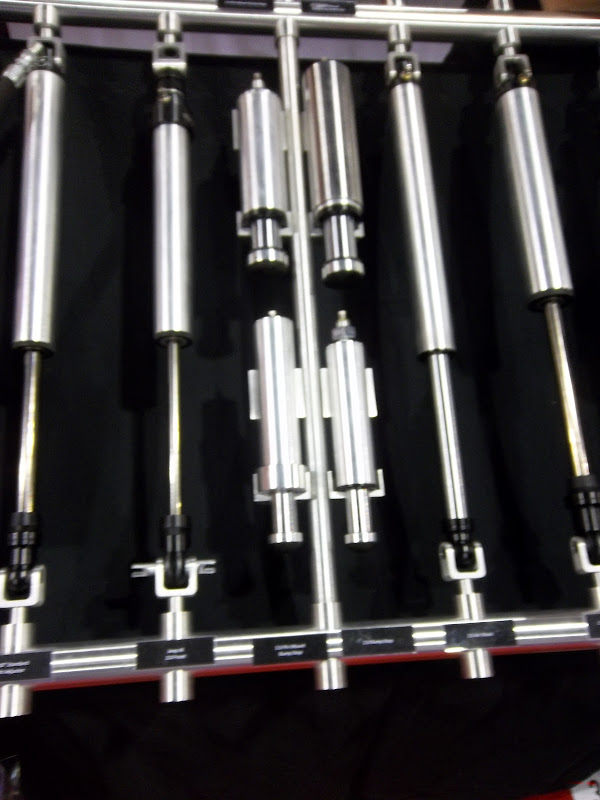
I stopped by their booth at SEMA and have to say that I was impressed with their products. They didn't spend a boat load of cash on a vehicle to display, or a chick in a bikini. They jammed as much product as they could display for the area they had. I've seen them on the various online forums I frequent, there are also quite a few reviews with positive comments about your offerings, quality, product line, and price point. I've seen a few with complains of squeaking noises, which I wouldn't be surprised to find on a coilover.

Their display:
100_1906.JPG


100_1908.JPG


100_1907.JPG


I'm tempted to order a pair of their rear 2.0 setup to try them out. Although at today's prices it is only $140 more to get the 2.5s, which would be comparable to an external reservoir 2.0... but add $200 and you would have Icon rears, which are trusted and known.

I sent a follow up email to get dimensions on them. I forgot to ask if they were a floating piston or emulsion style, and whether the valving was basic or digressive. I guess that's for the third email...
 
I'm interested on what you dig up from Radflo. I'm in the process of educating myself on shock technology and valving. You wouldn't happen to have found out the valving for those rear Bilstein Tundra shocks, did you? Or the OEM LC Tokico valving? I need to find the "most appropriate" valving numbers for our rigs...

RE: wheels. I think those wheels just look dirty as you can see the red dust around the hub. FWIT I re-finished my old FZJ80 wheels with elbow grease, some primer, and a rattle can job. They turned out surprisingly well and held up to tons of off road abuse. The nice thing was, when I would chip them on rocks or something I could just touch the paint up and you would never be the wiser.
 

Members online

Forum statistics

Threads
278,316
Messages
3,554,124
Members
248,016
Latest member
Advally Service

Trending content

Back
Top