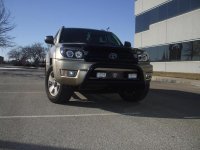
Bull Bar installation - photos, steps, and chaos

jediwebdude

New member
Installation steps for SteelCraft bull bar allegedly designed for my 2007 V8 4Runner Sport Ed. Tools needed:

ramps and lights
Olympic style luge...with wheels (aka creeper)
socket set with extension
metric sockets preferrable, but not necessary
flathead screwdriver
pliers
various wrenches
impact wrench or high torque drill helps a lot
a nearby hardware store
drill press
metal cutting blade for circular saw
creativity
patience

Pre-step: look at instructions and scratch head. The instructions do not identify how the brackets actually attach to the truck.


Step 1 - sweep garage.

1.jpg


Step 2 - ramp up and light up the underneath.

2.jpg


Step 3 - identify where the frame is (A). That rubber piece (B) will be re-attached underneath.

3.jpg


Step 4 - locate holes on top of frame for placement of upper brackets.

4.jpg

 
Last edited:
Register to hide this ad
Step 5 - place the upper bracket as such.

5.jpg


Step 6 - find the long bolts. Ignore instructions that say bolts must go upward. To do so in the forward frame holes would require removal of the front fender molding. Easier to aim the bolts downward.

6.jpg


Step 7 - locate the pesky rubber self-locking bolts that need to be removed from under the frame (B). Those holes are where the bolts go. You can see the upper bracket on top (A).

7.jpg


Step 8 - using the flathead screwdriver and pliers is the best method for removal of the stubborn self-locking bolts.

8.jpg


Step 9 - install bolts.

9.jpg

 
Last edited:

Step 10 - identify on frame where lower brackets will go. Bottom hole is threaded and SteelCraft supplies bolt to thread in. Do not tighten bolts until after you have attached Bull Bar, otherwise you will have issues with the brackets being too far apart for the bottom holes on the bull bar.

Repeat these steps for other side. Now attempt to attach the bull bar at the bottom, but don't tighten those bolts yet. I've provided extra photos on this step. Instructions continue after photos.

10a.jpg


10b.jpg


10c.jpg


Here is where I ran into my issue. No amount of adjusting would allow the upper bracket holes to line up with the upper welded holes on the bull bar. The closest I got required the bull bar to be pressed up against the rubber molding under the front fender. If you have this problem, then the next steps may help you. If your bull bar fits, then I'm happy for you. Really...I am. That means your little life is perfect and mine continues to be nuthin' but challenges.

After returning from Lowes with a piece of uncut, undrilled zinc plated steel (thickest they had, which IMHO isn't thick enough), and more bolts, washers, and nuts, I did the following steps:
 
Last edited:

Step 11 - measure the gap between the upper holes. Put metal cutting blade on circular saw and cut sections of the zinc plated steel to size.

11.jpg


Step 12 - drill holes in accordance with measurements.

12.jpg


Step 13 - attach newly cut/drilled sections to fill the gaps.

13.jpg


Step 14 - done...almost. It is a wee bit crooked, but I was too frustrated to mess with it. Besides, the pieces of steel I used are just a temporary measure. I'll find something more solid later and at that time will worry more about achieving a level look.

14.jpg


And here is the wonderful instructions diagram page:

15.jpg
 
Last edited:
Looks Good.....:thumb3: Hope you get your lights soon.

Very good step by step explanation.....good thing you got some creativity..otherwise those instructions would drive you nuts.

Do u already know which brand of lights?....rounds or rectangulars?...offroad or just regular driving lights?...
 
Looks Good.....:thumb3: Hope you get your lights soon.

Very good step by step explanation.....good thing you got some creativity..otherwise those instructions would drive you nuts.

Do u already know which brand of lights?....rounds or rectangulars?...offroad or just regular driving lights?...

Thx. I had planned to get PIAAs, but as I stated in the other thread, someone in the White House changed the federal tax laws and for the first time in my life, I will not be receiving a refund. This time I owes lotsa money. So lights, lift kit, black rims, etc... will all have to wait.

I may find some cheaper lighting for the interim. I really need effective lights because I sometimes arrive at the astronomy dark sky site late at night and need to see what I'm up against. Last time I had to kill a rattler that was headed right toward the area where I was setting up my telescope. The property sits between two rival coyote packs, and then we have the large wild hogs that are rather territorial. The whole reason I wanted a bull bar is because of several accidents others have had in that area with critters crossing the road at night and damaging vehicles (thus, I refer to it as a critter bar).

Here's the rattler...shot him with my Nikon D90 and SB600 flash first, then with with something more potent.

CS_rattler_grass.jpg
 
Man, its never easy is it? Nice improvising with the steel plate. I was looking at JAC's install thread and noticed the bottom bracket looks like its angled down a bit more than yours (not sure if this would change anything). It looks like the only way this would have worked is if the top bracket was longer, because as you said, even if you could get the holes to line up on top bracket, the bull bar would be pushed into the bottom of the bumper. Did you consider only attaching the top bracket with one bolt to pull it out further?

Anyway, thanks for the detailed instructions. I am considering this bull bar myself and can now anticipate these possible issues.

JAC-did you have any similar issues lining up the top holes?
 
I sorta had this issue with instalation of my bull-bar different manufacturer but the same instalation points. Did you tighten up *any* of the bolts before trying to fit the bar?

I ask because these types of brackets are made to be attached all loosely and then once you have them lined up you go ahead and tighten all the bolts. Having fit many such "finely made" items to my trucks I've found that the tolerances are most likely a sick joke at some of these Chinese factories where I think all of these types of items are produced. Leaving things very loose allows you to have a high fudge factor and allows you more grace with fitment.

Oh and at least you had directions, the T&H Bar I received only had directions on how to unpack the Bar from it's spray foam encasement, the bar itself. You were on your own, even the Manufacturer & Google were no help.
 
Last edited:
Man, its never easy is it? Nice improvising with the steel plate. I was looking at JAC's install thread and noticed the bottom bracket looks like its angled down a bit more than yours (not sure if this would change anything). It looks like the only way this would have worked is if the top bracket was longer, because as you said, even if you could get the holes to line up on top bracket, the bull bar would be pushed into the bottom of the bumper. Did you consider only attaching the top bracket with one bolt to pull it out further?

Anyway, thanks for the detailed instructions. I am considering this bull bar myself and can now anticipate these possible issues.

JAC-did you have any similar issues lining up the top holes?

No issues with the mounting points...th only issue was trying to figure out the crappy instructions.

One thing I notice here is that mines looks like the top bar of the bullbar reaches all the way to the edge of the bumper.It looks like, maybe because the 06 bumpers are different I think they are a bit bigger and more rounded than the early 4th gener.... or it just could be because of the angle of the pics....

Look at mine vs jediwebdude's ...his rig looks a bit different. The upper/top bar of the bullbar does not reach the edge of the bumper (but again...it could be the angle of the pics)
snowpic008.jpg~original
 

Attachments

  • my4runner333.JPG
    my4runner333.JPG
    73.6 KB · Views: 8,367
Last edited:
Installation steps for SteelCraft bull bar allegedly designed for my 2007 V8 4Runner Sport Ed. Tools needed:

ramps and lights
Olympic style luge...with wheels (aka creeper)
socket set with extension
metric sockets preferrable, but not necessary
flathead screwdriver
pliers
various wrenches
impact wrench or high torque drill helps a lot
a nearby hardware store
drill press
metal cutting blade for circular saw
creativity
patience

Pre-step: look at instructions and scratch head. The instructions do not identify how the brackets actually attach to the truck. Furthermore, English sentences are rather interesting. Definitely created from language translation software. Or Yoda.


Step 1 - sweep garage without dinging the inferior Mazda.

1.jpg


Step 2 - put 'er on ramps and light up the underneath.

2.jpg


Step 3 - identify where the frame is (A). That rubber piece (B) will be re-attached underneath.

3.jpg


Step 4 - locate holes on top of frame for placement of upper brackets.

4.jpg

@ jedi.....what is your take on using plastic ramps? Call me old school but putting a 4000# truck on two pieces of plastic smells like the aftermath of a Cat F3.
 
I sorta had this issue with instalation of my bull-bar different manufacturer but the same instalation points. Did you tighten up *any* of the bolts before trying to fit the bar?

I ask because these types of brackets are made to be attached all loosely and then once you have them lined up you go ahead and tighten all the bolts. Having fit many such "finely made" items to my trucks I've found that the tolerances are most likely a sick joke at some of these Chinese factories where I think all of these types of items are produced. Leaving things very loose allows you to have a high fudge factor and allows you more grace with fitment.

I left the bolts loose (see Step 10). The pre-drilled holes on the brackets and bull bar don't have much room for adjustment. I think this is more of an issue with the fender change by Toyota being ignored by SteelCraft. I did email SteelCraft my issue, but no response.
 
@ jedi.....what is your take on using plastic ramps? Call me old school but putting a 4000# truck on two pieces of plastic smells like the aftermath of a Cat F3.

The ramps come in various weight capacity ratings, and I chose these specifically for changing oil on my previous 3/4 ton full-size pickup truck. I wouldn't store a vehicle on the ramps, but for occasional use, they are fine. With that said, I do use jack stands as backups (you can't see them in the photos). The jack stands are positioned to hold the vehicle in place should a ramp give. I have the stands touching the vehicle, but not supporting any weight.
 
I left the bolts loose (see Step 10). The pre-drilled holes on the brackets and bull bar don't have much room for adjustment. I think this is more of an issue with the fender change by Toyota being ignored by SteelCraft. I did email SteelCraft my issue, but no response.


Hey good thing you e-mailed them so they can take care of that issue....did yo emailed the pics also?....
Hey....whenever you get a chance....can you take a front in-line view of the bullbar ?.
 
I emailed them as well to ask it there was a different model for 2006+ 4runners. I noticed here:

Steelcraft Bull Bars Skid Plate

they don't even list a model for 4runner and the model from autoanything, 73340B, is not listed there either. Strange.


Also, anyone else looking for this I found a better price here:

03-08 Toyota 4Runner 2/4 WD Steelcraft Black 3" Bull Bar at Carolina
Classic Trucks

Thats a good price....but got to check the shipping fee...thats the r eal price...I am pretty sure it 'll be about $50 for shipping. If So then it will be more expensive.

I got mine for $174 shipping included. I had to wait more than amonth to get it tho'...but it worth it.
 
I emailed them as well to ask it there was a different model for 2006+ 4runners. I noticed here:

Steelcraft Bull Bars Skid Plate

they don't even list a model for 4runner and the model from autoanything, 73340B, is not listed there either. Strange.


Also, anyone else looking for this I found a better price here:

03-08 Toyota 4Runner 2/4 WD Steelcraft Black 3" Bull Bar at Carolina Classic Trucks

SteelCraft use to have it listed on their website, but I noticed yesterday that it is no longer listed.

AutoAnything had a coupon for 20% off plus free shipping, so I did pretty good on the price.
 
AutoAnything had a coupon for 20% off plus free shipping, so I did pretty good on the price.

Good to know in case I order it and other stuff from them (thinking about husky liners and daystar 2.5/1.5).

Now that its all said and done are you happy with the end result? Or would you recommend another direction for an 06+?
 
I emailed them as well to ask it there was a different model for 2006+ 4runners.

FYI here is steelcraft's response:

"In regards to the 2006 Toyota 4Runner bull bar we have our development Dept.looking into customers having difficulty installing. I will keep your emailand update ASAP."
 
FYI here is steelcraft's response:

"In regards to the 2006 Toyota 4Runner bull bar we have our development Dept.looking into customers having difficulty installing. I will keep your emailand update ASAP."

I just got off the phone with SteelCraft. The guy I spoke with said they spec'd the parts based on an '03 model. He is going to look into it and see if they can try to get ahold of a 2007 or 2008 4Runner. He said if they determine that brackets need to be redesigned, he will send me new brackets. Kudos to SteelCraft.
 
FYI here is steelcraft's response:

"In regards to the 2006 Toyota 4Runner bull bar we have our development Dept.looking into customers having difficulty installing. I will keep your emailand update ASAP."

I just got off the phone with SteelCraft. The guy I spoke with said they spec'd the parts based on an '03 model. He is going to look into it and see if they can try to get ahold of a 2007 or 2008 4Runner. He said if they determine that brackets need to be redesigned, he will send me new brackets. Kudos to SteelCraft.

Good to know they already taking care of that issue.
Kudos to you guys...good job!!
 

Members online

Forum statistics

Threads
278,316
Messages
3,554,120
Members
248,016
Latest member
Advally Service

Trending content

Back
Top