Cargo area LED light mod!

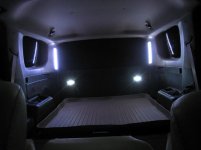
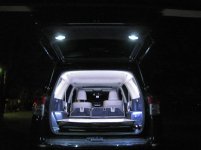
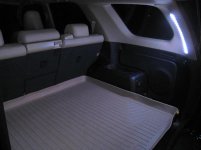
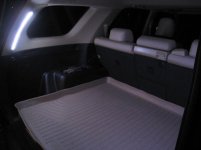
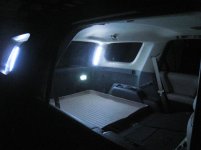
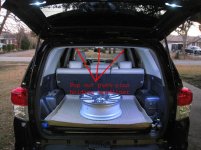
OK, I finally did this mod the right way. The LED strips are on the rear pillars and they now come on when I open the rear lift gate. They do not come on when I open any other doors to the vehicle. Here are some pics of it, but it looks SO much better in real life. After these pics I am going to break it down, so wait before commenting until you see my next post. Thanks and enjoy!
CargoLED_1.jpg

CargoLED_2.jpg

CargoLED_3.jpg

CargoLED_4.jpg

CargoLED_5.jpg
 

Attachments

  • CargoLED_1.jpg
    CargoLED_1.jpg
    26.8 KB · Views: 48,704
  • CargoLED_2.jpg
    CargoLED_2.jpg
    31.9 KB · Views: 37,073
  • CargoLED_3.jpg
    CargoLED_3.jpg
    27 KB · Views: 29,580
  • CargoLED_4.jpg
    CargoLED_4.jpg
    24.2 KB · Views: 29,368
  • CargoLED_5.jpg
    CargoLED_5.jpg
    28.5 KB · Views: 30,524
Last edited:
Register to hide this ad
1--Purchase LED strips at Autozone or elsewhere. I bought the ones that have two per pack, and they have the little test button right on the box. Mine are bright white.
2--Remove three clips on rear of headliner and remove panels that cover access to tail lights on inside of cargo area.
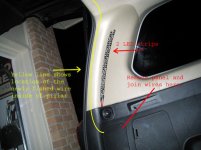
3--Run a dual wire from the tail light access area up through the rear pillar to the area under the headliner. Make the right one and the left one meet/end right in the middle (where there SHOULD be a dang dome light). Using a putty knife, screwdriver, and a panel remover, bend open the trim and/or weather stripping on the rear pillars just enough to slip your wire into the area behind it. You do not have to remove the pillar panel if you are careful and patient. You can use anything from shielded RCA wire to trailer wiring. I used trailer wiring for this part, but used bundled shielded RCA cable to get from the door to the headliner (in a later step).
4--Stick two LED strips on each rear pillar as pictured, leaving just a tiny bit of wire exposed, with the rest of it fished into the tail light access area.
5--Conjoin the wires with the one you fished down the pillar and tie them off somewhere in there using plastic ties.
6--Do the same on the right side.

Step1.jpg

Image2.jpg

More to come...please wait.
 

Attachments

  • Step1.jpg
    Step1.jpg
    55.3 KB · Views: 44,582
  • Image2.jpg
    Image2.jpg
    46.9 KB · Views: 29,032
7--Pop out each of the two rear lift gate interior lights using a small putty knife on the LEFT side of each one of them. Then, unplug them and set them aside.
8--Make sure your rear lift gate window is DOWN. Remove the rear lift gate paneling. This pops off just like most plastic door panels. It has about 6 or 8 plastic pins that will pop right out if you can get a putty knife in there, or use a panel remover. The top of the panel hangs on the edge of the window opening. FYI, the speakers ARE NOT connected in any way to the panel itself or the speaker grates.
9--Unplug the left speaker connector. Remove the left speaker using a 10mm socket. Just undo the three nuts that are right around the edge. You don’t need to remove the whole plate that holds the speaker. The first time your remove it, it feels like it is glued, but it is actually not—it is just a piece of padding that is between the metal and the speaker rim.
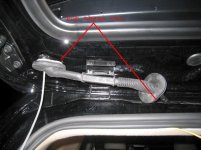
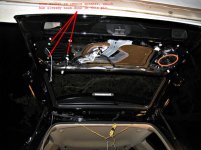
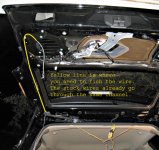
10--Pop out the rubber tubes that protect the wires coming from the gate door to the roof of the car. See image.
11--Fish a wire from the speaker hole opening down to the hole where the rubber tube was connected at the lift gate. This is tricky! Do not use a regular household wire fish that you buy at the hardware. It is too big and too stiff. Instead, try using a ground wire from your household-type wiring. It is rigid enough to fish through, but bendable enough to get it pointed in the right direction.
12--Once you have that wire fished through, tape on your dual wire on the lower end, and then carefully pull the wires back through.

Image3.jpg

Image4.jpg
 

Attachments

  • Image3.jpg
    Image3.jpg
    50.7 KB · Views: 28,900
  • Image4.jpg
    Image4.jpg
    79.6 KB · Views: 28,809
13--To get the wire from the speaker hole to the left interior light location, you can use a blank spot in the rubber connector, but you have to bore it out. I used a nail set tool to bore it out.
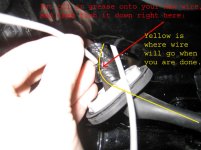
14--Once it is bored out, put some oil onto your LED wire and push it through.
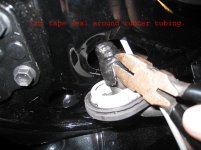
15--Now you need to fish the dual wire down the rubber tubing to get it into the headliner area of the vehicle. It is buttoned up pretty good on the lift gate side, so I had to use a pair of wire snips to cut a tiny hole in it to get the new wire in. You will need to lube up this part of the wire as well. Then, fish it through, tape back over where you put the hole in the lift gate side. See pics.
16--Push the rubber tube connectors back into their oval shaped holes.
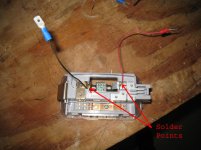
17--Take the left lift gate interior light assembly and solder two wires onto the back of it, and put connectors on them, as shown.
18--Put connectors onto the new wire you fished into the left side of the lift gate above the speaker hole.
19--Put connectors onto the wires that you fished into the headliner and hook them up.
20--Test it all before putting everything back together, and then use electrical tape to protect your connectors (if you used the kind that are exposed like I did).
21--Now, when you open the lift gate, there is TONS of light, and you can turn if off by turning off the left light assembly on the rear lift gate panel.
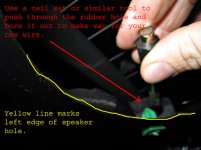
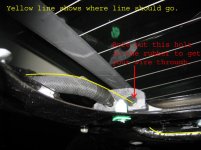
Image6.jpg

Image7.jpg

Image5.jpg

image8.jpg

Image9.jpg

Image10.jpg
 

Attachments

  • Image5.jpg
    Image5.jpg
    46.7 KB · Views: 29,002
  • Image6.jpg
    Image6.jpg
    44.8 KB · Views: 28,603
  • Image7.jpg
    Image7.jpg
    48.5 KB · Views: 28,810
  • image8.jpg
    image8.jpg
    46.5 KB · Views: 28,423
  • Image9.jpg
    Image9.jpg
    46.4 KB · Views: 28,426
  • Image10.jpg
    Image10.jpg
    48.9 KB · Views: 28,529
Last edited:
Great write-up. Do you remember how much room is between the headliner and the sheet metal? I'm pondering the idea of flush mounting through the headliner LEDs. Find the right LEDs is quite the challenge though.
 
Very nice Snooper, thanks for the writeup.


EDIT: I'm not too experienced at ripping apart my car. Please, what is a panel remover tool, and where do I get one?
 
Last edited:
Nice write up but damn man.... are trying land airplanes in there?

Ha! I probably could! They used to be hooked up to my dome light over the second row, and it was damn near embarrassing when I had to open the door to get in and out. People thought I was trying to make my t4r into a limo. That is why I did this mod this way...it only comes on now when I open the lift gate. Even though it is quite bright, it is frekin' AWESOME to be able to see as well as I can when I am loading things back there.
 
Great write-up. Do you remember how much room is between the headliner and the sheet metal? I'm pondering the idea of flush mounting through the headliner LEDs. Find the right LEDs is quite the challenge though.

There is room in the middle all of the way towards the rear of the vehicle where the headliner goes diagonally downwards toward the weatherstripping.
I would estimate about 2" between the roof and the headliner. There IS NOT room forward of that location. I had a hell of a time fishing a wire through that part.

The best way to see how much room is to pop out those three little fasteners on the back, pull it down a little bit carefully, and see for yourself. I bought a panel remover tool from Advance Auto Parts, which has been a very valuable tool for me for stuff like this.

I am actually thinking of putting a dome light there that is connected to my 2nd row dome light, so it has better light back there when I open one of the four front doors, so it won't turn on my "landing strip" LEDs as SeattleMike calls them, but I am just too scared to start cutting gaping holes into my headliner. I already have the wire fished from the 2nd row dome light though.
 
Damn you! Now it looks like I have to add this to my list of things to do! Thanks for the detialed write-up. I would like to do my own but dont have the patience to note and take pics of my progress. I really do commend you!
 
Very well done, and extremely detailed writeup/FAQ. Nice Job! :bigok:

My personal cargo mod?

1. Purchase stick on light
2. Remove from box
3. Stick to roof
4. Turn on

lol

I'm way to weary of ripping my truck apart for this mod but it looks cool!
 
Ha! I probably could! They used to be hooked up to my dome light over the second row, and it was damn near embarrassing when I had to open the door to get in and out. People thought I was trying to make my t4r into a limo. That is why I did this mod this way...it only comes on now when I open the lift gate. Even though it is quite bright, it is frekin' AWESOME to be able to see as well as I can when I am loading things back there.

thats pretty awesome. i like the looks. I may have to do that, but go with a smaller strip of lights.
 
Missed this before ..... great job Snoop!! Thanks for taking the time!

They make simple DC LED dimmer switches to go inline with the wiring if you need to adjust the brightness up or down.
 
thats pretty awesome. i like the looks. I may have to do that, but go with a smaller strip of lights.

The package has two strips, which can be cut shorter, or the same company sells a pkg of 2 - 6" strips. I thought about just using one 12" strip per side - not interested in attracting any 747s.
 
Missed this before ..... great job Snoop!! Thanks for taking the time!

They make simple DC LED dimmer switches to go inline with the wiring if you need to adjust the brightness up or down.

Thanks Harper! Now that is a great idea! You could put that dimmer switch right in the little area behind the tail lights for semi-easy access too. You could even put one on each side. Although, I think that if you do this mod, you will never want it on anything other than BRIGHT! I can see how you might want to dim it if you were sleeping in the back or something like that. Would be a good option to have.
 

Forum statistics

Threads
278,307
Messages
3,554,053
Members
248,016
Latest member
Advally Service

Trending content

Back
Top