Cup holder lights

BOSMECH

Member
I did not know there were lights for the cup holders till I read it here on the forum.
To replace them it says to remove the center console but after I did some fiddling around I found that I can just remove the little piece of trim just forward of the holders and then trim the plastic with a dremel and the with some needle nose pliers get the bulb out to replace it.
 
Register to hide this ad
any pics? I have most of my center console out right now, but still can't figure out how to get to the bulb, or the shifter bulb
 
I have not done it yet but it will be a peice of cake to do.
I have not thought about the shift lights but then again mine are still working.
It will be tricky to do the cup lights but for me its just like working on my big jets, you have to use your brain to figure it out the easy way and get it done right.
I will try to take pics when the wife lets me have it for a hour or two.
 
It takes about 5 minutes to get the center console apart and get to those lights. No Dremel required. IMO that is the easy and the right way to do it.

Sorry, no pics, but there are instructions floating around the forum for R&R of the center console. For the shifter bulb, you just gotta pop off the silver trim bezel once the console is out.

Edit: also unscrew the shift knob so you can slip the silver trim bezel off of the shifter unit.
 
333239143.png
 
Never done it but would rather do that then the other way I was thinking.
But still the dremel hole would make it real easy and you would never see it under the trim cover.
 
any pics? I have most of my center console out right now, but still can't figure out how to get to the bulb, or the shifter bulb

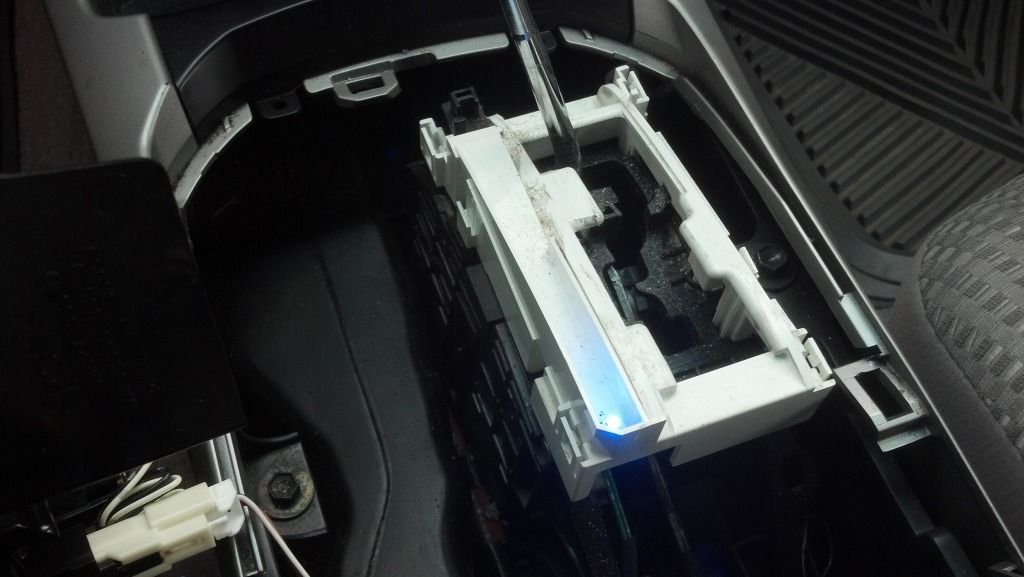
heres one from when i did my shifter. i didnt take a pic of the cup holder part because there wasnt much to see. i now have a white led strip in the shifter, the blue one in this pic wasnt bright enough

2012-10-03_13-37-05_132_zpse07e0249.jpg~original
 
Thanks for the picture, one thing I am cureous about though is there still more stuff to remove after the center panel sub-assembly.
 
Thanks for the picture, one thing I am cureous about though is there still more stuff to remove after the center panel sub-assembly.

after you get the main part of the middle out to get to the shifter I remember just working my way back piece by piece to get to the cupholder section. I had to use a pair of needle nose pliers to get the cupholder bulb out and put the new one in. That and my rear window button were the 2 toughest to get to from what I remember

I definitely recommend putting a small led strip in the shifter. Wire it off the 12v accessory power there with T-taps. It fits in that little tray so well and it much brighter (but not too bright) than the single 74led. I had a 5 led strip that I got for like $2 on clearance from superbright leds but I had to snip off one led to get it to fit.
 
I have not done it yet but it will be a peice of cake to do.
I have not thought about the shift lights but then again mine are still working.
It will be tricky to do the cup lights but for me its just like working on my big jets, you have to use your brain to figure it out the easy way and get it done right.
I will try to take pics when the wife lets me have it for a hour or two.

Actually, I still have most of my center console out since I've been waiting for my gauges and HVAC controls to be shipped back, and I found a pic on the interior LED swap thread, sure enough, I looked right behind my cup holder and the bulb is right there
 
Well as I was waiting for the shuttle bus to work I pulled the console of in about less then 3 minutes and had the bulb out in a flash. It is tight with big hands to get the bulb after you pop the small trim piece up but still very easy.
I got a bulb from work (for free) but was 28V so it was like not even on.
Found this link for LEDS that are 12V.
12V LED - Pre-wired Waterproof SuperFlux LEDs
Now just need to get them and start the change over.
 
I dont remember how many times I have had that thing out.

At least 2 times installing the head unit
once for installing the amp
a couple of times for installing the CB
once for adjusting the parking brake cable
once for installing the ARB compressor switch
once for changing out the rear air duct
Oh, and I actually took it out the first time to change the bulb which I took a blue pen and colored the little plastic pieces so it would be blue

Toyota engineers did a good job designing these snap together assemblies.
 

Members online

Forum statistics

Threads
278,307
Messages
3,554,049
Members
248,016
Latest member
Advally Service

Trending content

Back
Top