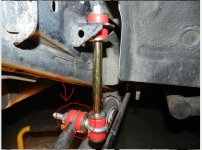
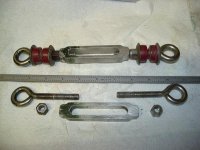
Custom(ish) Extended Rear Sway Bar Links Write-Up

Pretty excited about doing this. Found a $10 off coupon for advanceauto.com so it was only $25 for the two bushing kits and another $10 at Lowe's for the eyebolts and spacers. For $35 and maybe an hour's worth of my labor, I got this done. Awesome mod. Rep for OP.
 
I just did this mod today! Wasn't planning on it, but after installing the rear air bags and the stock link bolts snapping this thread saved me a decent amount of money! Thanks OP!
 
So today i partially parked on a snow bank( no where else to park :heh:) but then i heard a loud clunk from the passenger side rear, i checked and it turns out that the nut one of the washers and one of the bushings and sleeve was all gone off of the eye bolt! It didn't happen right then because none of it was anywhere to be found so it must of happened over time I don't know how long it was like that i'm just glad i caught it, i'm surprised though because i had it cranked down pretty good so i don't know how it could of come off like that? I checked the other one and everything was still good and tight. So i went to lowes and got a couple stainless steel locking washers and some loctight and also picked up some extra bushings and tightened it all back up so hopefully this won't happen again! Has anybody else experienced this?
 
OP, I wanted to thank you for posting detailed instructions including part numbers. I did this today after putting in a lift kit yesterday and for under $50, this is a great solution. Got all my parts at AutoZone and Lowes.

I noticed the part number of your eye bolt photo is cut off! So, here it is, in case anyone goes looking for it at Lowes. Keep in mind, I found the same 3/8 x 4.5 eye bolt at Home Depot, but the weight rating was only 160 lbs. Make sure you get galvanized or cast iron eye bolts with the 1200 lb weight rating!! Lowes had them.

Also, my Lowes was out of 3/8 x 1/2 x 1.5 steel spacers. So I picked up 1/2 x 5/8 x 1.5 and just drilled out the hole on my swaybar to fit. I loctited the bolt after reading the post above ^^, so let's hope it holds up while wheeling!

IMG_20140301_154004.jpg


IMG_20140301_154018.jpg
 
Is there a specific reason for the bushings on the eyebolt where it goes through the sway bar? I circled it in the pic so you can see what I'm talking about.
Screenshot_2.jpg
 

Attachments

  • Screenshot_2.jpg
    Screenshot_2.jpg
    109.1 KB · Views: 1,039
This took me forever!! First off just grind off the lower bolt on the stock link cuz it's a royal PIA to take off. Secondly, in the drivers side it's a ***** to get the grinder in the correct spot to grind that eyebolt down, and you have to do it because it doesn't fit if you don't. Melted a hole almost clean through my gas tank grinding that bolt. Anywho wasn't too too bad and pretty cheap!!
4ea9c39a69950d5bf6d245b320b63d12.jpg
8ec98e40353c15bf578b8bc8412d5cd5.jpg
 
Oh yeah almost forgot, I picked up 3/8x1/2x1" spacers instead of 1.5" and the didn't have to grind them at all. Press them from the inside flush with the outside and the bushings slide right over them on the inside part when you tighten the nut. This is how far they stick out when flush with the outside of the swaybar.
e5fa34a963659803f63599d3ae94b696.jpg
 

Attachments

  • disconnect1.jpg
    disconnect1.jpg
    48.1 KB · Views: 1,002
Hey! Thanks for posting this!

I decided to make a set of these after installing my Bilsteins and 2.5 rear lift.

eSCKAEc.jpg


I decided to make a slight change to the build procedure. Instead of cutting the sleeves that go in the sway bar hole, I drilled out the bushings so that the sleeves can fit into them. I also used a 1" sleeve, instead of the 1.5" sleeve used by OP. This allowed me to drill 2/3rds of the way into each bushing, insert the sleeve, and end up with a ~1/8" gap between the two, which will be close up when the part is tightened.

rrAvRUW.jpg


Rdm7YTa.jpg


WosErjy.jpg


Here's the final product. Looks great, and drops the sway bar just enough. Here's a few notes for future builders:

- Do a rough assembly, mark your cuts and make them away from the vehicle. On the driver's side, you're in gas tank territory. Sticking a grinder in there is both tight and dangerous.

- Used bushing lube when you put these together! It'll make them last longer and avoid any potential noise!

- If I were to make any changes, I would cut my eyebolt just a bit shorter than I did.

- On that note, I am in Canada. I was not able to find an eyebolt that was threaded anywhere near to the eye, so I had to bring them to a machine shop to have them threaded. They are high-grade bolts, and threading them with a simple tap and dye kit will not work.

Anyways, thank again for coming up with this! Hope my post helps some people in the future.

 
Thinking about doing this since I put on the lift, but...

I was reading on Energy Suspension's site that the two points which are connected by the link should be parallel on the front end of the vehicle and made me wonder if it should be the same on the rear. See diagram: energysuspension.com | Sway Bar End Links & Set Sizing Charts Can someone check their stock setup or remember if the frame bracket and sway bar are parallel on the rear?

If so, I think this setup could still be used, but modified with a longer vertical link bolt and matching spacer to push the end of the sway bar more towards the ground and be parallel. I can't tell from the posted pictures if extending this link would hit anything. I wouldn't think so as the stock one doesn't hit with stock height and it does the same thing during flex.

I'm guessing that having these two points parallel is beneficial (at least in the front?)? I don't know.

Thoughts?
 
ok dumb question time. can this mod be done on a stock suspension? is the end link too long? i bought all this and realized later that this is meant for those with a lift.

anybody have insight into a proper length end link if this wont work?
 
You answered your question...if you're not lifted, put them on the shelf and wait for your maybe one-day lift...don't fix it unless it's broken kinda deal...
 
You answered your question...if you're not lifted, put them on the shelf and wait for your maybe one-day lift...don't fix it unless it's broken kinda deal...

what i figured. i have some pretty harsh clunking going on over bumps and whatnot, was trying to replace swaybar bushings and these endlinks as a first attempt at mitigating. I"ll try some shorter ones, thanks.
 
You could, if you don't pan on lifting anytime soon, just cut them down or get the right sized piece and improve over the current OEM setup...
 
Be sure to use a stop nut, loctite, or as the OP suggested, double nut on the eye bolt. Don't just use the nut that comes with the eye bolt.

I rotated my tires the other day and noticed the nut, washer, and bushing were all missing from the end of the eye bolt on my driver's side. :shocked: Thankfully there was enough pressure or whatever to keep the sway bar from disconnecting.
 
Hey guys, just did this. I have 3" Fox 2.5 lift (medium constant weight springs in the back) and was getting annoyed at the heavy "forced" left to right body roll over bumps and such. Followed the OP's directions and couldn't be happier with the results! Nice to go from a discardable part to a serviceable one, that is MUCH more robust. I think my end length for the eyelet bolt was about 4". I ended up pressing the full length sleeve into one of the bushings, then using an oversized nut to pull the sleeve through the sway bar itself. Saved a few hundred bucks by doing this- super pleased!

Swaybar DIY by Seth Schueller, on Flickr

Swaybar DIY by Seth Schueller, on Flickr

Swaybar DIY by Seth Schueller, on Flickr

Swaybar DIY by Seth Schueller, on Flickr
 

Members online

Forum statistics

Threads
278,316
Messages
3,554,120
Members
248,016
Latest member
Advally Service

Trending content

Back
Top