Cytronus 2016 4Runner Trail Premium Build Thread (Pic Heavy)

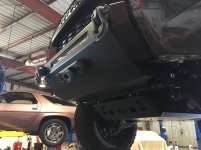
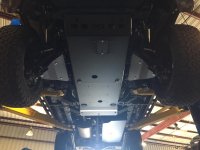
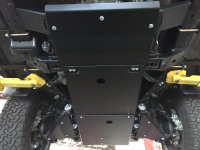
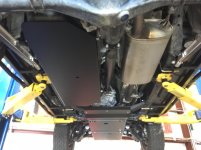
RCI 1/4" Alluminum Skids Powder Coated and Installed

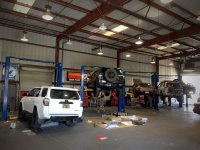
This past weekend, a few forum members and I went to town at Pit Row, a local shop that rents lift bays and tools by the hour. Myself and my twin brother, IN4RNO, with the Inferno Red TRD Pro installed our RCI skid plates. TRDYTRD installed new sliders and XTREMELUCK got his new ICON stage 7 components installed. As usually, the always-willing-to-help good friend, InfamousRNR, helped everyone out with their installs.

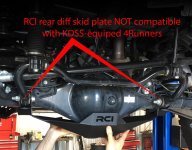
I was bummed to find out the RCI rear diff plate will not install on a KDSS-equiped 4Runner, however, RCI confirmed they are currently beta testing one now, though not sure when it will be available to market. Today, no company makes one so we'll have to wait for RCI to be the first but I'm glad they're stepping up to design one for us.

Another small disappointment was that the rear most U-bolts on each of my White Knuckle Offroad sliders prevents the RCI rear trailing arm skid armor from going on. They could be cut shorter and welded on but we'll see about that another day.

I had my skids powder coated matte black to match my SSO front bumper to coincide with the vehicle's black and gray theme and to serve as an indicator of where I hit things based on where paint scratches off, making it easier to spot and survey damage. Skids included A arms, front, transmission with added supports, transfer case with frame cross member and fuel tank.

We forgot to wrap our exhaust pipes with heat shielding wrap to dampen the rattle banging of the exhaust against the skids so we'll be heading back to Pit Row this weekend to wrap the pipes and get TRDYTRD's skids on his white TRD Pro.

Overall, I really like the quality, design, engineering and simplicity of RCI's 1/4" aluminum skids plate package and very happy with the purchase. We'll have to review how they perform on the trails in a later post.
 

Attachments
  • IMG_4201edit.jpg
    IMG_4201edit.jpg
    139.1 KB · Views: 1,843
  • IMG_4208.jpg
    IMG_4208.jpg
    127 KB · Views: 1,859
  • IMG_4223.jpg
    IMG_4223.jpg
    127.1 KB · Views: 1,827
  • IMG_4227.jpg
    IMG_4227.jpg
    128.1 KB · Views: 1,874
  • IMG_4205.jpg
    IMG_4205.jpg
    122.7 KB · Views: 1,833
  • RCI rear diff edit.jpg
    RCI rear diff edit.jpg
    137.2 KB · Views: 2,011
Last edited:
Installed Tekonsha P3 90195 trailer brake controller

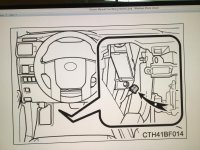
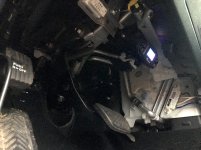
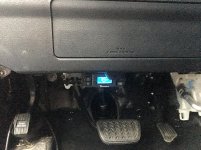
Today I installed the Tekonsha P3 trailer brake controller in a rather stealthy location, directly under the steering wheel in the foot well. Luckily, the controller bracket bolts right on to 2 factory bolts that appear to hold the lower air bag unit in place. Very easy and fast install.

I'm a tad concerned about the location not providing ease of visibility to the display screen for info/alerting but the buttons for brake boost and increasing or decreasing trailer braking are easily found without sight due to their large tactile shapes. I do like that it's out of the way and keeps the cabin clean and neat but I'll asses the location after actually pulling the new camper trailer home in early September.
 

Attachments

  • IMG_4235.jpg
    IMG_4235.jpg
    126.8 KB · Views: 1,835
  • IMG_4236 copy.jpg
    IMG_4236 copy.jpg
    137.2 KB · Views: 1,836
  • IMG_4237 copy.jpg
    IMG_4237 copy.jpg
    137.7 KB · Views: 1,837
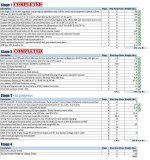
Build stage list updated...

On to Stage 3!
 

Attachments

  • Progress as of Aug 8 2017.jpg
    Progress as of Aug 8 2017.jpg
    136.5 KB · Views: 1,835
2 things: are you enjoying the runner sans roof rack? I have been on the fence for a while on whether I should delete mine as I can haul everything I need either inside or on a rear bumper with swingout.

Also, does the tiregate twist when it's swung open?
 
Your build is impressive and I want to give you big props for being so detailed in your write-ups. Ii really helps those who have never been there before. Sometimes people leave out what they consider obvious, which doesn't always help. But you sir, nailed it!!! Can't wait for you next stage.
 
This past weekend, a few forum members and I went to town at Pit Row, a local shop that rents lift bays and tools by the hour. Myself and my twin brother, IN4RNO, with the Inferno Red TRD Pro installed our RCI skid plates. TRDYTRD installed new sliders and XTREMELUCK got his new ICON stage 7 components installed. As usually, the always-willing-to-help good friend, InfamousRNR, helped everyone out with their installs.

I was bummed to find out the RCI rear diff plate will not install on a KDSS-equiped 4Runner, however, RCI confirmed they are currently beta testing one now, though not sure when it will be available to market. Today, no company makes one so we'll have to wait for RCI to be the first but I'm glad they're stepping up to design one for us.

Another small disappointment was that the rear most U-bolts on each of my White Knuckle Offroad sliders prevents the RCI rear trailing arm skid armor from going on. They could be cut shorter and welded on but we'll see about that another day.

I had my skids powder coated matte black to match my SSO front bumper to coincide with the vehicle's black and gray theme and to serve as an indicator of where I hit things based on where paint scratches off, making it easier to spot and survey damage. Skids included A arms, front, transmission with added supports, transfer case with frame cross member and fuel tank.

We forgot to wrap our exhaust pipes with heat shielding wrap to dampen the rattle banging of the exhaust against the skids so we'll be heading back to Pit Row this weekend to wrap the pipes and get TRDYTRD's skids on his white TRD Pro.

Overall, I really like the quality, design, engineering and simplicity of RCI's 1/4" aluminum skids plate package and very happy with the purchase. We'll have to review how they perform on the trails in a later post.

Must have just missed you guys, I was there Friday evening. Rig is coming along great! We'll have to link up soon.
 
Must have just missed you guys, I was there Friday evening. Rig is coming along great! We'll have to link up soon.

It was great meeting y'all last weekend. I will be at Pit Row this Saturday morning to finish out the rest of my suspension install. Hopefully I wont have another 3 hour emergency work conference call in middle of it :doh:
[MENTION=166901]Bay_Runner[/MENTION] I think Dennis @Pit Row mentioned your truck to me the other day. I practically live there ;) If you ever want to get the truck dirty let me know. A few of us will be heading up to Tahoe for a weekend 4x4 camping trip at the end of the month.
 
It was great meeting y'all last weekend. I will be at Pit Row this Saturday morning to finish out the rest of my suspension install. Hopefully I wont have another 3 hour emergency work conference call in middle of it :doh:

[MENTION=166901]Bay_Runner[/MENTION] I think Dennis @Pit Row mentioned your truck to me the other day. I practically live there ;) If you ever want to get the truck dirty let me know. A few of us will be heading up to Tahoe for a weekend 4x4 camping trip at the end of the month.

Yeah! I was over there just to finish buttoning up my fender liner before Hollister. My spidertrax spacers and Gobi ladder arrive today, and I still need to install my diff breather.. so I'm going to swing by to meet you guys on Saturday and see what I can get knocked out. And I'm always down to get off the pavement! I'll chat with you guys about Tahoe as well when we link up on Saturday, I'll be getting my new battery and electricals installed on the 25th in San Diego so it may be a stretch for me, but would love to attend if I can make it back to the Bay in time to roll with you guys. Looking forward to linking up this weekend man!
 
Step-by-step instructions and photos to move your 5th Gen (2016 Trail) front wheel well aprons forward in preparation for larger tires. In my case, I will be lifting 3" and adding BFG 285/70/17 KO2s on TRD Pro wheels.

I was able to achieve 1 & 1/16" additional forward clearance on the driver side and 7/8" additional forward clearance on the passenger side. The apron plastic on the passenger side is shaped a little differently - it has a contour which makes it difficult to easily move it forward more than about 7/8". With some work, it's possible to move it forward more. Try this first and see if there's rubbing before spending unnecessary time.

While my wheel well aprons have now been moved forward, the body painted bumper lip is fixed in place, interfering somewhat with the newly added apron clearance. Should rubbing occur in this area post lift & tires, I will trim the body painted plastic to make it flush with the apron/inner wheel well plastic.

Let's start with the before and after, followed by driver side, then passenger side instructions.


Very clean instructions & Photos.
 
Thanks! The scepter tie-downs came with my Wilco Hitchgate. I'm sure you can order it from them. It's awesome.
 
Hey there, thanks for the note. I'm not sure what you mean about "sans" roof rack but I did take the rails off in anticipation of putting a new rack on however the rack that I was going to put on, Ecotechne gen 2, had so many flaws in it that I couldn't mount it to my roof. I'm considering designing a roof rack myself with an industrial designer and manufacturer. It would be aluminum with some cool features that I think a lot of guys would like.

When I was off roading in Yosemite, my rear Hitchgate came a little loose, so when it was open it would definitely twist and angle oddly. When I got home, I tightened up the wedge block so it's straight now whether closed or open. Good eye.

I decided to go with the hitch mount tire carrier in order to save weight overall. With everything that I've added onto the vehicle so far, it's nearly 1000 pounds of additional weight so it's getting close to GVWR. If I do consider a full rear bumper it will most likely be aluminum dual swing out. My twin brother is putting on a full aluminum rear bumper soon so we'll have to see how that goes and how much weight it adds to the vehicle with everything he puts on it .

A major consideration of my build is keeping weight under GVWR so that I can maintain safety, handling and breaking.

What are you considering adding?

2 things: are you enjoying the runner sans roof rack? I have been on the fence for a while on whether I should delete mine as I can haul everything I need either inside or on a rear bumper with swingout.

Also, does the tiregate twist when it's swung open?
 
Last edited:
Hey there, thanks for the note. I'm not sure what you mean about "sans" roof rack but I did take the rails off in anticipation of putting a new rack on however the rack that I was going to put on, Ecotechne gen 2, had so many flaws in it that I couldn't mount it to my roof. I'm considering designing a roof rack myself with an industrial designer and manufacturer. It would be aluminum with some cool features that I think a lot of guys would like.

When I was off roading in Yosemite, my rear Hitchgate came a little loose, so when it was open it would definitely twist and angle oddly. When I got home, I tightened up the wedge block so it's straight now whether closed or open. Good eye.

I decided to go with the hitch mount tire carrier in order to save weight overall. With everything that I've added onto the vehicle so far, it's nearly 1000 pounds of additional weight so it's getting close to GVWR. If I do consider a full rear bumper it will most likely be aluminum dual swing out. My twin brother is putting on a full aluminum rear bumper soon so we'll have to see how that goes and how much weight it adds to the vehicle with everything he puts on it .

A major consideration of my build is keeping weight under GVWR so that I can maintain safety, handling and breaking.

What are you considering adding?


I was asking whether or not you liked the Runner without the rack. I am on the fence on whether I think it looks good but wont really need the rack if I get a rear bumper that can hold my equipment.

I will be ordering a hefty fabworks rear aluminum bumper, I love the utility and weight of it!

Your Runner is awesome!
 
Thank you for the compliments. Nice! I think the Hefty Fabworks aluminum bumper is best out there. Great choice!

I was asking whether or not you liked the Runner without the rack. I am on the fence on whether I think it looks good but wont really need the rack if I get a rear bumper that can hold my equipment.

I will be ordering a hefty fabworks rear aluminum bumper, I love the utility and weight of it!

Your Runner is awesome!
 
Brackets for emergency amber LED lights

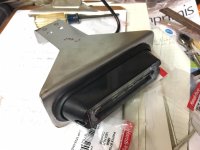
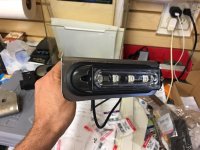
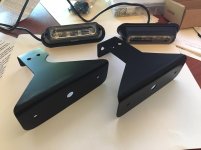
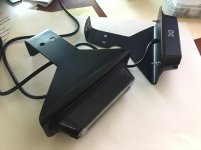
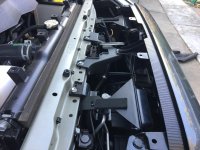
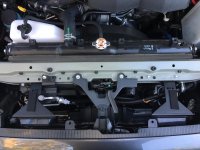
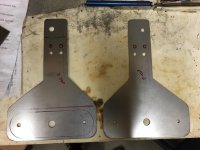
This past weekend I made some brackets for emergency amber LED lights.

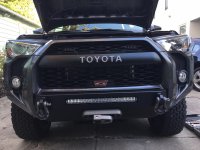
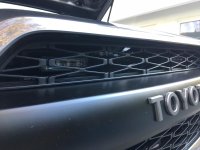
The lights contain 4 bright LEDs on each, have an excellent water proof housing and a dark appearance when off, which lends to the stealth look behind the grille.

I picked these up on Amazon here: https://www.amazon.com/gp/product/B01D4282LO/ref=oh_aui_detailpage_o01_s00?ie=UTF8&psc=1

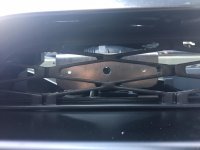
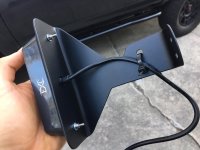
The brackets I fabricated allow the lights to be mounted behind the upper grille mesh using existing threaded holes on the upper radiator support. Because they're mounted and wired separately from the bumper, the bumper can come off and back on without unbolting or unplugging the lights.

Once I get the roof rack on and a few other emergency lights installed, I will wire them all up together to the sPOD and create strobing effects.
 

Attachments

  • IMG_4345.jpg
    IMG_4345.jpg
    130.1 KB · Views: 1,402
  • IMG_4351.jpg
    IMG_4351.jpg
    117 KB · Views: 1,395
  • IMG_4352.jpg
    IMG_4352.jpg
    124.4 KB · Views: 1,388
  • IMG_4369.jpg
    IMG_4369.jpg
    118.9 KB · Views: 1,394
  • IMG_4673.jpg
    IMG_4673.jpg
    122.7 KB · Views: 1,383
  • IMG_4675.jpg
    IMG_4675.jpg
    127.8 KB · Views: 1,389
  • IMG_4676.jpg
    IMG_4676.jpg
    117.7 KB · Views: 1,408
  • IMG_4677.jpg
    IMG_4677.jpg
    124.7 KB · Views: 1,381
Amber light brackets continued...

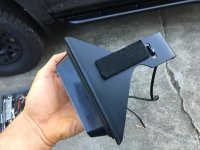
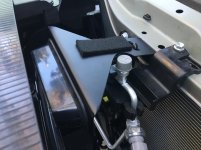
Each bracket naturally points up a little higher than the intended position. I added little soft pads with adhesive to the tops of each bracket, which when the large plastic tray is installed above, pushes slightly down on the brackets putting the lights right into the position I wanted behind the grille. This tension between the bracket and upper tray prevents the bracket and lights from vibrating or bouncing up and down on rough terrain, which would just look flimsy and silly on the trails and possibly damage the lights or shake them loose over time.
 

Attachments

  • IMG_4678.jpg
    IMG_4678.jpg
    131.6 KB · Views: 1,373
  • IMG_4681.jpg
    IMG_4681.jpg
    133.5 KB · Views: 1,391
  • IMG_4682.jpg
    IMG_4682.jpg
    127.7 KB · Views: 1,393
  • IMG_4684.jpg
    IMG_4684.jpg
    131.2 KB · Views: 1,389
  • IMG_4689.jpg
    IMG_4689.jpg
    123 KB · Views: 1,373

Members online

Forum statistics

Threads
278,316
Messages
3,554,120
Members
248,016
Latest member
Advally Service

Trending content

Back
Top