Daystar Budget 1" Spacer Install

Ordered. My first lift of any vehicle at any time and I have been through some cars. LOL.

I figured this would get me started on a level until I decide to go with a complete coilover set up if necessary. Dont think I will ever need it but when my oem set up wears out or I want a better ride, I'm on it.

Now, anyone in south jersey want to help install. I can cook up a mean steak and provide plenty of cold ones.

[MENTION=61775]seanmullin[/MENTION] maybe
 
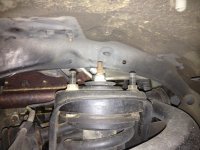
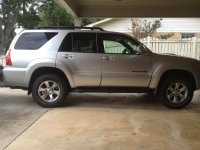
I did not trim the existing bolts like the instructions said. Here is a pic of the installed spacer and one of the truck as it sits with it installed. Plenty of room and everything tightened up like it was supposed to.

Biggest PIA is that inner nut on the top of the strut.
 

Attachments

  • IMG_0837.jpg
    IMG_0837.jpg
    133.4 KB · Views: 1,726
  • Image.jpg
    Image.jpg
    131.2 KB · Views: 1,676
So just to confirm and not make a new thread, the newer kits don't have to cut the studs. Just screw the extenders on the original studs, correct? How difficult is this to do with XREAS? I want to keep it for now since it rides so great and I have no intentions of off roading it yet. I might do a suspension lift after it's paid off. For now I want to enjoy the XREAS, I already have the budget boost kit, I just need to have it installed.
 
1" spacer so it'll be ~2" total lift. Part number KT09117BK.

Wait can you tell me how that works? I was about to order a 2" space for my 06 2wd just to get it to sit level. Hate the stink bug stance.

Will the 2" spacer end up being 4" lift? I only need 2" to get it level.
 
So just to confirm and not make a new thread, the newer kits don't have to cut the studs. Just screw the extenders on the original studs, correct? How difficult is this to do with XREAS? I want to keep it for now since it rides so great and I have no intentions of off roading it yet. I might do a suspension lift after it's paid off. For now I want to enjoy the XREAS, I already have the budget boost kit, I just need to have it installed.

You shouldn't have to cut the studs, just screw the extenders on. The install with xreas isn't much different than without, same procedure but you'll have the line attached to the shock limiting movement.

Wait can you tell me how that works? I was about to order a 2" space for my 06 2wd just to get it to sit level. Hate the stink bug stance.

Will the 2" spacer end up being 4" lift? I only need 2" to get it level.

Most spacers are advertised as the lift amount and not the spacer thickness. The Daystar budget boost is one of the few that is advertised as thickness. Easiest analogy I have is for you to hold your arm straight out in front of you. Now, push your elbow down 1". Your fingertips would have moved 2" or more, even though you only moved your arm one inch. Because you moved somewhere in the middle and not the end away from the pivot point, the lift amount is multiplied. The Daystar budget boost will give you the 2" lift you're looking for.
 
So a couple of weeks ago i replaced my fronts. left side was at about 2 1/2 and right was 3 1/2. that is about top of the wheel to bottom side wheel well. after the install with struts and Daystars I remeasured to different measurements, drove it around and remeasured the following day. both sides were at 4 3/4 inches. And now notice that i have to step up a bit to get in. That is using the Daystar budget boost 1"
 
A little confused

I emailed daystar on the kit mentioned, KT09117BK

They said the kit does come with longer studs, so the factory studs would need to be removed...

I know the more common 2.5" does have the stud extenders, but it appears the 1" level kit has gone back to replacement extended studs??
 
Last edited:
I emailed daystar on the kit mentioned, KT09117BK

They said the kit does come with longer studs, so the factory studs would need to be removed...

I know the more common 2.5" does have the stud extenders, but it appears the 1" level kit has gone back to replacement extended studs??

I think Daystar may have given you the wrong information. I bought that same kit (KT09117BK) and it came with the stud extenders.

Here's the thread from my writeup:
http://www.toyota-4runner.org/4th-gen-t4rs/144968-daystar-cornfed-2-1-lift.html
 
I ordered my daystar 1" kit last month but the more I drive the more I feel like my XREAS has gone to shit and might as well save up for 5100's all around. If anyone wants to buy the kit shoot me an offer.
 
This doesn't show the actual install... but if you have any questions with what to pull apart to get at the strut this video looks perfect from XinnKoda on youtube. Search 'HOW TO: 2005 Toyota 4Runner Lift Kit/Front Strut Replacement' if the link breaks. Looks like they had some rust issues lol. https://www.youtube.com/watch?v=huJ9N028sOY&t=333s
Already have 1.5 in spacer on the rear, and am going for this 1" on the front this weekend.
 
So just to confirm and not make a new thread, the newer kits don't have to cut the studs. Just screw the extenders on the original studs, correct? How difficult is this to do with XREAS? I want to keep it for now since it rides so great and I have no intentions of off roading it yet. I might do a suspension lift after it's paid off. For now I want to enjoy the XREAS, I already have the budget boost kit, I just need to have it installed.
I have xreas and installed this kit around 10k km ago. The only difference is that front struts have to stay connected to hydraulic lines, so I used a rubber strap with hooks to keep it hanging and loosen 1 bolt on each side to allow hydraulic line to extend a little further for strut to move an extra inch or so at the top to insert the spacer. I didn't do alignment and my truck is driving fine, no uneven wear on tires or anything.

05v6LTD-daystar front 1", 1,25" wheel spacers, 5th gen brakes, Chinese Bluetooth.
 
Installed today

I wanted to post up my experience with the daystar budget boost 1 inch spacer lift since this is one of the only threads that had most of the information I was looking for prior to buying the budget boost spacers. I installed the budget boost today on my own in my driveway. It took around 3-4 hours, but it was my first spacer lift install, so I took it slow to keep an eye on the details.

My 2004 4runner has XREAS, so i had to get a bit creative with getting enough space to fit the spacer in while not straining the XREAS hydraulic lines. I found that disconnecting the two bolts that connect the lower control arm to the hub assembly helps a lot in getting the LCA down far enough to have space to lower the strut assembly to fit the spacer on top.

I can also confirm that you do not have to cut your existing top hat studs, just screw on the daystar stud extenders. Also (as others have suggested) get a 14mm ratchet wrench - I cant imagine doing the job with a regular 14mm wrench.

I went from having 8.75" of clearance under the front skid plate, to having 10.75" of clearance under the skid plate.

Overall, I'm very please with how it turned out. :banana:

Cheers

97E

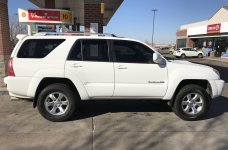
PS here's a picture of how it sits after the lift. (excuse my missing roof rail fascia - came off in the car wash :frusty:)
 

Attachments

  • 4runnerspacerlift_1_31.jpg
    4runnerspacerlift_1_31.jpg
    136.3 KB · Views: 540
Can anyone provide a couple of details on the install for the Daystar 1" kit?
  • Is an alignment required afterwards?
  • Is the steering wheel centered after the leveling kit is installed?
Thanks!
 
Can anyone provide a couple of details on the install for the Daystar 1" kit?
  • Is an alignment required afterwards?
  • Is the steering wheel centered after the leveling kit is installed?
Thanks!

I've done a ton of suspension work to my now 4runner(just installed the budget booster this weekend) and lots of hi-po cars.

Always get an alignment after doing suspension work.
 
I just completed this install last night on my 04 4x4 v8 in anticipation of some new 265/70/17 tires coming later this week. I was able to get the inner top bolts out in a matter of minutes on both sides.

On the passenger side, remove the airbox, then look down into the area where the shock is, you should see the edge of the nut on the shock mount. From there use a flat crow bar and gently pry the sheet metal back an inch or so. This gave me the clearance I needed to fit a socket over the nut from the engine bay. On the drivers side you just need to pry the sheet metal back to make room, nothing needs to be removed.

Aside from this the DS instructions do not mention (or mine did not at least) anything about getting the swaybar out of the way, dropping this is a total of 8 bolts (4 for the skid plate and 4 for the sway bar brackets) and makes getting the strut out of the truck a breeze. This was my first time working on the T4R (not my first time working on suspension) and I had this completed in about 4 hours which included having to cut one of the top mount bolts on the passenger side because it did not want to budge.
 

Members online

No members online now.

Forum statistics

Threads
278,316
Messages
3,554,111
Members
248,016
Latest member
Advally Service

Trending content

Back
Top