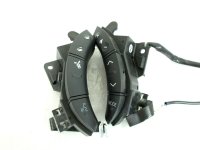
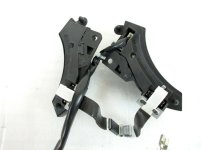
DIY Bluetooth/Voice Command steering wheel button install (pics)........for REAL

Just installed the new buttons in preparation of the new HU...took about 15 minutes and looks great...thanks to the OP for the great instructions! More will be posted upon HU installation.
 
I bought another set of the steering wheel controls...SUPER easy to install with the OP's instructions...If anyone wants it, I paid $136 to my door and it includes the ribbon, the buttons, and new screws...I'll sell it for $120 shipped to your door and it is all brand new in box from Toyota; all items are still in the Toyota parts bags...
 
I bought another set of the steering wheel controls...SUPER easy to install with the OP's instructions...If anyone wants it, I paid $136 to my door and it includes the ribbon, the buttons, and new screws...I'll sell it for $120 shipped to your door and it is all brand new in box from Toyota; all items are still in the Toyota parts bags...

PM Sent...
 
Need some advice from someone who has ripped into these wheels before. I have an 06 SR5 with no audio controls on the wheel. I am replacing the wheel with one that has audio controls. My question is, for models without the factory steering wheel controls, will there be an existing wire harness in the steering column that the updated wheel with the controls will plug into, and lead to the radio?

Alongside the new wheel, the head unit will also be upgraded and a Maestro added to make use of the steering wheel controls. The only piece of this puzzle that I don't know is whether there already exists the wires running from where the steering wheel control harness plugs into the wheel down to the harness that plugs into the head unit.

Sent from my SM-G935V using Tapatalk
 
Chances are the clock spring is different. But only way is to try and find out. When I changed a clock spring out in a few 2013 Tacomas. They needed the VIN since there were 3 variations. Leads me to believe there are differences
 
Researching clock spring, looks like limited, sport and SR5 have the same part number. Looks like you are good to go. But if you're ymmv good luck.
 
Reading through old threads it appears that all models used the same radio wire harness, so upgrading to the audio controls should be as simple as swapping out the airbag and plugging in the control module. Will report back once I've gotten it all together, as I'm also swapping out the steering column.

Sent from my SM-G935V using Tapatalk
 
Confirmed - Did the swap this past weekend. Base steering wheels can be upgraded to include steering wheel controls by only swapping out the airbag with the proper cutout and inserting the volume control module. I also bought the Bluetooth/phone control module and ribbon cable off of ebay, and these installed without a hitch.

Bear in mind aftermarket head units do not come wired to operate with factory steering wheel controls and aux ports, so if you are running an aftermarket head unit, you will also need to wire in a Maestro RR with TO1 harness in order to be able to use the steering wheel controls. It's not difficult to do and is pretty self explanatory.

My upgrade was partially to gain functionality but also to play around and derive satisfaction from the insatiable urge to make things better. I paired this all to a Kenwood head unit, and total cost excluding time was:

Maestro RR + TO1 harness - $140 (Amazon for the RR, Crutchfield for the harness - don't buy these used)
Airbag - used OEM - $145 shipped from ebay (will sell my old one and probably break close to even)
Salvaged Steering column containing audio control module - $155 shipped from ebay (also includes telescoping functionality which mine does not have. Will make this swap at some point.)
Steering wheel phone control module - new OEM 84244-35030 - $79 shipped from ebay
Steering wheel cable sub-assembly to connect audio and phone modules - new OEM 84204-58010 - $34 shipped from ebay
 
For those (including me) who say you need a PAC or Maestro kit for your aftermarket kits, I wanted to add, if you decide to go for an Android head unit, you will not need either module as these buttons are recognized by the head unit. On all of them, you can program each button to do whatever you want.
 
[MENTION=50507]CookieRoe[/MENTION] - By any chance, do you still have the pictures that go along with your write-up? It looks like they're no longer available via photobucket.

Thanks.
 
[MENTION=50507]CookieRoe[/MENTION] - By any chance, do you still have the pictures that go along with your write-up? It looks like they're no longer available via photobucket.

Thanks.

I have them SOMEWHERE. Yeah, photobucket sux. Hard.

Give me a couple of days to find them.
 
OK, this subject has been covered ad nauseum, however many complain of the lack of pictures. It's really quite simple. Hope this helps anyone.

Purpose: If you added an OEM NAV, like I did, this will enable BT commands for the headunit on the steering wheel, just like it came from the factory. If you have an aftermarket HU, this will also help you, however you guys will need a PAC unit and will need to program it. Unfortunately I don't have any knowledge of that.

Note: You will notice both my right and left side buttons are not installed initially for this writeup. I previously took them off. In any event, it shouldn't matter.

1) Disconnect the negative terminal of your battery. You will need a 10mm socket. This is to minimize (eliminate) any chance of the airbag exploding in your face. Expert installers usually don't, but most of us are novices, so.........

yHAocsdl.jpg


2) On either side of the steering wheel, there are covers that pop out. Use a flathead and gently pop them off. After that, you will see a Torx 30 head, loosen this (but don't completely take it off). Loosening it (screw) will loosen the airbag off of the steering wheel. Repeat for the other side.

gBr4kffl.jpg


3) Grab the bottom part of your airbag and push up and/or outward and the bag will come off. That's it, the bag is held in place by only these 2 torx screws. You don't need to disconnect it, just set it aside.

zq0fUYml.jpg


4) Set it aside, or better stated: place it on top of the steering wheel. Again, no need to uninstall the airbag connectors.

aIk2tdTl.jpg


5) Here you will see a philips screw toward the top of the volume/station/mode button assembly. Take it off and set it aside. The left side buttons (volume/station/mode) are further attached to the steering wheel via a connector (white) at the rear of the assembly. Unlatch it. Your button assembly is now free. Same goes for the blank over on the right side. However, there will be no connector to unlatch.

gjp14KDl.jpg


6) Install your buttons and ribbon cable (Right Module/bluetooth buttons #84244-35030-B0 and Ribbon Cable #84204-58010). The ribbon cable is what attaches your BT buttons to the left side button assembly. It is used to transport signals from the left side button to the right side module when any button on the BT side is pressed. Be careful not to rip it or its game over.

7) Note that at the end of the ribbon cables are the attachment ports. You will notice the word "PULL" on the side of the port. I noticed you can push it in , but I haven't confirmed if it's to lock it into place or what.

lTv9ZPil.jpg


lock or unlock?

u6WdGyDl.jpg


8) Anyway, gently snap it into place. It only goes in one way. You will also notice a whitish/clear plastic tabs with holes in the ribbon cable assembly. This is to hold the ribbon cable in place and prevent it from completely folding (damage).

VTOGmWTl.jpg


9) Take hold of the plastic and bend it SLIGHTLY so it fits into the button assembly. You will notice two "prongs" sticking out. Ok, these prongs are to go through the holes, like so:

7kgKzKGl.jpg


10) Turn the assembly around and install it into the steering wheel. At the halfway point of the ribbon cable, you will notice a clip. Now look behind toward the steering wheel and you will notice where this clip is supposed to "clip" onto.

vbSpK3yl.jpg


11) Clip on!! Repeat for the other side: (please note this ribbon is ripped, I used it to "practice" installing the new one)

cTTiIlWl.jpg


12) Reinstall the screws on both sides so they both button assemblies are firmly installed.

fV0Kc6Fl.jpg


13) Get your airbag and place in where it should go. Make sure it's aligned and go to either end where you loosened those torx screws and tighten! Next reinstall the plastic steering wheel covers (snap on) and your done!

m5N66fGl.jpg


14) Reconnect your battery, let your NAV boot up. When you touch any BT button, you should get a screen similar to this one:

IKrEtfbl.jpg


At night, they will light up like so:

lEWu7AHl.jpg


Like I mentioned before, this is very easy. Especially for those with aftermarket HU (you will need a PAC kit and program it) or an OEM NAV unit. Other BT enabled HU (OEM Toyota) will also benefit from this add on.

EDIT: fixed the photos, sorry. Also, if you add these buttons, if you get an Android head unit, you can totally use them without any PAC kit.

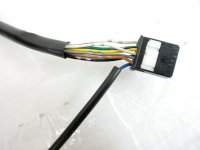
Great thread, I’ve been wanting to add the Bluetooth controls to mine as well. Do you know if this one will work in our setup? Mine is a 2008. Will the ribbon plug into our stock volume controls? If not will replacing them both work and the new wiring harness plug into the steering wheel? This one is an ANH10 75B037 model if that helps.
 

Attachments

  • 3B009412-0CC3-445C-894C-9FEF05F15613.jpeg
    3B009412-0CC3-445C-894C-9FEF05F15613.jpeg
    129.1 KB · Views: 814
  • D2F7B802-1A3B-432B-B22E-F692741E0350.jpeg
    D2F7B802-1A3B-432B-B22E-F692741E0350.jpeg
    117.7 KB · Views: 825
  • 1108EFB2-A4E7-42F8-8F6C-3AEB046D941B.jpg
    1108EFB2-A4E7-42F8-8F6C-3AEB046D941B.jpg
    116.4 KB · Views: 823
Last edited:
Wow, that are some interesting controls you found there! Never saw them. Are those front parking sensor buttons??? What do they do? Anyway, I'm fascinated, but I'm warry about if the plugs do the same as the stock 4Runner. It's worth a try, it is only $57 compared to $150 to the stock ones (or more).

To answer you question, yes, the ribbon cable should wire up to your stock volume controls, there is a an unused plug for them on the steering wheel volume control assembly.

good luck!
 
Last edited:
Wow, that are some interesting controls you found there! Never saw them. Are those front parking sensor buttons??? What do they do? Anyway, I'm fascinating, but I'm warry about if the plugs do the same as the stock 4Runner. It's worth a try, it is only $57 compared to $150 to the stock ones (or more).

To answer you question, yes, the ribbon cable should wire up to your stock volume controls, there is a an unused plug for them on the steering wheel volume control assembly.

good luck!

Idk honestly lol. I thought maybe a navigation button? I want to do the mod but not really enough to spend $150+ Just yet. Was just hoping to find a second hand right side, good shape and in working condition.
 
Idk honestly lol. I thought maybe a navigation button? I want to do the mod but not really enough to spend $150+ Just yet. Was just hoping to find a second hand right side, good shape and in working condition.

Maybe it will wire right up and work, except for that "parking sensor thingy" which of course our rigs don't have. I'm sure someone can figure out if they work by looking some some schematics. Whatever, it would be nice to know if this is a good low cost alternative to getting the factory buttons (cheaper).
 

Members online

Forum statistics

Threads
278,312
Messages
3,554,087
Members
248,016
Latest member
Advally Service

Trending content

Back
Top