DIY: Retrofit a Homelink garage opener into a '99 SR5

Drcoffee

Senior Member
ry%3D400


The cheapest way to start this project is on Ebay. I found this Tan Homelink rolling code unit for $22 shipped. You'll want at least 6" wires but you can replace it with 18ga wire if it comes too short.This unit came with a Black and Green/Brown wire. It looks like it has 4 wires but its really just 2 wires attached midway along the wire.
Green/Brown is (+)
Black is Ground (-)

ry%3D400


The headliner is about 1/8" thick so without modifying the headliner or the Homelink, you will not get the faceplate to lock into place. The easier choice was to mod the Homelink case. Use the rubber button piece as a template to mark the outer case. Open the Homeling case like a clam shell and cut along your lines and about 1/8" down from the top side. You will want to leave the frame intact to lock closed when you are done. Using a dremmel and cutoff wheel carefully cut out the case and discard the remnants.
ry%3D400


ry%3D400


ry%3D400


On the side view, you can see how the cutout will fit through the headliner.
ry%3D400


Its time to remove the console. Pop the lens out and you will find a Phillips head screw. remove the screw and remove the console.
ry%3D400


You will be able to see that the drivers side houses the sunroof motor and there is a large cavity on the passenger's side. Figure out where you want to install the unit and mark the headliner in pencil or chalk.
ry%3D400


What I did once I found the location, I used stamp ink and dabbed it on the Homelink cutout on the plastic case and pressed it onto the headliner. Then with pencil darkened the outline to cut along.
ry%3D400


I used a utility knife to carefully cut the headliner. Its just presed cardboard so don't push too hard. You may go too far. Considering this is a cosmetic piece I would not suggest using an electric tool for this part.
ry%3D400


Keep trimming until you get a perfect fit.
ry%3D400


Here is the unit in place.
ry%3D400


Now for powering the unit. Decide if you want constant power or switched power. You have your choice here because the map lights are constant on and the sunroof is switched. The pointer is in the second hole on the plug which is switched power. The hole below is constant power. Trace the wires back up 5" to the Y in the harness and tap splice into the wire of choice. I decided to use switched power because I park on the driveway and for security reasons I thought it was the best choice.
ry%3D400


Blue/Red = Switched power
Blue/Yellow = constant power

ry%3D400


The ground wire was easy. I stripped off 1/2" of the insulation from the black wire and tightened one of the motor mounting bolts down against it as you can see in the picture.
ry%3D400


ry%3D400


Test that the Homelink is getting power and if it is, press the rubber buttons and faceplate into place. If the face fits loosely, shim it from inside the headliner with something non-metallic.
ry%3D400


Tuck all the wires back up in the headliner and re-install the console and lens plate.
ry%3D400


This took me about 10 minutes to cut the Homelink housing and about 30 minutes to install. Looks factory and works great. You can find the programming instructions at the Homelink website.
:tea:
 
Last edited:
Register to hide this ad
Another Homelink location

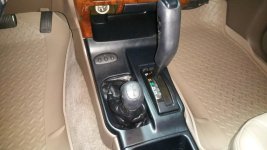
Hey guys, I've just purchased a 97 4runner and one of the first mods I did was add homelink. I got a ton of useful info off of these forums on how to do it, but I wanted to show you guys another location that works flawlessly and in my opinion it looks factory. ThIs location is if you don't wanna cut into your headliner. I found this console piece on ebay for $30, just in case I screwed it up, it's alot easier and cheaper than a new headliner, that was my thinking.
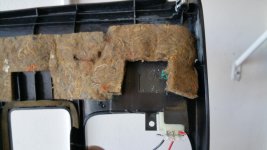
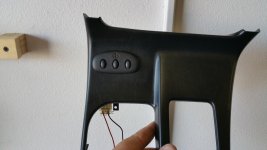
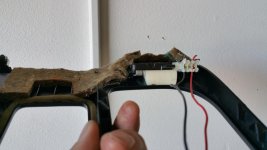
I installed my homelink on the center console above the 4wd shift lever, I wired it to the cigarette lighter for power (grey wire) and grounded it to a bolt under the console. Since the plastic is thicker, I also had to cut the homelink module casing just like the above install, and the hole in the console was also cut like he did above in his headliner. Also you have to install it exactly where I have it because there are large electrical connections just to the right where the module now sits under the console. Since the console piece starts to curve up more drastically the more forward you go, you need to keep it as far back as possible towards the 4x4 shifter, that way the homelink faceplate will sit flush. Also that curve creates a gap between the homelink module and the plastic console on the back side, so I "shimmed" that gap using foam, it's actually a triangle makeup sponge and it worked perfect. The other reason you need to have that gap is so the 4x4 boot can install in that gap between the console and module. Also you can see that the wire plug from the homelink hangs down into the 4x4 shift area, but there is plenty of room and nothing comes close to hitting each other. If for some reason you were worried about that, you could cut off the plug and solder the wires directly to the board, so it wouldn't go into the 4x4 shift area, but like I said, there is plenty of space. I test fit it multiple times by shifting into 4x4 low gear, and it doesn't even come close to touching. I didn't take photos of the module cut up, or the hole cut in the console, because it's exactly like above with his headliner install. The only thing I had to cut on the console besides the hole for the buttons, was there were a couple plastic "ribs" on the underside of the console that needed to be cut off. There is also some padding that I peeled back and the put it back over the module when it was installed. It was pretty easy and straightforward, thanks to all your guys help on here. Here are a few photos. If you guy have any questions, let me know. Thanks
 

Attachments

  • 20150919_125519.jpg
    20150919_125519.jpg
    124.2 KB · Views: 1,012
  • 20150919_125513.jpg
    20150919_125513.jpg
    123.3 KB · Views: 953
  • 20150919_125534.jpg
    20150919_125534.jpg
    127.5 KB · Views: 1,255
  • 20150919_164438.jpg
    20150919_164438.jpg
    134.9 KB · Views: 1,053
Nice job. A lot of guys like me install a transmission temp gauge in that location. Make sure a spilled slurpee cant wet your circuit board.
 
That's a good idea about it not getting wet. I Never thought about that. My next mod is going to be the 99+ console with cupholders, so hopefully I wont be worrying about a drink looming over the homelink area...I'll have to check out the trans temp gauges you guys have installed. I absolutely love this forum, I've never been a member to any forum before, so I'm new to how all this forum stuff works. The information and experience that everyone has on here is great. Your write up really made my install easy, so thank you!!
 
Thanks for the walkthrough... did exactly as you said (lesson learned when i tapped into one of the two blue/yellow wires and didn't get power - then i reread it and saw you clearly identified which wire i was supposed to use) and it works as it should. As an added bonus i was able to easily scrub off 14 years of grime off the overhead console/map light

I think I put mine back towards the sunroof a little too far because it hits something and forces the unit to go uphill a little... May put some dense foam to space it out towards the windshield in hopes that it will even it out and remove that gap between the headliner and the face


Members online

Forum statistics

Threads
278,315
Messages
3,554,125
Members
248,016
Latest member
Advally Service

Trending content

Back
Top