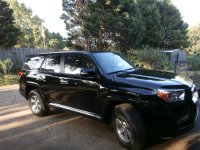
DIY: Roof Rack Delete (w/ pics)

Thanks for the great post with step-by-step instructions. I am anxiously waiting for my Bajarack to arrive and will need to remove my rails. Your post will help make the job go smoothly for me.
 
roof rack

great write up, thanks for adding the detailed pictures, I am going to use this to remove mine and Rhyno line it, I want it black and a truck bed liner is a great and durable way to go.
 
Great write up WB. That FJ is awesome. I grew up in Wilmington and still get back quite a bit (wife and I still have a lot of family and friends in town). Can't believe I haven't seen it out and about.
 
Rack removal thank you

Thank you for the rack removal tutorial. I think this is much cleaner looking, and I don't have any use for the decorative rails that don't carry anything. If I decide to put stuff on the roof, a Gobi should do the trick.

I forgot to pay attention to one thing. Note, do not use the roof as a fulcrum to remove the plastic caps, you will put divots in the bodywork. Use the 3" and 7" method, and the screwdriver to push the tabs, and try to lift up to gently snap the cover out of place.

 

Attachments

  • image.jpg
    image.jpg
    137.6 KB · Views: 8,123
Last edited:
Thank you for the rack removal tutorial. I think this is much cleaner looking, and I don't have any use for the decorative rails that don't carry anything. If I decide to put stuff on the roof, a Gobi should do the trick.

I forgot to pay attention to one thing. Note, do not use the roof as a fulcrum to remove the plastic caps, you will put divots in the bodywork. Use the 3" and 7" method, and the screwdriver to push the tabs, and try to lift up to gently snap the cover out of place.

Sorry! Thats why I recommended using the rag between the screwdriver and the car to prevent denting/scratching. Maybe using something stronger would be the ticket. Glad it worked out! :D
 
The rag works great for protecting the finish, just cannot use the body as a fulcrum, and you don't need to...just get the screwdriver in at the places you measured and lift up. My local hail repair body guy will be able to pop out the divots!!!
 
Sweet Corrado. I used to have a G60, and remember what a headache it was keeping that thing running. But it sure was fun!

Incidentally, I'm moving close to Wilmington soon. Getting stationed in Camp Lejeune. I know nothing about the area, but me and the wife are excited to get out and explore - we hear it's beautiful country.
 
oh thanks for this write-up! i've been wanting to take out mine just so that it would look better without it with 24's in.
 
New member and I just came across this thread. I noticed a number of suggestions for waterproofing the bolt holes. One suggestion I did not see was the use of teflon tape. It is used in plumbing applications for threaded connections under pressure. It would seem to be more than adequate for stopping any water leakage and it has the added benefit of being easily removed (unlike a loctite solution).

Anybody try this or have any thoughts about using it.
 
New member and I just came across this thread. I noticed a number of suggestions for waterproofing the bolt holes. One suggestion I did not see was the use of teflon tape. It is used in plumbing applications for threaded connections under pressure. It would seem to be more than adequate for stopping any water leakage and it has the added benefit of being easily removed (unlike a loctite solution).

Anybody try this or have any thoughts about using it.

I did used teflon tape on all of bolts and is working great after a few years of car washes and rain storms.
 
New member and I just came across this thread. I noticed a number of suggestions for waterproofing the bolt holes. One suggestion I did not see was the use of teflon tape. It is used in plumbing applications for threaded connections under pressure. It would seem to be more than adequate for stopping any water leakage and it has the added benefit of being easily removed (unlike a loctite solution).

Anybody try this or have any thoughts about using it.
i used Teflon tape on the bolt threads and a little silicone around the bolt heads for the ones where the gasket material came up when removing the factory bolts. (unlike SR5 & Limited, 10-13 Trail Edition already has the brackets and gasket underneath) a couple came out perfectly clean and left the gasket sealed in place intact; Teflon tape on threads only for those. been about a year. no leaks so far.
 
Last edited:
In front of the Rado is a 1971 Series IIa Land Rover w/ Defender 90 axles/coils, transmission and transfer case, military spec engine w/ headwork, etc etc. I'm a huge Rover fan.

IMG_0926.jpg~original

That Land Rover is cool beyond words! If you have a build thread anywhere on the interwebs, I would love to see it!
 
SandCrawler--does that mean I might only need to acquire the plastic covers after removal of the brackets with no other hardware necessary. I have the 2014 TE.
 
SandCrawler--does that mean I might only need to acquire the plastic covers after removal of the brackets with no other hardware necessary. I have the 2014 TE.
the 14+ Trail has the same roof rack as the SR5 & Limited so i can only assume you need the complete kit (bolts, brackets and covers) as laid out in the first post in this thread.

btw "@" in front of a username (exact spelling) generates a "mention" which shows up in the user's control panel, letting them know there's someone asking a question, etc. like this: [MENTION=107452]JAD[/MENTION]

good luck. :cheers:
 
New member and I just came across this thread. I noticed a number of suggestions for waterproofing the bolt holes. One suggestion I did not see was the use of teflon tape. It is used in plumbing applications for threaded connections under pressure. It would seem to be more than adequate for stopping any water leakage and it has the added benefit of being easily removed (unlike a loctite solution).

Anybody try this or have any thoughts about using it.

I recently developed a leak from the rear driver's side rack fitting. I pulled it off and went to town with 3M 4200 marine sealant. In theory it should be water-tight from the factory, but after miles on the road with paddleboards and gear tugging at those bolts, I have little confidence in a rubber washer. My solution isn't pretty, but it sure as shit won't leak. 4000 / 4200 is good stuff and if needed, can be disassembled. Stay away from the 5200 unless you like heat guns, hammers and crowbars.
 
I recently developed a leak from the rear driver's side rack fitting. I pulled it off and went to town with 3M 4200 marine sealant. In theory it should be water-tight from the factory, but after miles on the road with paddleboards and gear tugging at those bolts, I have little confidence in a rubber washer. My solution isn't pretty, but it sure as shit won't leak. 4000 / 4200 is good stuff and if needed, can be disassembled. Stay away from the 5200 unless you like heat guns, hammers and crowbars.

Any pictures you got on how you did it
 
Any pictures you got on how you did it

No pics, unfortunately. I simple pulled the bracket and bedded it, ensuring that sealant worked its way between the sheet metal and the plastic tubes extending inside. I reattached the rack and put plenty of sealant on the threads of the screws.

In the process, the fitting that holds the backing plate for the screws fell off inside of the headliner. As an added bonus I got to learn how to take that down, as well as find out how sensitive it is to prying. Enjoy
 
No pics, unfortunately. I simple pulled the bracket and bedded it, ensuring that sealant worked its way between the sheet metal and the plastic tubes extending inside. I reattached the rack and put plenty of sealant on the threads of the screws.

In the process, the fitting that holds the backing plate for the screws fell off inside of the headliner. As an added bonus I got to learn how to take that down, as well as find out how sensitive it is to prying. Enjoy

Ever thought about using windshield glue
 

Members online

Forum statistics

Threads
278,316
Messages
3,554,111
Members
248,016
Latest member
Advally Service

Trending content

Back
Top