Wish there was a how to video on Youtube or something for this, I always like to know what I'm getting myself into before doing it.
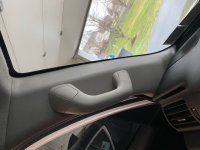
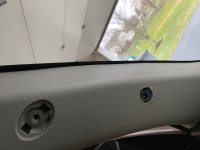
So do we have to actually drill into the metal A pillar itself? Or just drill out a hole in the A pillar cover and shave some black plastic underneath? Most folks are mentioning that this is fairly easy but after going through this thread, everything seems a tad vague with limited pictures that are usually just the finished product.
No hate I just really want to do this mod and want more detailed info, always sucks to start a project before being prepared and I live in a small town without a nearby Lowes.
So ironically I though of this and was kinda hoping to find a local member to install and take a video....
But like others said it's not too though at all.
I recommend a old bath towel on the dash so you don't drop something...scratch the dash or steering wheel etc....
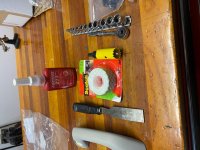
Need a drill or 1/4 impact inoder to screw the self taping screws into the metal A-pillar. I provide self tapping sheet metal screws. Smaller pilot hole helps but the self tappers can bite right in.
I provide color photo instructions and a template that shows where to drill etc.
A Dremel tool is nice as it makes easy work of getting the inside of the plastic A-pillar. But it can be done with a good utility knife as its all think plastic that needs to be removed.
Wish there was a how to video on Youtube or something for this, I always like to know what I'm getting myself into before doing it.
So do we have to actually drill into the metal A pillar itself? Or just drill out a hole in the A pillar cover and shave some black plastic underneath? Most folks are mentioning that this is fairly easy but after going through this thread, everything seems a tad vague with limited pictures that are usually just the finished product.
No hate I just really want to do this mod and want more detailed info, always sucks to start a project before being prepared and I live in a small town without a nearby Lowes.
So ironically I though of this and was kinda hoping to find a local member to install and take a video....
But like others said it's not too though at all.
I recommend a old bath towel on the dash so you don't drop something...scratch the dash or steering wheel etc....
Need a drill or 1/4 impact inoder to screw the self taping screws into the metal A-pillar. I provide self tapping sheet metal screws. Smaller pilot hole helps but the self tappers can bite right in.
I provide color photo instructions and a template that shows where to drill etc.
A Dremel tool is nice as it makes easy work of getting the inside of the plastic A-pillar. But it can be done with a good utility knife as its all think plastic that needs to be removed.
If you have the hand tools described by Jason, and some metric sockets and ratchet, you should be fine.
You will need a 1” hole saw or a step drill (I think that’s what it is called).
No trips to the hardware store, Jason includes everything all hardware to mount the bracket.
Today I used 1 method previously used here by [MENTION=604721]smeerun[/MENTION].
I used a wood chisel to cut the back side of my a pillar cover. I went methodically “Slow” as to not cut too deep. I outlined the area that would require being removed as seen in the first post and in Jason’s instructions. I didn’t even cut the post with the clip on it, when finished cutting it all came off in one complete piece.
Upon looking at the instructions & and my previous photo, I realized the center of the hole was perfectly lined up with 2 support ridges on the back side of the cover.
I scribed a line with a straight edge both ways and just as suspected..... perfectly center!
Used a center punch where the 2 lines crossed, checked it with the new handle.... perfecto!
I cut the hole, and proceeded.
I just installed mine this morning. I used a heat gun to soften the plastic and then used razor blade to cut it out. Very easy and fast.
I think all in from start to finish was about 45 minutes maximum including clean up.
It's solid and not going anywhere. A great product which will make things easier for getting into my 4R. Thank you Jason for the simple and easy process from order to shipment and my subsequent easy install.
Jason, do you have bracket and install instruction for pre facelift 5th gen (2010-2013)? On my 2013 SRC cover doesn't exist whole A-pilllar cover is one piece. Also removal of it is not simple pop it off and looks like some cord holding it and must be cut. Without clear instructions I'm hesitant to cut anything near curtain air bag.
Jason, do you have bracket and install instruction for pre facelift 5th gen (2010-2013)? On my 2013 SRC cover doesn't exist whole A-pilllar cover is one piece. Also removal of it is not simple pop it off and looks like some cord holding it and must be cut. Without clear instructions I'm hesitant to cut anything near curtain air bag.
Yes, it can be done, it takes two brackets and have had people do it successfully just need to line up brackets with out the plastic apillar in place then install the apillar and drill holes into it.
you can just remove that cover, the cord can be removed. the airbag is installed AFT of where the handle goes and airbag is not affected at all.
Hello [MENTION=604721]smeerun[/MENTION]. New guy here, I've been following this thread and yours on the subject for some time. I have everything on order to complete this mod, the parts are due to deliver today. One question - do you need to remove all the raised portions of the bottom mounting surface of the grab handle with a dremel, so it's flat, with no raised surfaces? Thanks!
Hello [MENTION=604721]smeerun[/MENTION]. New guy here, I've been following this thread and yours on the subject for some time. I have everything on order to complete this mod, the parts are due to deliver today. One question - do you need to remove all the raised portions of the bottom mounting surface of the grab handle with a dremel, so it's flat, with no raised surfaces? Thanks!
Hey, welcome to the forums!
Yes, I had to shave off nearly all of the raised portion of the bottom mounting surface (only on the lower portion of the handle). However, I recommend waiting until the final stage of install to do this (metal bracket is permenantly mounted and plastic pillar cover is put on for the last time) so you know just how much you need to take off.
PM me or tag me here if you have questions, happy to help if you have issues during the installation!
Hey, welcome to the forums!
Yes, I had to shave off nearly all of the raised portion of the bottom mounting surface (only on the lower portion of the handle). However, I recommend waiting until the final stage of install to do this (metal bracket is permenantly mounted and plastic pillar cover is put on for the last time) so you know just how much you need to take off.
PM me or tag me here if you have questions, happy to help if you have issues during the installation!
I really appreciate the reply, thank you! Still waiting for the mail delivery, but I'll check everything out later and tag you if I have any questions. I don't think I have enough posts to PM yet...
Again, test fit it. The end goal is to have the handle flush with the pillar and solid. I didn't shave off the top portion at all but YMMV as it seems like [MENTION=103267]Saker[/MENTION] needed to shave both ends. :shrug:
Again, test fit it. The end goal is to have the handle flush with the pillar and solid. I didn't shave off the top portion at all but YMMV as it seems like [MENTION=103267]Saker[/MENTION] needed to shave both ends. :shrug:
I got out of work early Thursday. Had a prepped the handle previously & was just waiting for Jason's kit. It Arrived Tuesday. So having time & no real plans for MYE I went at it 3:00 done by 4:00. Thank you SAKER for getting me Jason's contact info.
Thank you Jason for working with me not having a Paypal acct.!!
I cn't figure out how to up load photo's here :der::loco::wacko::noidea::noidea::mmph:
I got out of work early Thursday. Had a prepped the handle previously & was just waiting for Jason's kit. It Arrived Tuesday. So having time & no real plans for MYE I went at it 3:00 done by 4:00. Thank you SAKER for getting me Jason's contact info.
Thank you Jason for working with me not having a Paypal acct.!!
I cn't figure out how to up load photo's here :der::loco::wacko::noidea::noidea::mmph:





 :noidea::noidea::mmph: