Eibach Pro-truck lift

I can't say I've read every post in this thread but darn near most. Many questions relate to the perch settings. I couldn't wrap my head around how the lowest setting was going get get the max claimed 2.5" lift. How would the other settings not provide higher lift?

I'll attempt to explain so others in my shoes may have a better understanding. Please correct me if I'm wrong and of course disregard lol.

Many of us are comparing and shopping the Eibach kit against the Bilstein 5100's as apple's to apples. This Eibach kit comes with a taller than factory spring which would provide a lift if even just mounted on a factory shock, whereas with the 5100 the lift comes solely from the perch settings using a regular factory length coil. Kind of apples and oranges.

Obviously if you you use the higher settings on the Eibach it will lift it higher, but that is only designed to compensate for additional weight of accessories such as bumpers. Winches etc.

In order to get the maximum advertised lift out of the 5100's you HAVE to use the upper setting.

How'd I do???

Sent from my SM-A205U using Tapatalk

You have it correct. The Eibach coil is where the lift comes from. Without the coil, it'd be similar to a 5100 with different lift height based of where you put the snap ring
 
Ryan, is this true or is their an easier way to make adjustments?

Also, would it be correct to assume measuring from the top line to the bottom line will tell me how much height I will loose after adjustment to lower line?
Sent from my SM-N950U using Tapatalk

The only way to adjust is to pull the shock off, take the spring off and move it down a couple notches.

You can down load the instructions from our web site. They state how much lift you'll get at each clip setting.
 
Any KDSS guys running this rear spring? Any issues with leaning after the install? And do these actually lift a vehicle 1 inch as opposed to 1.5-2 inches?

Me. I got the 1" dead on. But I'm also not running a third row. I hear that that is a variable on some people's lifts.

Can't say if I have a lean or not. Not that OCD to look, but some days it seems like it is, and other times it isn't. :shrug:
 
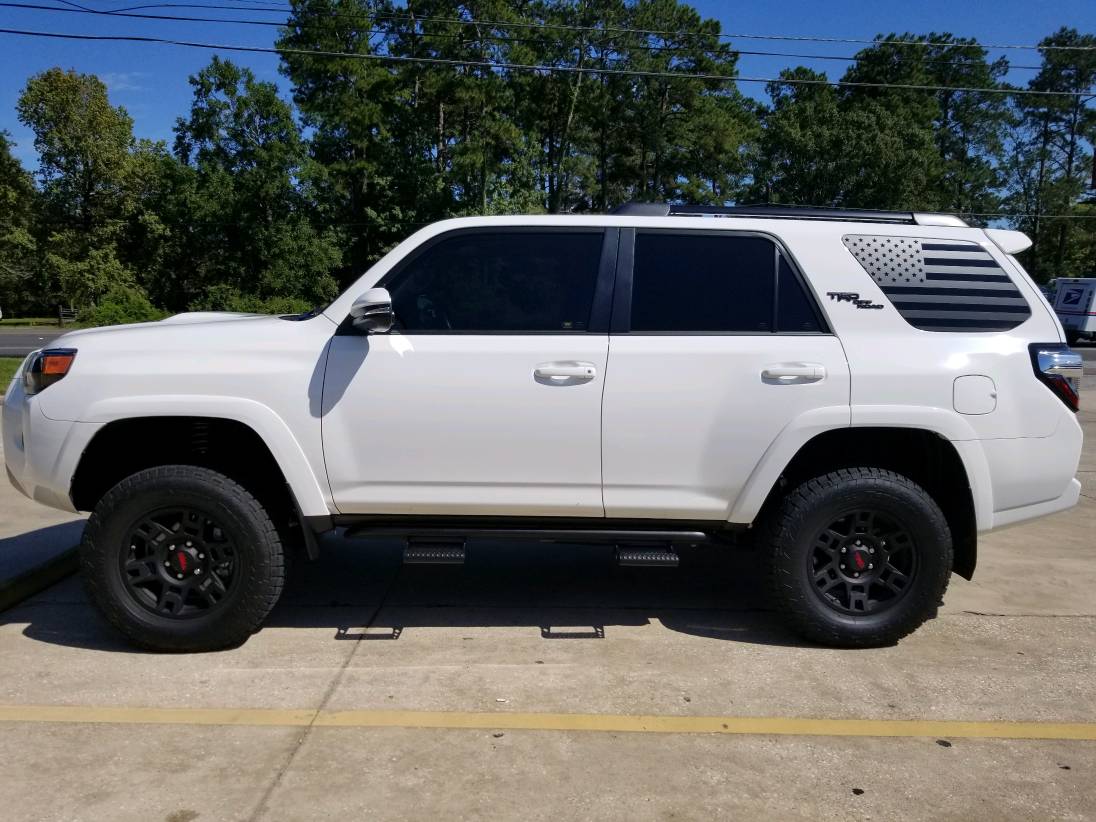
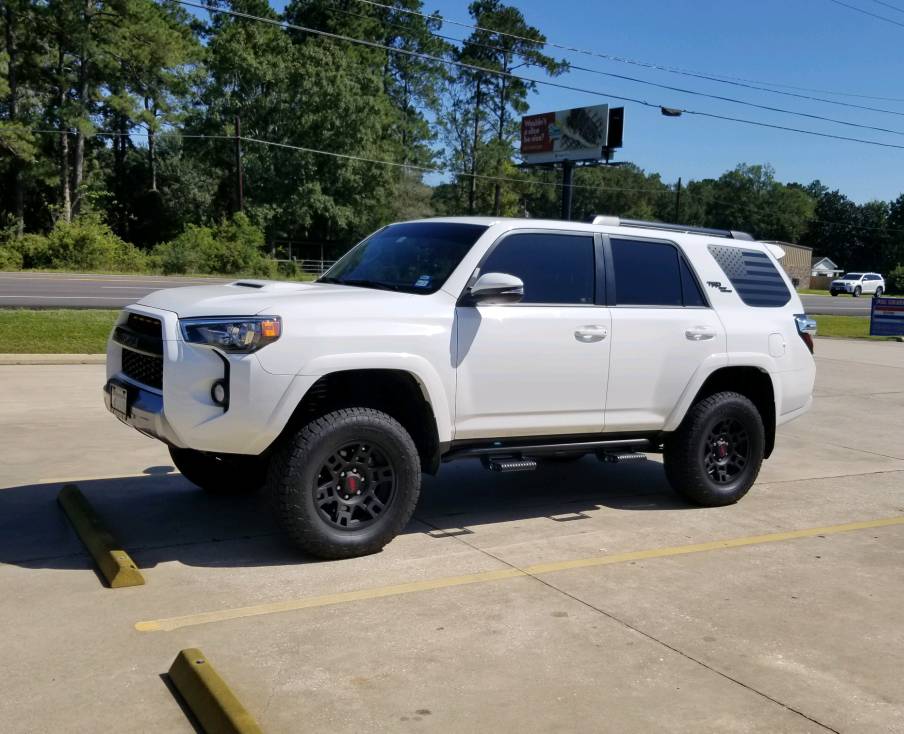
Reverse Rake on the top notch:
b7b750667e0d48a501b37d6ddc1db0a7.jpg
7b848a22dd14b497a8402f65fa28c7c3.jpg


Sent from my SM-N950U using Tapatalk

The ol' Carolina Squat
 
Me. I got the 1" dead on. But I'm also not running a third row. I hear that that is a variable on some people's lifts.

Can't say if I have a lean or not. Not that OCD to look, but some days it seems like it is, and other times it isn't. :shrug:

Sounds good. I am not OCD when it comes to lean. The rear of my 4Runner changes height as I use gas. I was just worried that I would get a crazy 1 inch lean that some get with other springs.
 
The only way to adjust is to pull the shock off, take the spring off and move it down a couple notches.


You can down load the instructions from our web site. They state how much lift you'll get at each clip setting.
I dropped it off for repair at noon, but they won't be able to get to it until tomorrow morning.

I talked to the tech that did the install and he claimed the clip came set on the tallest adjustment so that's how he installed it. Also said there were no instructions in the box.

Sent from my SM-N950U using Tapatalk
 
Most manufacturers are going paperless these days. Again, they can be downloaded on our web site.

Just looked for them on the site.... WOW! I will be honest here... Yea they CAN BE downloaded, but for someone with little mechanical knowledge those instructions are NOT GREAT to say the least. Im currently in college for auto tech and performance and i have full access to alldata with all torque specs, and suspension removal procedures, but for the average person with no experience or access to shop manuals, better instructions would be a welcomed addition.


QUOTED FROM INSTALL INSTRUCTIONS
1. Park vehicle on level surface and set emergency brake. Raise and support the vehicle with safety stands.
Refer to factory manual for proper location of safety stands.
2. Power washing your chassis will make the installation cleaner.
NOTE: Never work on or under a vehicle unless it is properly supported by safety stands.
3. Loosen and remove the OE shock per the factory recommended removal procedure.
4. Installation of the Eibach Pro Damper shock should be done in the reverse order of removal.


"Torque all fasteners to vehicle manufacturer’s specs."

"OEM mounting hardware may be either standard or metric."


Those are some REAL generic instructions there. This kit is for a specific vehicle. I think it would be rather easy to actually list the torque specs and hardware sizes at a minimum, better yet a step by step installation that includes pictures for someone that has never removed or installed suspension components. Haynes and chiltons arent around like they used to be on every vehicle and electronic manual subscriptions can be costly.


All that being said, there are plenty of youtube videos available online for people needing further guidance. Im also pretty impressed with the build quality on my kit, especially for the price... SO if the choices are, no detailed instructions but a nice low price VS highly detailed instructions with a higher price.... I will pick ZERO instructions LOL
 
Just looked for them on the site.... WOW! I will be honest here... Yea they CAN BE downloaded, but for someone with little mechanical knowledge those instructions are NOT GREAT to say the least. Im currently in college for auto tech and performance and i have full access to alldata with all torque specs, and suspension removal procedures, but for the average person with no experience or access to shop manuals, better instructions would be a welcomed addition.


QUOTED FROM INSTALL INSTRUCTIONS
1. Park vehicle on level surface and set emergency brake. Raise and support the vehicle with safety stands.
Refer to factory manual for proper location of safety stands.
2. Power washing your chassis will make the installation cleaner.
NOTE: Never work on or under a vehicle unless it is properly supported by safety stands.
3. Loosen and remove the OE shock per the factory recommended removal procedure.
4. Installation of the Eibach Pro Damper shock should be done in the reverse order of removal.


"Torque all fasteners to vehicle manufacturer’s specs."

"OEM mounting hardware may be either standard or metric."


Those are some REAL generic instructions there. This kit is for a specific vehicle. I think it would be rather easy to actually list the torque specs and hardware sizes at a minimum, better yet a step by step installation that includes pictures for someone that has never removed or installed suspension components. Haynes and chiltons arent around like they used to be on every vehicle and electronic manual subscriptions can be costly.


All that being said, there are plenty of youtube videos available online for people needing further guidance. Im also pretty impressed with the build quality on my kit, especially for the price... SO if the choices are, no detailed instructions but a nice low price VS highly detailed instructions with a higher price.... I will pick ZERO instructions LOL

Anyone can get the toyota shop manual specs for a couple of bucks. If one is not competent enough to research and understand how and why suspensions work, then its safe to assume that they should put the pliers down and go to a shop.
 
Anyone can get the toyota shop manual specs for a couple of bucks. If one is not competent enough to research and understand how and why suspensions work, then its safe to assume that they should put the pliers down and go to a shop.


Pliers? LOL i hope pliers arent the tool of choice for ANYONE swapping suspension components.

The first line of research for installing new components on a vehicle should be from the manufacturer of the new component. Second is from the manufacturer of the vehicle, as aftermarket parts do not always retain the same specs as the originals.

Anyone doing ANY work on a vehicle should be willing to research what they are doing fully, but that doesnt mean the company selling aftermarket parts should not include thought out instructions. I have no issues with eibach... I just think the install instructions are generic, which they are. That personally doesnt effect me... As i am fully capable of doing this without any included instructions. This is a very basic swap... But im in college for auto tech. i know lots of people are brand new to installing anything... Doesnt mean they shouldnt learn to do it and go pay a shop, just means they should make sure they are doing it right by researching it fully.... ANd it would be nice if the research started with the manufacturer.

PS....I havent seen anything listed for a couple of bucks anywhere... I have seen 20 bucks for 2 days from toyota but personally i think the DIY alldata for $30 bucks for a year or $50 for 5 years is a better deal... Its only a 1 vehicle subscription but still a better deal if you have more than 1 thing to do.... I dont need either. I can access full site alldata in school and print what i want, which i do occasionally.
 
Pliers? LOL i hope pliers arent the tool of choice for ANYONE swapping suspension components.

The first line of research for installing new components on a vehicle should be from the manufacturer of the new component. Second is from the manufacturer of the vehicle, as aftermarket parts do not always retain the same specs as the originals.

Anyone doing ANY work on a vehicle should be willing to research what they are doing fully, but that doesnt mean the company selling aftermarket parts should not include thought out instructions. I have no issues with eibach... I just think the install instructions are generic, which they are. That personally doesnt effect me... As i am fully capable of doing this without any included instructions. This is a very basic swap... But im in college for auto tech. i know lots of people are brand new to installing anything... Doesnt mean they shouldnt learn to do it and go pay a shop, just means they should make sure they are doing it right by researching it fully.... ANd it would be nice if the research started with the manufacturer.

PS....I havent seen anything listed for a couple of bucks anywhere... I have seen 20 bucks for 2 days from toyota but personally i think the DIY alldata for $30 bucks for a year or $50 for 5 years is a better deal... Its only a 1 vehicle subscription but still a better deal if you have more than 1 thing to do.... I dont need either. I can access full site alldata in school and print what i want, which i do occasionally.

I might have missed it, but are you in school?
 
I might have missed it, but are you in school?

Nope. That's why I think pliers are used for installing suspension components... :D

My point was I have a good understanding of suspension, but everyone doesn't and good instructions would be beneficial... You wanted to defend the company even though I wasn't downing them... I think the kit is great but the instructions are lacking... Which they are.

No need to argue about it. Have a good night.
 
Not dead, just delayed. We're still moving forward. It's just disappointing because these should be in stock by now. We're being completely let down by a company we've worked with for over 20 years.

Sucks to wait but sometimes the best things in life are worth waiting for.
Now can I get a free pair when they are ready :clap2:
 
Just looked for them on the site.... WOW! I will be honest here... Yea they CAN BE downloaded, but for someone with little mechanical knowledge those instructions are NOT GREAT to say the least. Im currently in college for auto tech and performance and i have full access to alldata with all torque specs, and suspension removal procedures, but for the average person with no experience or access to shop manuals, better instructions would be a welcomed addition.


Those are some REAL generic instructions there. This kit is for a specific vehicle. I think it would be rather easy to actually list the torque specs and hardware sizes at a minimum, better yet a step by step installation that includes pictures for someone that has never removed or installed suspension components. Haynes and chiltons arent around like they used to be on every vehicle and electronic manual subscriptions can be costly.


All that being said, there are plenty of youtube videos available online for people needing further guidance. Im also pretty impressed with the build quality on my kit, especially for the price... SO if the choices are, no detailed instructions but a nice low price VS highly detailed instructions with a higher price.... I will pick ZERO instructions LOL

Couple things:

1. Somebody with little mechanical knowledge usually doesn't try to tackle suspension installs like this. Especially if a spring compressor is required.
2. Finding torque specs on new vehicles isn't rather easy and we'd have to do it for 1000's of instructions sheets if we went down that road. Generally when we're doing the R&D on these vehicles they haven't even hit the showroom floors yet.
 
Getting Ready to puul the trigger

I am trying to decide between the using just the Eibach shocks with the OEM springs and the Eibach pro truck lift kit.

The kit provides 2.75" / 1" lift.

In committing sin :), I was reading on another 4Runner site that some people were saying that this would cause reverse rake. I find it hard to believe that Eibach would have designed it that way, but i want to confirm some things.

I will not be adding bumpers or winches, but I would like to 'level' (a little factory rake is ok), the vehicle, slightly stiffen the ride, and change the tires to 265/17R17 all terrains (this should be easy) or 275/70R17 all terrains.

Can anyone who is running the Eibach Kit, or installed / seen it, or Ryan, confirm that there is no reverse rake on a SR5.

Thanks
 

Members online

No members online now.

Forum statistics

Threads
278,316
Messages
3,554,112
Members
248,016
Latest member
Advally Service

Trending content

Back
Top