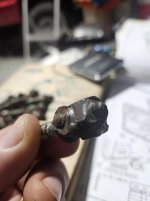
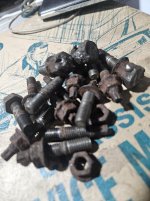
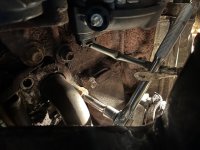
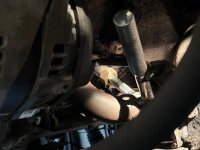
Exhaust Manifold - Broke a bolt, go figure...

Jesus! I can't even imagine. That's insane - I truly hope it doesn't come to that....

Haha, now that is funny right there. Just keep buying more tools , the weight of all of them will be enough to turn the stud eventually....or return them all and buy a cheap flux core wire feed welder....pictured are TWO sets of nuts and studs because I reinstalled factory hardware after going to war with the original stuff. But that's OK because working for hours on end in the wheel well is fun.
 

Attachments

  • 20241231_113905.jpg
    20241231_113905.jpg
    124.9 KB · Views: 322
  • 20241231_113953.jpg
    20241231_113953.jpg
    132.6 KB · Views: 322
Last edited:
Haha, now that is funny right there. Just keep buying more tools , the weight of all of them will be enough to turn the stud eventually....or return them all and buy a cheap flux core wire feed welder....pictured are TWO sets of nuts and studs because I reinstalled factory hardware after going to war with the original stuff. But that's OK because working for hours on end in the wheel well is fun.

Victory!!

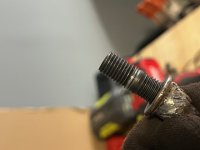
So here's what got me the last bolt for anyone you gets stuck and wants to try this method on passenger side, 1st cylinder closest to front, bottom bolt:

Tools:
-3/8' drive ratchet
-3" extension
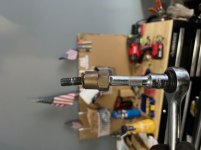
-14mm extractor
-blow torch
-extra long crow bar

Method:

I had to take off the terminal to the alternator and move that stuff out of the way. Side note, rookie move and forgot to disconnect the battery, i touched the alternator with metal and big sparks :wink2: so stupid. I went to make sure the she went to two position on the ignition and it seems fine, yikes.

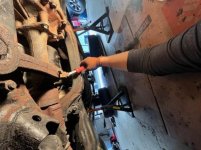
So back to the saga - after that was moved out of the way, I put on the extractor by hand as straight as possible. Then I went under the vehicle and threaded the large crow bar throw the bottom. I wedged the crow bar between the extractor socket and the manifold tubing. I then found the right angle to apply leverage and I pulled very hard to push the extractor as flush as possible on to the bolt to get a big solid bite for my first ratchet turn. I then went back up top, hit it with heat with the extractor on to soften the metal, then used the ratchet with a hand pull to get that flush, solid bite. Once it cooled a bit, I turned it from the bottom with what little room I had to check if my bite was solid. Finally! It wouldn't wobble with any turn by hand. Good.

Now, this is where I got creative, I went farther towards the rear of the vehicle and found a space I could thread my crow bar through and be able to have bottom support on a frame beam and wedge my bar so I could push on the bottom of the ratchet with the edge of the bar making contact with the ratchet handle. I went up to heat one more time. Went to the bottom, wedged the crow bar and pushed with ALL my strength. I'm a decently strong dude and it took almost everything I got and WHAM!!! It broke free - literally pure joy lol.

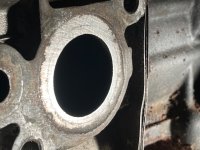
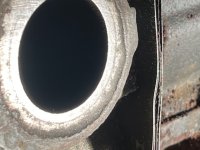
Now, I may have another issue. I cleaned up the surface of the aluminum head with some light sanding and noticed some pitting on the last exhaust port. This looks not so good. Not sure if others have had this issue but its the only cylinder that has it. I'm assuming this would be an issue with getting a proper seal? Interesting enough, I noticed the exhaust valves on only this cylinder look white. The others are black. Doesn't mean they're running hot if they have white residue?

Any way, whats the word on this pitting? I'm assuming that's what it is...


wowza, that's a whole lot of frustrations :cry2:

 

Attachments

  • IMG_3148.jpg
    IMG_3148.jpg
    28.9 KB · Views: 258
  • IMG_3150.jpg
    IMG_3150.jpg
    125.8 KB · Views: 257
  • IMG_3140.jpg
    IMG_3140.jpg
    120.9 KB · Views: 250
  • IMG_3141.jpg
    IMG_3141.jpg
    92.5 KB · Views: 250
  • IMG_3143.jpg
    IMG_3143.jpg
    54.3 KB · Views: 244
  • IMG_3158.jpg
    IMG_3158.jpg
    125.2 KB · Views: 252
  • IMG_3160.jpg
    IMG_3160.jpg
    114.2 KB · Views: 254
Last edited:
^ Any opinions on this what looks like pitting on the mating surface of the exhaust manifold?

I’m thinking of putting red high-temp gasket maker around it before putting on the new metal gasket. Thoughts?

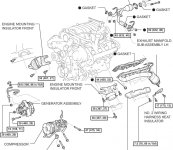
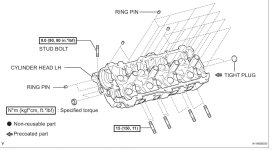
Also, I can’t find the torque spec on the manifold studs and nuts. I read somewhere the nuts are 25 ft lbs, but can’t confirm.

Thanks!!!
 
If what I found is correct - looks like:

Exhaust manifold stud to cylinder head: 11ft lbs
Manifold nuts to stud: 33ft lbs

Anyone confirm?
 

Attachments

  • Screenshot 2025-01-04 at 12.13.07 PM.jpg
    Screenshot 2025-01-04 at 12.13.07 PM.jpg
    131.1 KB · Views: 253
  • Screenshot 2025-01-04 at 12.12.33 PM.jpg
    Screenshot 2025-01-04 at 12.12.33 PM.jpg
    118 KB · Views: 232
She's alive!!!

Well, that was an epic journey. Probably close to 40 hrs when all said and done. Granted I also did coilovers, UCAs, rust remediation, both sections of the Y-pipe and some other small projects I ran into.

But she works, and sounds great - so quiet and smooth!

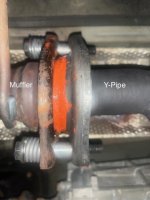
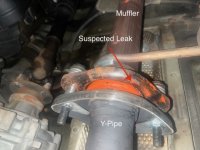
Now, the only issue - She was SUPER quiet for the first 20-30 miles. Sounded brand new. No exhaust leaks I could hear. But then, I started her a little later in the day and drove around, I slowly started to notice that rumbling sound of an exhaust leak. And yep, in park when I rev'd her I could hear it. So I checked the center muffler donut gasket and sure enough I can tell it's blowing stuff out of it. I tried tightening as much as I could. I started back up and a little quieter but it's still there.

I struggled with this before. I have an after market walker cat back and now the Y-section is AP Exhaust. They're not perfect fitment. The AP seems like 1 cm shorter than OEM - damn aftermarket stuff. But it fit up fine initially and was totally quiet.

Any ideas how to fix the the leak on the dounut? I had to use high temp rtv on the inside of donut because the one included in the hardware provided has a larger circumference than the pipe, so it was loose by like 6-8 mm. It looks like the leak is pushing out through the muffler side, not y-pipe.

Thanks for the help. Totally worth the time but now I need her quiet!!
 

Attachments

  • image1.jpeg
    image1.jpeg
    105.2 KB · Views: 208
  • image0.jpeg
    image0.jpeg
    122.5 KB · Views: 207
She's alive!!!

Well, that was an epic journey. Probably close to 40 hrs when all said and done. Granted I also did coilovers, UCAs, rust remediation, both sections of the Y-pipe and some other small projects I ran into.

But she works, and sounds great - so quiet and smooth!

Now, the only issue - She was SUPER quiet for the first 20-30 miles. Sounded brand new. No exhaust leaks I could hear. But then, I started her a little later in the day and drove around, I slowly started to notice that rumbling sound of an exhaust leak. And yep, in park when I rev'd her I could hear it. So I checked the center muffler donut gasket and sure enough I can tell it's blowing stuff out of it. I tried tightening as much as I could. I started back up and a little quieter but it's still there.

I struggled with this before. I have an after market walker cat back and now the Y-section is AP Exhaust. They're not perfect fitment. The AP seems like 1 cm shorter than OEM - damn aftermarket stuff. But it fit up fine initially and was totally quiet.

Any ideas how to fix the the leak on the dounut? I had to use high temp rtv on the inside of donut because the one included in the hardware provided has a larger circumference than the pipe, so it was loose by like 6-8 mm. It looks like the leak is pushing out through the muffler side, not y-pipe.

Thanks for the help. Totally worth the time but now I need her quiet!!

excellent post with pics and questions. Sorry to hear about this leak issue though. I'd order an OEM donut gasket, then have it on hand and take apart this joint. Then compare the two gaskets, and see if one of them is deformed during installation. These gaskets have a fair amount of tolerance to minor misalignment.
 
She's alive!!!

Well, that was an epic journey. Probably close to 40 hrs when all said and done. Granted I also did coilovers, UCAs, rust remediation, both sections of the Y-pipe and some other small projects I ran into.

But she works, and sounds great - so quiet and smooth!

Now, the only issue - She was SUPER quiet for the first 20-30 miles. Sounded brand new. No exhaust leaks I could hear. But then, I started her a little later in the day and drove around, I slowly started to notice that rumbling sound of an exhaust leak. And yep, in park when I rev'd her I could hear it. So I checked the center muffler donut gasket and sure enough I can tell it's blowing stuff out of it. I tried tightening as much as I could. I started back up and a little quieter but it's still there.

I struggled with this before. I have an after market walker cat back and now the Y-section is AP Exhaust. They're not perfect fitment. The AP seems like 1 cm shorter than OEM - damn aftermarket stuff. But it fit up fine initially and was totally quiet.

Any ideas how to fix the the leak on the dounut? I had to use high temp rtv on the inside of donut because the one included in the hardware provided has a larger circumference than the pipe, so it was loose by like 6-8 mm. It looks like the leak is pushing out through the muffler side, not y-pipe.

Thanks for the help. Totally worth the time but now I need her quiet!!

Had the same issue. Use oem hardware (bolts and springs). I found the aftermarket stuff wasn’t tightening the joint down enough.
 

Members online

Forum statistics

Threads
278,317
Messages
3,554,125
Members
248,016
Latest member
Advally Service

Trending content

Back
Top