Field Monitor install

ArmArak

New member
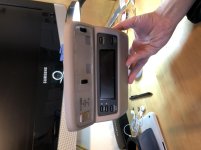
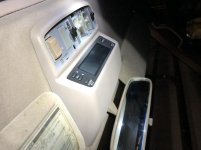
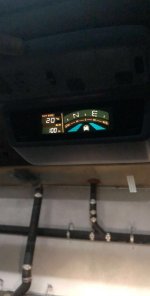
This is a bit late but a few weeks back I installed the field monitor on my 2001.

I ordered the field monitor from Russia, it took a while to come, but it was worth the wait. I'm not going to go into detail on the wiring because there are already a few good sources which explain it very well.

Here's a great guide: Hilux Surf Field Monitor installed in a 3rd Gen Write-Up *PICS* - YotaTech Forums

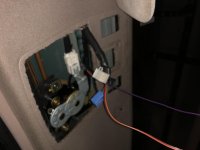
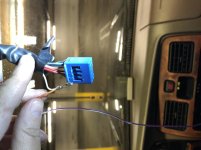
The first step was creating compatible wiring harnesses. I bought a simple 9 pin wiring harness from a local electronics shop and soldered up the connections for the monitor.

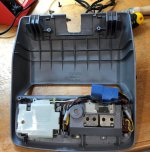
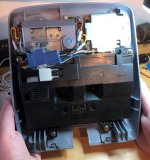
After, I swapped the control logic board for the sunroof from my original part into the new one. The mounting points are the same and its a direct fit. I needed to do this because the connections for the field monitors sunroof controller did not match with my car's.

For the temperature sensor I used the OEM Toyota part and mounted it under the bumper.

Installing and wiring the field monitor was easy enough but it had some headaches. The big issue was removing the grab handle upper bolt. After stripping it I tried removing it with a tap out which just ended up breaking the bolt inside ;). I ended up drilling the bolt out and using a helicoil to match the threads. Beyond that the install went pretty smoothly.

To tap into the ground, 12v and constant 12v, I took out the pins on the cars side sunroof control harness and directly soldered my wires into the metal pins. (Make sure not to be too thick or the pins wont fit back into the plastic harness).

Getting the temperature sensor wires through the grommet was tricky, but I tied them to a coat hanger and got them through. The rest I followed the above write up and spliced into the abs and dimmer wires to make the connections.

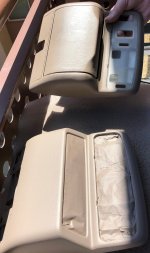
I also painted the monitor to match my interior tan color. I used SEM 15223 spray paint and got a really good match. Photo below compares the original color to the painted one.

This was a really fun mod and looks great in the car.
Next is the JDM inclinometer!

+100 Dope JDM Points! :dancin:
 

Attachments

  • IMG_4140.jpg
    IMG_4140.jpg
    124.5 KB · Views: 2,246
  • IMG_4226.jpg
    IMG_4226.jpg
    122.3 KB · Views: 2,136
  • IMG_4153.jpg
    IMG_4153.jpg
    108.8 KB · Views: 2,097
  • IMG_4195.jpg
    IMG_4195.jpg
    120.9 KB · Views: 2,096
  • IMG_4224.jpg
    IMG_4224.jpg
    136.7 KB · Views: 2,101
  • IMG_4227.jpg
    IMG_4227.jpg
    119.9 KB · Views: 2,122
  • IMG_4228.jpg
    IMG_4228.jpg
    122.8 KB · Views: 2,086
  • IMG_4198.jpg
    IMG_4198.jpg
    124.8 KB · Views: 2,319
Register to hide this ad
You can find inclinometers from 2nd gen 4Runners and retrofit them on your 3rd gen dash. It has three analog gauges that tell you your altitude and your tilt angle in 2 axis.

Here's a video of someone else doing it: YouTube
 
This is a bit late but a few weeks back I installed the field monitor on my 2001.

I ordered the field monitor from Russia, it took a while to come, but it was worth the wait. I'm not going to go into detail on the wiring because there are already a few good sources which explain it very well.

Here's a great guide: Hilux Surf Field Monitor installed in a 3rd Gen Write-Up *PICS* - YotaTech Forums

The first step was creating compatible wiring harnesses. I bought a simple 9 pin wiring harness from a local electronics shop and soldered up the connections for the monitor.

After, I swapped the control logic board for the sunroof from my original part into the new one. The mounting points are the same and its a direct fit. I needed to do this because the connections for the field monitors sunroof controller did not match with my car's.

For the temperature sensor I used the OEM Toyota part and mounted it under the bumper.

Installing and wiring the field monitor was easy enough but it had some headaches. The big issue was removing the grab handle upper bolt. After stripping it I tried removing it with a tap out which just ended up breaking the bolt inside ;). I ended up drilling the bolt out and using a helicoil to match the threads. Beyond that the install went pretty smoothly.

To tap into the ground, 12v and constant 12v, I took out the pins on the cars side sunroof control harness and directly soldered my wires into the metal pins. (Make sure not to be too thick or the pins wont fit back into the plastic harness).

Getting the temperature sensor wires through the grommet was tricky, but I tied them to a coat hanger and got them through. The rest I followed the above write up and spliced into the abs and dimmer wires to make the connections.

I also painted the monitor to match my interior tan color. I used SEM 15223 spray paint and got a really good match. Photo below compares the original color to the painted one.

This was a really fun mod and looks great in the car.
Next is the JDM inclinometer!

+100 Dope JDM Points! :dancin:
Nice job. Where did you order the parts? Also on my 02 limited, i have the same sunroof housing with a compartment for sun glasses. Do i have to order a different version of that housing? If so, what is it called and where do you get it?
 
Honestly, if I could find that shroud somewhere for the field monitor I would send it off and get a 3d printer file for it so that the rest of us could print the shroud and use it for an overhead switch bank :D
 
Nice job. Where did you order the parts? Also on my 02 limited, i have the same sunroof housing with a compartment for sun glasses. Do i have to order a different version of that housing? If so, what is it called and where do you get it?

Thanks! I did not have to order any different housing, it fits in the one that comes with the field monitor. The only thing is that you have to use the original clear plastic cover not the one that comes with the field monitor.

Lmk if you have any questions.

Good Luck
 
Honestly, if I could find that shroud somewhere for the field monitor I would send it off and get a 3d printer file for it so that the rest of us could print the shroud and use it for an overhead switch bank :D

That's actually a really good idea... I'm pretty handy with CAD so I'm gonna take some measurements and see what I can come up with.
 
Thanks! I did not have to order any different housing, it fits in the one that comes with the field monitor. The only thing is that you have to use the original clear plastic cover not the one that comes with the field monitor.

Lmk if you have any questions.

Good Luck

Hmm. So the monitors I see on ebay are just the monitors themselves without any housing. Im guessing your monitor came with a housing. What’s not clear to me is whether my current housing (i.e. the trim piece that has the compartment for sunglasses etc.) will accept the monitor if I just find one off ebay or something.
 
That's actually a really good idea... I'm pretty handy with CAD so I'm gonna take some measurements and see what I can come up with.

Awesome!

I was thinking that there must be some place that does 3d scanning of parts and can generate a file for it, though maybe I just saw that in a sci fi movie :D
 
Hmm. So the monitors I see on ebay are just the monitors themselves without any housing. Im guessing your monitor came with a housing. What’s not clear to me is whether my current housing (i.e. the trim piece that has the compartment for sunglasses etc.) will accept the monitor if I just find one off ebay or something.

Yes, mine did come with the housing (I got it off ebay btw).

No your stock sunglass one will not work because it does not have the cutout for the screen. Look at my picture where I compare the color and you'll see the difference between the stock sunglass one and the FM one. I would say just keep looking and you'll find one that comes with the housing. You will have to paint it so it matches though.

Good Luck
 
There is one on ebay now w/ the housing coming from Russia. I'll be honest, I don't really dig the field monitor but I'm severely tempted to shell out the $150 just for that mount cover b/c it would be the only factory-look overhead switch panel that I am aware of (and I've been combing through threads for weeks).
 
There is one on ebay now w/ the housing coming from Russia. I'll be honest, I don't really dig the field monitor but I'm severely tempted to shell out the $150 just for that mount cover b/c it would be the only factory-look overhead switch panel that I am aware of (and I've been combing through threads for weeks).

I'm also curious how well a scangauge would fit in there.
 
One of the Russian suppliers has a listing for $149 or make offer on ebay. I offered $129 and he countered with $149, lol. I planned on declining it, but just for being a jerk and making a counter offer for the exact price of the listing I'm letting the offer run out the clock :flamethrwoer2:
 
One of the Russian suppliers ...

Would this happen to be seller autopartsmsv? I offered $140 and he countered with $149 (the buy it now price). He got ticked-off when I asked why he was accepting offers.
I was so keen to replace my broken FMU and having had no no luck in the UK or Japan I went ahead and ordered it anyway. There are some horror stories out there about items being stalled at Russian customs for weeks, even months, but the item took only 2 weeks to reach US shores and delivery is imminent.
 
[MENTION=10751]blarchitect[/MENTION] Yeah, that's him, lol.

Wait, so you have a FMU installed currently but it's broken? Does that mean you already have a shroud? If that's the case, I'd love to buy the extra shroud from you b/c I really want to make a switch plate out of one.
 
Sure. It's not in my hands as yet and I will have to swap the innards over as my original is painted tan and the replacement is the standard grey.
Warning, I do dilly dally and it will likely be the festive holidays before I look at this. Will DM you in the future!
 

Members online

Forum statistics

Threads
278,316
Messages
3,554,120
Members
248,016
Latest member
Advally Service

Trending content

Back
Top