Front strut tower inner nut removal

OpenYota

New member
So I'm attempting to replace my shot suspension with a Bilstein/OME combo and I'm having trouble removing the innermost nut on one of the strut towers.
Does anyone have any tips on removing it?
I've been soaking it in PBblaster for a few days and have tried an extended 14mm wrench on it to no avail and the nut is starting to round a little bit so I'm worried about yanking on it further to fully round it.
Any help would be appreciated!
 
Register to hide this ad
So I'm attempting to replace my shot suspension with a Bilstein/OME combo and I'm having trouble removing the innermost nut on one of the strut towers.
Does anyone have any tips on removing it?
I've been soaking it in PBblaster for a few days and have tried an extended 14mm wrench on it to no avail and the nut is starting to round a little bit so I'm worried about yanking on it further to fully round it.
Any help would be appreciated!

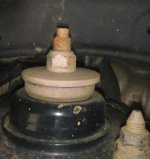
I believe you have to grab the the top of the stud the nut threads on to with vice grips. Or it spins the shock housing.
 
I used a racheting flexhead box wrench on that back nut. Seems with the PBblaster it should break free, the torque there is 45flbs or something. Is it stock? When I put Toytec coilovers on the nuts supplied were SAE.
 
So I'm attempting to replace my shot suspension with a Bilstein/OME combo and I'm having trouble removing the innermost nut on one of the strut towers.
Does anyone have any tips on removing it?
I've been soaking it in PBblaster for a few days and have tried an extended 14mm wrench on it to no avail and the nut is starting to round a little bit so I'm worried about yanking on it further to fully round it.
Any help would be appreciated!
Are you talking about the front or rear shock/strut tower?
 
I'd consider using a nut splitter/ cracker/ cutter. Something like this. I'm not sure how it will work on a flange nut though. If something like that doesn't work, you can just cut the stud and replace the strut mount which is something you may want to do anyway when replacing your shocks.
 
Not to state the obvious, but hopefully you're using a 6 point wrench/socket, not a 12 point or an open end wrench. That should reduce the chance of rounding the nut.
 
I found that even the stubbiest 3/8" 14mm 6 pt socket and breaker bar had trouble fitting all the way over that nut. And there's obviously no room for a deep socket.

I've also found that there's no room around that nut for any of the 14mm box ratchets I own.

To get a proper fit, I'd suggest using a Dremel tool to grind down that pyramid atop the stud. Six mm of metal could easily be removed above the stud's threads. Then, the setup I mentioned in paragraph one ought to work and fit nicely over the nut. Once you've got bar and socket in place in place, you could use a piece of wood, a stick of 1x2 for instance, to exert downward pressure as you turn the nut. When the nut breaks loose, switch to a 1/4" ratchet and 14mm socket.

Alternative #1: a 14mm S-wrench - also called a manifold wrench, I think - with a 6pt opening might work well.

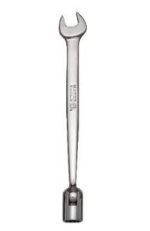
Alternative #2: If you grind down the pyramid it's possible you could use one of those 14mm wrenches that are an open end combined with a socket that swivels. These wrenches don't seem to have a widely agreed upon name, so I've attached a picture. Again, 6 pts.

Alternative #3: if you have access to a welder, weld a stubby 6pt 14mm socket to a piece of strap steel 1/8" x 1" x 12 (or more)".

In any case, that particular nut that's troubling you is more difficult on the driver side. I found on the passenger side I could get a breaker bar and socket in place and hit the bar with a hammer- plenty of swing room. Not so on the driver side. I had to add a small length of pipe my breaker bar.

Finally, before you reinstall the assembly - assuming you're reusing the Toyota tower - run a die over the stud you shortened with the Dremel tool.
 

Attachments

  • flex head wrench.JPG
    flex head wrench.JPG
    10.4 KB · Views: 643
I know but I wanted to make sure since Jakeepoo3's response sounded like rear shocks

Should be the same. Some times you have to vice grip above the thread or it will just spin along with the rest of the shock.
 

Attachments

  • IMG_20211015_142122~2.jpg
    IMG_20211015_142122~2.jpg
    146.5 KB · Views: 697
I found that even the stubbiest 3/8" 14mm 6 pt socket and breaker bar had trouble fitting all the way over that nut. And there's obviously no room for a deep socket.

I've also found that there's no room around that nut for any of the 14mm box ratchets I own.

To get a proper fit, I'd suggest using a Dremel tool to grind down that pyramid atop the stud. Six mm of metal could easily be removed above the stud's threads. Then, the setup I mentioned in paragraph one ought to work and fit nicely over the nut. Once you've got bar and socket in place in place, you could use a piece of wood, a stick of 1x2 for instance, to exert downward pressure as you turn the nut. When the nut breaks loose, switch to a 1/4" ratchet and 14mm socket.

Alternative #1: a 14mm S-wrench - also called a manifold wrench, I think - with a 6pt opening might work well.

Alternative #2: If you grind down the pyramid it's possible you could use one of those 14mm wrenches that are an open end combined with a socket that swivels. These wrenches don't seem to have a widely agreed upon name, so I've attached a picture. Again, 6 pts.

Alternative #3: if you have access to a welder, weld a stubby 6pt 14mm socket to a piece of strap steel 1/8" x 1" x 12 (or more)".

In any case, that particular nut that's troubling you is more difficult on the driver side. I found on the passenger side I could get a breaker bar and socket in place and hit the bar with a hammer- plenty of swing room. Not so on the driver side. I had to add a small length of pipe my breaker bar.

Finally, before you reinstall the assembly - assuming you're reusing the Toyota tower - run a die over the stud you shortened with the Dremel tool.[/QUOT

Don't destroy your shock it's made that way for a reason. Refer to my post and picture.

 
Should be the same. Some times you have to vice grip above the thread or it will just spin along with the rest of the shock.

The OP is talking about one of the three studs attaching the shock mount to the truck, not the center nut of the shock. So the shock is not going to spin.
 
Should be the same. Some times you have to vice grip above the thread or it will just spin along with the rest of the shock.
The center stud you are referring to is what holds the strut assembly together. The OP is trying to remove the strut from the vehicle so the 3 nuts that surround the center stud.
 
The center stud you are referring to is what holds the strut assembly together. The OP is trying to remove the strut from the vehicle so the 3 nuts that surround the center stud.

Ok a three year old could do that so I thought it was the other.
 
I'm running into the same issue on my 4Runner.
I got the top two nuts off on each side, it's just the inner-most nut that's giving me issues. I've tried using an open end wrench and a mallet to move it with no luck. It's been sprayed with PB Blaster for a couple days in a row.

It's impossible to fit a ratchet or breaker bar onto that back nut so I'm wondering if anyone else had any success with other methods.
 
It's impossible to fit a ratchet or breaker bar onto that back nut so I'm wondering if anyone else had any success with other methods.
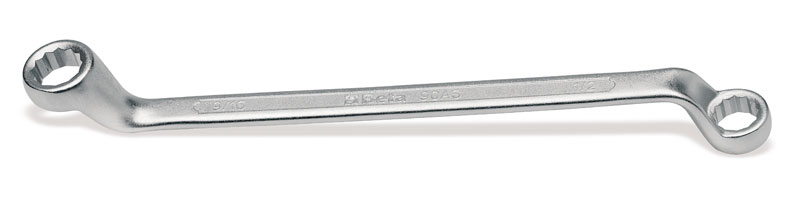
I use a offset box-end wrench for the final step. They are helpful in a few other places too. Ratcheting box-end for the majority of the threads otherwise.

BT-IMG2420_HR.JPG


-Charlie
 
First, I suggest doing that back nut first. When I did mine, putting the other ones back, seemed to reduce the torque needed to break it loose. I don’t remember exactly how I got it loose but I believe it was a variation of the two wrench trick.

The second time I did it I had removed the frame from under the truck which made it a whole lot easier.
 
Last edited:

Members online

Forum statistics

Threads
278,309
Messages
3,554,068
Members
248,016
Latest member
Advally Service

Trending content

Back
Top