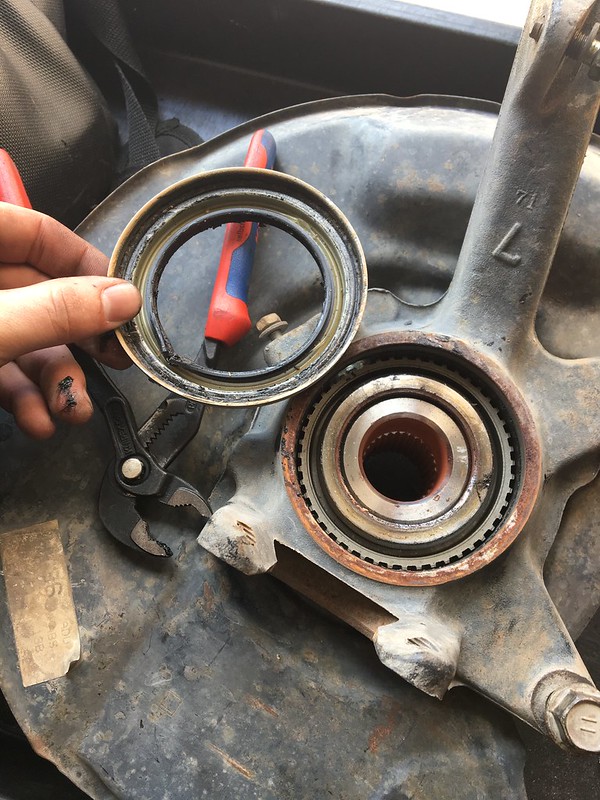
Front Wheel Bearing DIY

Spunk

New member
I've been browsing several forums, and I thought that every thread relating to 3rd gen front wheel bearing replacements left much to be desired. So, here we go.

Front Wheel Bearing Replacement, 1999 4x4 ADD 4Runner w/ ABS.

Parts List for ONE SIDE: note that parts are universal for both sides.

Shipment Details
Part Number Part Name Price Quantity
43502-35170 HUB ASSY $140.68 1
90312-95001 WHEEL BEARING OIL SEAL $14.87 1
90521-99114 WHEEL BEARING SNAP RING $5.18 1
90369-54002 WHEEL BEARING $66.31 1
43515-35010 ABS ROTOR $19.36 1
43524-35010 WHEEL BEARING SPACER $15.82 1
90316-69001 WHEEL BEARING OIL SEAL $35.45 1

Tools List:
*Shown at each step with photos. Will be added later.

1. Get your rig on jack stands and remove the offending wheel.
29490505634_f36d505544_c.jpg


2. Remove hub cap w/ flat head screwdriver. Note that hub cap will be damaged by screw driver (replacing optional. can bend back to shape)
30004324952_3c6d5014fc_c.jpg


3. Remove axle hub nut retainer w/ pliers.
30004323682_54b0210358_c.jpg


4. Press and hold the brakes, and loose nut w/ 35 mm socket and breaker bar. Release brakes when done.
30004322652_2c33a08f4b_c.jpg


5. Disconnect ABS line from spindle/steering knuckle using 10mm wrench.
30034714451_25c9e022a3_c.jpg


6. Disconnect ABS sensor from spindle/steering knuckle using 10 mm socket. Mount it in a safe spot, sealed from the elements.
30004321212_1a8333cb83_c.jpg

--
30034713311_e657892e35_c.jpg


7. Remove Brake line from steering knuckle using 12 mm socket.
30004319832_c20e0fbe69_c.jpg


8. Remove Brake caliper from steering knuckle with 17mm socket and breaker bar. Hang the caliper, protecting the brake line from pinching, kinking or stretching.
30118770115_5bcbc94250_c.jpg

--
30118768265_634fea01d2_c.jpg


9. Remove LBJ/knuckle bolts w/ 14mm socket. No need to loosen tie rod/LBJ or LBJ/LCA bolts.
29490487584_f7997d6519_c.jpg


10. Pull steering knuckle and remove CV axle from the hub. The axle can free-hang so long as the boots are not damaged. No tools needed, but a pop with a hammer on the CV axle may be needed to konk it loose.
30118765645_61b7983246_c.jpg


11. Disconnect upper ball joint and remove steering knuckle from the rig. I have TC uppers, so I follow their procedure.
30118763015_ef12a6e511_c.jpg


12. Grab your favorite drink and take a break. Next steps will take time.
 
Register to hide this ad
Nice write up! i replaced way to many of these on my old tacoma (way to much lift on ifs, i was young and dumb) i just got back in to the toyota world and I'm already not looking forward to replacing wheel bearings again lol
 
Argh. No need to trash the axle nut cover. Take a small (not too small) screwdriver and lightly tap it sort of horizontally in between the cover and the hub. Work you way around. Eventually, you'll get a large enough gap where you can get a bigger screwdriver in there and just turn it. Again, working your way around. Don't create more work for yourself!
 
Part 2!


13. Set knuckle on bench or table, hub-side down. Please note that I do not have a soft vice like the OEM repair manual recommends, nor any of the special tools listed by toyota.

29490482074_8f1220413c_c.jpg


14. Pop off inside wheel bearing oil seal with pliers or screw driver. Discard part.

29490480174_518e616384_c.jpg


15. Unbolt the dust shield from the knuckle with a 12 mm wrench. Save the four bolts if you plan to reuse them.

29490478484_e9f7b085a3_c.jpg

--
29490475314_407c1187ea_c.jpg


16. Mount hub to a wheel (now a sphedo soft vice, as mentioned in step 13). Just snug bolts will do.

29823649910_687ba57280_c.jpg


17. Slice through hub and hub spacer with carbide tip sawzall blade (with orbital setting on medium to maximum, between speed 4 or 5 on Milwaukee)). Please note that the abs rotor is only a partial cut, where the hub spacer was cut clean. Ignore the tangent cut--that was a failed attempt to use a dremel. Discard hub spacer.

29823643090_824e209f38_c.jpg


18. Remove ABS rotor with a screw driver or pair of pliers. Please note that in the new-condition, ABS rotors typically fall into place with no effort, but old ones are hard to remove. Discard abs rotor.

30083843956_847596ef0b_c.jpg


19. Mount a hub/bearing puller on the knuckle. Apply heat to hub/bearing assembly, to help loosen some parts. When you smell the burning grease or oil, it is a good sign of a fair preheat. Crank down on the bearing puller until a loud "POP" or "BANG" is heard. That is usually either the hub slipping or the bearing giving way. This opens provides spacing between the hub and the outer oil seal. Do this until a 1/8" gap is visible between the hub and the outside oil seal. Keep the puller very, very tight for step 20.

29823607840_c2f1159149_c.jpg


20. Slice off hub with a 8" to 10" long carbide-tip blade. I used the tire as a weight to help make cutting easier. Ignore the large cuts and grinding dips on the face of the hub--other attempts that did not pan-out.

29490466454_d43cfb1655_c.jpg

--
30004301732_b6856c178c_c.jpg


21. Remove outer seal with screw driver. Discard oil seal.

30083834886_cd86bf71ac_c.jpg


22. Remove the snap ring from the knuckle with a set of pliers and a screw driver. Keep it laying around in-case a snap ring goes missing.

30083842066_561ec4e1a8_c.jpg


23. Realize the value of a press, and buy one. $220.00. I bought it before the start of the job, since the OEM instructions require a press. Buy front bearing adaptors at the same time (+$100 approx).

24. Spray PB blaster into bearing and mount the knuckle into press, hub side-down. Use the bearing adapters to fitup the knuckle and up to the press.

29490463234_384c11cbda_c.jpg

--A better fitup/setup. This one allows the bearings to drop clear (consider steel toes)
29823620000_66a8995402_c.jpg


25. Press that son of a bearing till it shatters, breaks and falls out.

29490450974_d81b3fbea1_c.jpg

--
30083829196_bf1c2672a6_c.jpg

--
29490449834_0b672b39d8_c.jpg


26. Garb your other favorite beverage, tacos and take a break. You have removed the old bearing and hub assembly. Good job!

Part 3 coming soon!
 
Part 3!

27. Make sure the ID of the steering knuckle is free of rust and debris.

28. Take the new bearing, and press it in with silver/polished side of the bearing to the outside of the knuckle. The OEM bearings have a black face and a bushed/polished face. Be sure to press it in square. If it starts out of square, just recenter on the high side to level it out. Once that is complete, press from the center again.

30004289382_56ffd6491d_c.jpg

--
30083825606_cf316bffc9_c.jpg


29. Install new snap ring with pliers.

29490446854_ac57afd421_c.jpg


30. Prepare to press the hub. Using blue tape on some front bearing adapters to center them on the backside of the bearing. Ideally, the force to install the hub would travel thru the ID bearing's sleeve, not stressing the bearing or knuckle.

29823614860_2958c67692_c.jpg

--
29490445714_f0ec3fb499_c.jpg


31. Install outer oil seal. Soft hammer and plastic or some type of bearing thingy work great. Be sure not to bend or damage the seal, and be sure to add a light amount of MP grease to the rubber seal.

29490444544_cab72f9ed5_c.jpg


32. Remount the dust shield. I forgot to do so.

33. Press the hub in until it stops being pressable! It should become flush with the rubber lip of the outer oil seal.

29823613490_fbe923d748_c.jpg


34. Feel accomplished, and mutter a sound of frustration if you still forgot to add the dust shield.

30083822026_e726ae011f_c.jpg


35. Drop in ABS rotor.

30083821086_da872f1b08_c.jpg


36. Press in Hub Spacer. Does not take alot of force. It should free float once it's past the hub's hump.

29823611840_2f88619886_c.jpg

--
29823611240_4d4d97ba21_c.jpg


37. Press the oil seal. I guess a hammer or something would work too, but the press is just fun to play with now.

30083819006_8f78424328_c.jpg


38. <<Alternative>> If you forgot the dust shield, but still want it, keyhole the shield with a cut-off disk so it can be installed after the hub. This is also a fantastic idea, considering that the hub needs is most easily removed via pressing. Gives you more flexibility later on.

29490439474_194dbe2827_c.jpg


39. Tada!! You know have a completely rebuilt knuckle to install. Proceed per SOP's for ball joints and axles. Be sure to get that alignment! :)

29490436614_81b727861f_c.jpg
 
There is a much easier way to do it - without cutting the hub / and you can reuse your hubs too if you like. (I also re-used my ABS rotor and snap ring without issue / could have used the old hubs easily too but purchased new just in case) This is why you always keep around old rotors for press-work :) Starts at post #38

http://www.toyota-4runner.org/3rd-gen-t4rs/193922-my-4gunner-restore-refurb-re-work-3.html

Awesome writeup man! I have a press guy that charged me $23 for each side, so this isn't as tempting to do as it could be. I might just have to give it a try if I need to do a wheel bearing in the future. After doing my rear bearings, press work is actually kinda fun for me.

I know the one he did, I could not have done at home though. He had to break out the 20 ton press to get the bearing off because it was all rusted up inside.
 
Great write-up too Spunk. I just wouldn't want to waste the hubs you cut off :shrug:

Since I have Aisin manual hubs on mine (different hub that has a lot more machining put into it), that would cost me an extra $350 to do mine for both sides!
 
In general, I hate dust shields lol I cut them off / leave them off every car I mod. They clearly serve a purpose, but I have never had an issue running without them.
 
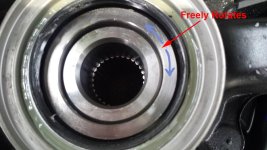
Quick question for [MENTION=101060]Spunk[/MENTION]. Did you have any "Play" between the spacer and the main bearing after it was pressed in or did it fit snugly against the bearing?

EDIT: Just to clarify the question with a picture. It just seemed unusual to have the spacer freely rotate around the hub once it was "pressed" on. When it came off it didn't freely rotate. I think once the axle is torqued down the movement will go away.

BTW - nice write up. I didn't need to use a sawzawl to press it apart but you did a nice job documenting your work.
 

Attachments

  • Spacer Rotates.jpg
    Spacer Rotates.jpg
    82.6 KB · Views: 31,702
Last edited:
Quick question for [MENTION=101060]Spunk[/MENTION]. Did you have any "Play" between the spacer and the main bearing after it was pressed in or did it fit snugly against the bearing?

EDIT: Just to clarify the question with a picture. It just seemed unusual to have the spacer freely rotate around the hub once it was "pressed" on. When it came off it didn't freely rotate. I think once the axle is torqued down the movement will go away.

BTW - nice write up. I didn't need to use a sawzawl to press it apart but you did a nice job documenting your work.

Yup! That free spins with play.
 
Wow! Thanks for the expedient response! I'm glad this wasn't a life or death situation! Almost forgot I asked you this question. :biggrin2:

Everything is all back together and in fact, I started installing everything on my rig yesterday. Thanks again!!
 
If one doesnt have the skills to do this job could one just buy the entire new knucke with bearing/hub already in it from the dealer? Asking for a friend :D
 
Hate to shit on somebody else's work but I'm going to take a big dump on this one. This DIY thread should be shit-canned or the title should say, "This is How Not to Do It".

Newsflash, you don't need a reciprocating saw for this job. If you do, you're doing something terribly wrong and wasting a lot of money sawing through reusable parts.

These 2 Manual Hub Swap videos I did with [MENTION=148218]JZiggy[/MENTION] will show you the right way to do the press work. I'd watch part one to learn the removal and reinstallation of the knuckles and watch Part 2 for the presswork.

<iframe width="560" height="315" src="https://www.youtube.com/embed/TZ2sOfVrnhU" frameborder="0" allow="accelerometer; autoplay; encrypted-media; gyroscope; picture-in-picture" allowfullscreen></iframe>

<iframe width="560" height="315" src="https://www.youtube.com/embed/1TpOYj0sUpA" frameborder="0" allow="accelerometer; autoplay; encrypted-media; gyroscope; picture-in-picture" allowfullscreen></iframe>
 

Members online

No members online now.

Forum statistics

Threads
278,312
Messages
3,554,089
Members
248,016
Latest member
Advally Service

Trending content

Back
Top