• If you plan to post to Classified forums, you must follow these rules, or your post will be deleted.

    1. Thread title must include at a minimum: FS or FT, Item(1st, 2nd, 3rd, 4th or 5th gen), Price and Location. For Example: FS: 4th GEN Carpet Floor Mats - Tan, $50 Denver, CO.
    2. All Threads must contain the following information
      • What is for sale/trade (model, specs, etc.)
      • Condition
      • Price/What you want to trade for
      • Location of item
      • At least one picture of the item for sale or for trade
    3. No "Feeler" Threads - Its either for sale or it isn't.
    4. Moderators lock Classified Threads that have not had any activity in 90 days or when the part is announced SOLD.
    5. Threads not complying with the rules will be deleted without notice.

FS: eimkeith PCK® (Panhard Correction Kits) for 3rd gen $93.50, 4th/5th Gen $98.20

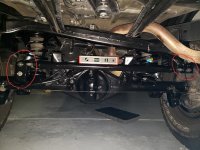
I got a quick quote from a local shop to have the bracket welded on. They were talking about having to take off the wheel, removing the ABS, and hard brake line to weld it on (the backside).

Did anyone else have issues with the brake line and ABS wire?
 
I got a quick quote from a local shop to have the bracket welded on. They were talking about having to take off the wheel, removing the ABS, and hard brake line to weld it on (the backside).


Did anyone else have issues with the brake line and ABS wire?


Find someone in your local 4x4 group who welds. I got a quote of $ 350 to weld them on from a shop :-/


Sent from my iPhone using Tapatalk
 
Find someone in your local 4x4 group who welds. I got a quote of $ 350 to weld them on from a shop :-/


Sent from my iPhone using Tapatalk
$350?!?! Holy crap its like a ten minute job including moving the lines out of the way. The bracket is such a good fit that it requires zero fit up. Literally jacked truck up, removed panhard on the axle side, moved/bent lines out of the way, put bracket on and loosely installed pan hard on top position to make sure it lined up, tacked bracket. Removed panhard, finish weld, paint and reinstall panhard. Done.


Sent from my SM-G986U using Tapatalk
 
Had eimkeith's panhard correction kit welded October 2018 & have about 25,000 miles on it. This was the first time I had anything welded to my 4runner. I would have purchased this kit sooner but trying to find a welder I trusted took a while. I found a local mobile welder, Steeling Time Welding, on t4r. Corey, owner/welder was great to work with & had him do a few other projects for me. I disassembled my rear suspension & had it on jack stands the night before. I did this to give him as much space as possible to work. I had him cut 1/4" wall, 1/2" ID steel round tube to use as crush sleeves for the empty bolt holes in the original mounting locations. This was not necessary but liked the idea for increased potential strength. I don't remember exactly how much & how long everything took but it was about $150-$200 & 3-4 hours for both sides. This included taking measurements, waiting for weld-thru primer to dry, spot welding, remeasuring, welding, grinding, test fitting the panhard bar & crush sleeves etc. The time it took to complete this install had nothing to do with the quality of eimkeith's PCK. I just don't like to rush work that requires proper fitment, welding, etc especically if it's something I haven't done before. If I had to do this a 2nd time it would probably take half that time.

Eimkeith's PCK was a great investment. It noticeably improved handling over bumpy roads & turns. It's important to keep in mind that this is one of several variables that can influence vehicle handling but it's a pretty big one. I'm still using my Sonoran Steel adjustable panhard but I have it shortened to where it is just slightly longer than stock length. An adjustable bar isn't necessary with eimkeith's kit but it's nice to have to make sure the rear axle is as close to fully centered as possible since rear lift heights can vary. I determined the new length of my adjustable panhard by putting the rear suspension back together (minus the panhard) & the weight of the vehicle on the tires with my usual cargo load. I settled my suspension by lifting up & down on the trailer hitch multiple times. I then adjusted the SS bar until the bolt holes lined up exactly with the PCK brackets. Panhard is level & axle is centered.

A few tips:
1. The 2 washers that come with the PCK brackets are for the passenger side bracket. They go directly in front & behind the panhard bolt holes.
2. Grind/sand the paint/powder coat off the areas of the frame & axle that are going to be welded beforehand to save time.

 

Attachments

  • PCK.jpg
    PCK.jpg
    114.3 KB · Views: 464
Removing the tires does help a lot and allow you to weld the front easier. all the brakes lines just need be move a little, I've done it to my 4th gen and my buddy 5th gen. anyone with basic welding can do it for cheap.
 
If I only have a 2in lift would it be a bad idea to install upper bracket too? Since lower bracket should be enough to level the bar I’m wondering if I might lose some room to flex if I have the upper bracket welded in while still using factory bolt location.
 
The welder welded both the outside & inside of the brackets for strength. Don't know how common or necessary it is but thought it was worth mentioning.
 
The welder welded both the outside & inside of the brackets for strength. Don't know how common or necessary it is but thought it was worth mentioning.

hey there, just saw this! welding the inside is just fine, but you'll need to grind a portion of the weld if you return to the factory hole in the future (not a huge deal.)

I just chamfered the outer face well and welded that side when I installed mine, but I certainly won't advise against more welds!
 
hey there, just saw this! welding the inside is just fine, but you'll need to grind a portion of the weld if you return to the factory hole in the future (not a huge deal.)

I just chamfered the outer face well and welded that side when I installed mine, but I certainly won't advise against more welds!

Good that you brought that up. We thought about grinding a small portion of the inside weld after we realized the crush sleeve wouldn't slide into the factory location but also to have the option to return the panhard to its original location. We decided to cut the crush sleeve in half & slide it in place in 2 pieces and save the grinding if it becomes needed. The kit is awesome, more people need to know about it.
 
I have a 2002 4Runner that came with a Rough Country lift. Replaced the rear springs with OME 861s and Bilstein 5100 shocks. The Rough Country lift left the panhard bar at an angle. Not knowing this was not standard, when I installed the OME 861 springs and took a ride, I noticed the rear end was a lot more loose and floaty. I had noticed this when I first bought the 4Runner, but resolved that with replacing all the bushings in the rear and replacing the rear end links with front end links. So, having resolved those issues, I wasn't sure why I was feeling this again, although less than before. Additionally, going into a curve I drive daily at a certain speed, now the traction control light and beeping comes on often, but never did before on this curve.

FWIW, I bought the OME 861 springs because one, I am not a fan of Rough Country and two, after loading the rear end with a Shrockworks bumper, a spare 33" tire, a high-lift and 2 Jerry cans, it leveled out the rear. But when I would load it with gear, the rear sagged a bit.

Anyway, I am really happy this post helped me to figure out why the rear is acting the way it is. I just bought these [MENTION=28464]eimkeith[/MENTION] :) Looking forward to getting them welded on.
 
Finally got a decent amount of driving in since the install. I have to admit I was a little skeptical that I’d notice a difference but wanted to correct the geometry anyway. Believe the hype. You will notice improved stability/handling in the rear. Very impressed with the product and customer service. Plan on buying more products in the future
 
[MENTION=28464]eimkeith[/MENTION] thanks again for the brackets. Had my neighbor weld them on, added an outside mounted flat bracket on the driver side to add some extra strength. Made my pan hard bar almost perfectly straight, but made my wheels sit perfectly center. Love the brackets!
 
Just ordered these. Figured while I have my axle out to clean up all the rust this is the perfect time to weld these on. Excited to feel the difference because on washboard roads I can feel the rear end bouncing all over the place.
 
Apologies in advance if this has already asked. For 3rd gens with 3” lift, which hole should be used for the lowering bracket side? Should I use lowest hole?
 
Looking at getting this kit for my 4th gen here soon. Can anyone offer tips on install on a 4th/5th gen? Jack the truck up, take off driver rear wheel. Does the spring need to come out to weld the back side?
 
Looking at getting this kit for my 4th gen here soon. Can anyone offer tips on install on a 4th/5th gen? Jack the truck up, take off driver rear wheel. Does the spring need to come out to weld the back side?
I jacked it up (frame not the axle so it can droop for more work room) and left the tires on. The brake lines you have to bend a bit out of the way but no big deal. No spring doesn't have to come out. I ran it pretty hot to get good penetration and not weld the inside as there's no room. No problems so far.

I took out the bolt, put the bracket on the panhard bar with the bolt. Lined up the bottom of the bracket with the axle and tacked it. I did it that way to make sure my panhard would line up afterwards. Then removed panhard from bracket, weld and paint and done.

Sent from my SM-G986U using Tapatalk
 
Apologies in advance if this has already asked. For 3rd gens with 3” lift, which hole should be used for the lowering bracket side? Should I use lowest hole?

You’ll know when you put the panhard bar in either end as you want it level. For mine, because I have 250 pounds on the rear end, 861 OME springs with Bilsteins, I had to use the bottom hole on the passenger side. I also used an OEM bolt for the top hole as added strength. For the drivers side, I used the bottom stock hole with a plate that I drilled holes for both stock and the adapter to also add strength.
 
This will likely be a stupid question, any plans for a bolt in correction kit in the future? I don’t have access to a welder nor any shops around I’d really trust. I assume using the correct grade hardware you could get the same strength as welding? The bar is bolted in already? Thoughts?
 
This will likely be a stupid question, any plans for a bolt in correction kit in the future? I don’t have access to a welder nor any shops around I’d really trust. I assume using the correct grade hardware you could get the same strength as welding? The bar is bolted in already? Thoughts?

No sir; to make a bolt-in solution as durable requires extensive bracing and I personally don't think it's a preferable solution to a welded mount (consider that all manufacturers weld on their suspension link mounts)

Another company - Delta Vehicle Systems - makes a quality bolt-on solution for the 80 series; check out how complicated it becomes to properly secure a bolt-on solution.

(BTW, I'm a fan of their stuff - if you have an 80 you should definitely check them out)
 

Members online

Forum statistics

Threads
278,317
Messages
3,554,128
Members
248,016
Latest member
Advally Service

Trending content

Back
Top