• If you plan to post to Classified forums, you must follow these rules, or your post will be deleted.

    1. Thread title must include at a minimum: FS or FT, Item(1st, 2nd, 3rd, 4th or 5th gen), Price and Location. For Example: FS: 4th GEN Carpet Floor Mats - Tan, $50 Denver, CO.
    2. All Threads must contain the following information
      • What is for sale/trade (model, specs, etc.)
      • Condition
      • Price/What you want to trade for
      • Location of item
      • At least one picture of the item for sale or for trade
    3. No "Feeler" Threads - Its either for sale or it isn't.
    4. Moderators lock Classified Threads that have not had any activity in 90 days or when the part is announced SOLD.
    5. Threads not complying with the rules will be deleted without notice.

FS: eimkeith PCK® (Panhard Correction Kits) for 3rd gen $93.50, 4th/5th Gen $98.20

I placed an order last week too, and came here to find out about timeline. Gotta love this forum, full of answers!

Can't wait to install w/ 5100s & 880/890...only been waiting 6 years to do this!

EIMKeith, I have a 2002, which holes should I be using with the OME 890s in the back? Any advice or information is greatly appreciated.

I’m in the exact same situation. I just ordered 890s and considering putting in the 10mm trim spacers
 
Just had the 5100s & 880/890s installed.
The shop used the third hole on the passenger side bracket. Panhard appears level, maybe even ever so slightly lower on the passenger side. It handles amazingly well, so I will keep it as-is for now.

FYI, my 2002 got just over 2.5" lift on the back end (no trim packers) and just over 2" on the front with that shock/coil combo. I asked them to keep some rake, so they set the front lower on purpose.

Big thanks to EIMKeith for the correction kit, its perfect for the job!
 
Ordered! I'm looking forward to the reduction in body roll. Thanks for taking the time to develop the PCK.

– and thanks for the order.

your PCK will be sent out as soon as possible – let me know if you have any questions during installation; and if you don’t mind, photos of your finished work are always appreciated.
 
Just got my 4th Gen kit welded in on Wednesday. Ordering to receiving was very quick. Everything arrived packaged nicely. VERY pleased overall. Only thing to be aware of is that the new new nut sent with the kit uses a larger size wrench than the 19mm that is used on the bolt. I wasn't near my full toolkit and maxed out at a 19mm socket and wrench, so I had to use an adjustable wrench to tighten the bolt together.

QUESTION/SANITY CHECK: If my current lift has the panhard level right in the middle of the two bracket holes, should I be using the lower hole? I'm right at 0.5" too high using the top hole and 0.5" too low using the lower hole. I figure that using the lower hole will make the panhard more level when loads are added, where the higher hole under load would make the angle worse in the opposite direction than it was before the bracket was installed.
 
Last edited:
QUESTION/SANITY CHECK: If my current lift has the panhard level right in the middle of the two bracket holes, should I be using the lower hole? I'm right at 0.5" too high using the top hole and 0.5" too low using the lower hole. I figure that using the lower hole will make the panhard more level when loads are added, where the higher hole under load would make the angle worse in the opposite direction than it was before the bracket was installed.

I'd go lower in that situation. :)
 
In the event anyone else comes across the same situation, I've now tested both positions, and the lower position does noticeably ride better if you're halfway between holes. I rode with it in the upper position for 2 days before I could paint the part. When I painted the bracket this afternoon, I switched to the lower position and it's much improved. My Runner rides like a normal vehicle again!
 
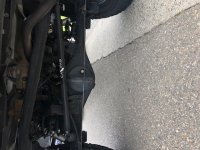
Is this something I need? My previous builds were leaf sprung. Just bought this built 3rd gen.

Sorry about the side ways photo.

Ryan
 

Attachments

  • IMG_6739 - Copy.jpg
    IMG_6739 - Copy.jpg
    115.3 KB · Views: 395
Last edited:
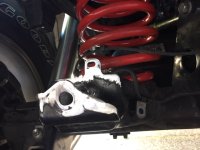
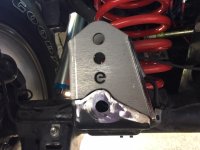
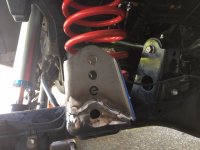
I received my bracket today and immediately welded it in on my 2018 ORP today. Wow amazing the difference a simple part can make. It feels more stable over bumps at high speed and just drives generally better. Thanks for a great product that fit nicely

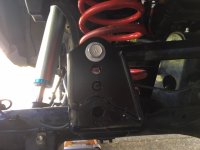
Not my best welding job but I didnt want to remove the springs and stuff. I did weld the back side but it was just not the prettiest since I had to weld in tight space with the coil still in place. Ground the welds flat a little bit and sprayed some black paint over it
 

Attachments

  • 1.JPG
    1.JPG
    90.5 KB · Views: 341
  • 2.JPG
    2.JPG
    97.6 KB · Views: 352
  • 3.JPG
    3.JPG
    98.6 KB · Views: 368
  • 4.JPG
    4.JPG
    83.2 KB · Views: 352
Last edited:
Installed this on my '17 TRDOR with 3" rear lift. Very happy with the fit and the noticeable difference it made. Much more stable over bumps and the rear suspension feels much better in every driving scenario.

47743644211_ca9c01f4bc_c.jpg


47690897602_c65319b183_c.jpg
 
Just got my kit recently, the quality is fantastic. I did have a bit of a stupid question though, well it might just be a perspective thing I guess. Does the top bracket go over the factory bracket? and then do I need to put an extra bolt through it after welding it?

(3rd gen)
 
Does the top bracket go over the factory bracket? and then do I need to put an extra bolt through it after welding it?

(3rd gen)

Hi there! Yes, the frame side bracket slips over the factory mount; the 2 hardened spacers are used inside of it to return the ID to that of the stock mount. (A lot of folk go ahead and cut an arc in the bottom of the factory mount for the spacer in the middle position before installation - you'll see what I mean)

No need for an additional bolt; in fact, you run the risk of crushing the factory mount if you do that.
 
Hi there! Yes, the frame side bracket slips over the factory mount; the 2 hardened spacers are used inside of it to return the ID to that of the stock mount. (A lot of folk go ahead and cut an arc in the bottom of the factory mount for the spacer in the middle position before installation - you'll see what I mean)

No need for an additional bolt; in fact, you run the risk of crushing the factory mount if you do that.

I meant to ask about the spacers, do you have any photographs of how that all goes together? Sorry for the trouble... I just don't want to have it installed wrong! Haha
 
I meant to ask about the spacers, do you have any photographs of how that all goes together? Sorry for the trouble... I just don't want to have it installed wrong! Haha


I’ll see what I have this evening when I get home as far as photos go - several folks have kindly sent me photographs of their installs, so we might be in luck! :)


Sent from my iPhone using Tapatalk Pro
 

Members online

No members online now.

Forum statistics

Threads
278,315
Messages
3,554,125
Members
248,016
Latest member
Advally Service

Trending content

Back
Top