GeoRoss' 1986 4Runner

nice work on the door cards.

i know it was a year ago, but too bad about the mirror. i just took the power mirrior head from my '88 to a local glass place (granite state glass), and they were able to cut a new mirror and install it in the head for $35.
 
I half-heartedly looked at the time for a glass store. Then I found the second pair. I’ll do more looking so have a spare set.
 
Louisiana 1st Gen 1989: Door & Tailgate Weatherstrip sources?

Hi, fellow 1stGen fans! Mine is painted and ready for the interior and carpet to be installed, but need to make it weather-tight first. Where can I find ]weatherstrips for both doors and the tailgate? __
 
Louisiana 1st Gen 1989: Door & Tailgate Weatherstrip sources?

Hey, GeoRoss, I hope that you're enjoying your 1stGen. My own restoration started in July 2017 with a $600 SR5 that was about to be scrapped after a minor front-end wreck. It still ran fine, however, and now, after a some parts and paint (slate blue metallic), we're ready to install the interior & carpet. Who can recommend a source for Door & Tailgate Weatherstrips? ___
I greatly appreciate your guidance. (FYI, Rock Auto sent door seals for "89-94" that don't fit.)
 
...
I did develop a hard cold start only when temps are below 60˚F...
As routine maintenance, try cleaning CSI mounting threads to bare metal. Same on where it mounts.

BTW, I just noticed that your orig. rear seats are Frankenstein creations like mine. :)
 
Hey, GeoRoss, I hope that you're enjoying your 1stGen. My own restoration started in July 2017 with a $600 SR5 that was about to be scrapped after a minor front-end wreck. It still ran fine, however, and now, after a some parts and paint (slate blue metallic), we're ready to install the interior & carpet. Who can recommend a source for Door & Tailgate Weatherstrips? ___
I greatly appreciate your guidance. (FYI, Rock Auto sent door seals for "89-94" that don't fit.)

I haven’t gotten that far, I wish I could help.
 
As routine maintenance, try cleaning CSI mounting threads to bare metal. Same on where it mounts.

BTW, I just noticed that your orig. rear seats are Frankenstein creations like mine. :)

CSI is on my list. Do you recall if the gasket is reusable or one-time use?

Those seats still make me laugh. I am still floored at how the original owner used tech screws for so much of the interior.
 
CSI is on my list. Do you recall if the gasket is reusable or one-time use?

Those seats still make me laugh. I am still floored at how the original owner used tech screws for so much of the interior.
Ooops, I meant CSI TIMER SWITCH mounting threads. That's how the switch gets its ground.
However, when I inspected my CSI the gasket did not break when I removed it. Looks durable.
I think seats were dealer-installed in the U.S. to save Toyota on taxes, because without rear seats they were considered utility vehicles. They surely do not show evidence of Japanese quality nor attention to details; my rear seat backrest latches are plastic so they're broken now.
Looking at 3rd-gen ones.
 
Ooops, I meant CSI TIMER SWITCH mounting threads. That's how the switch gets its ground.
However, when I inspected my CSI the gasket did not break when I removed it. Looks durable.
I think seats were dealer-installed in the U.S. to save Toyota on taxes, because without rear seats they were considered utility vehicles. They surely do not show evidence of Japanese quality nor attention to details; my rear seat backrest latches are plastic so they're broken now.
Looking at 3rd-gen ones.

Thanks Ray!
 
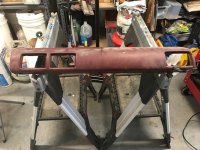
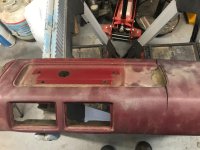
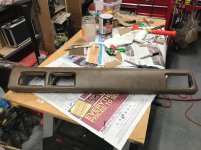
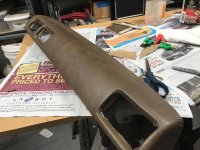
I took a stab at recovering a dash. I learned some things and haven't decided if this one is good enough or to try again. I have enough vinyl and I think I can do better or find someway to camouflage my crack repair. The details can be found here.

You can see what I started with and how it turned out. My crack repair shows through the vinyl. I really thought the vinyl would cover it up. I wish I'd spent more time evening the edges. Live and learn.
 

Attachments

  • IMG_2471.jpg
    IMG_2471.jpg
    135.6 KB · Views: 150
  • IMG_2472.jpg
    IMG_2472.jpg
    129.8 KB · Views: 149
  • IMG_2484.jpg
    IMG_2484.jpg
    136.7 KB · Views: 160
  • IMG_2485.jpg
    IMG_2485.jpg
    133.9 KB · Views: 149
I took a stab at recovering a dash.
Not bad, GeoRoss!
That's how I plan to restore mine, too, but been too busy with more functional projects - LOL!

To further smooth out imperfection, I'm considering:
1) Doing dry-fit. Wrap with vinyl, stitch edges in back to opposite edges with thread or cord - something I can adjust tightness of. Don;t cut vent opening, yet. Stitched cord through center of vinyl in vent opening, and stretch back. Expose to sun so whatever stretches gets tightened and vinyl would be shaped closer to the foam).

2) When you're happy, pad the whole thing with 1/8-inch ensolite - same stuff used for sound insulation (different from vibration dampening). Found some at good fabric / upholstery stores.
This would give the dash a plush feel.

3) Repeat (1), then when you're happy finish it up.

 
Not bad, GeoRoss!
That's how I plan to restore mine, too, but been too busy with more functional projects - LOL!

To further smooth out imperfection, I'm considering:
1) Doing dry-fit. Wrap with vinyl, stitch edges in back to opposite edges with thread or cord - something I can adjust tightness of. Don;t cut vent opening, yet. Stitched cord through center of vinyl in vent opening, and stretch back. Expose to sun so whatever stretches gets tightened and vinyl would be shaped closer to the foam).

2) When you're happy, pad the whole thing with 1/8-inch ensolite - same stuff used for sound insulation (different from vibration dampening). Found some at good fabric / upholstery stores.
This would give the dash a plush feel.

3) Repeat (1), then when you're happy finish it up.

Those are all good ideas. I didn't want to add any padding to avoid bulking things up for fitment. I think I can just put my cellphone mount on the offending repair and it won't be noticeable.

I watched this guy's videos to learn some techniques. https://www.youtube.com/user/Cechaflo

I am really surprised at how well they worked. It is pretty simple, but does take patience. I started by glueing a 4 cm patch along the entire long axis of the dash just above the transition to horizontal above the vents. From there I glued in sections, from transition to transition so I could form to each bend. This whole time you stretch and form. I had a heat gun ready, but found it not really necessary. The vents were surprisingly easy. The depression on the top was a PITA. This is because I tried to do it all at once. Had I divided it up it would have been easier. Most of the edges were simple. The most complex was the getting the vertical section on the PS done. The way I did it is fine and none of the seams will be visible once installed, but I could have done in cleaner looking back.
 

Members online

No members online now.

Forum statistics

Threads
278,310
Messages
3,554,079
Members
248,016
Latest member
Advally Service

Trending content

Back
Top