Head Gasket symptoms starting to show...

Got some pricing back after calling around.

Water belt/ Timing Kit (OEM Toyota Parts): $350
Head Gasket kit: $150
Head work for two heads (resurface, replacement of seals, etc): $360

I'm going to also change out my radiator as recommended for preventative damage and get a tranny cooler which should run me about $150 total.

Do you think these prices are fair? I live in California and i know prices vary but just hoping to get your opinions..

After this ~$1,000 parts + my own labor job, if done right, hopefully it'll be everlasting to go on long trips.
 
Finally got started on the runner yesterday. Found a nice spot in my aunt's garage so i can safely leave it there for a couple weekends while i work on it.

Started by taking the radiator out, then the little tedious things such as wiring, hoses, and some brackets. For the top manifold off as well as fuel rail. Next time i wrench on this, i want to get the heads up.

Few questions though, i notice that the tranny fluid goes in the radiator through another spout. Is the big issue with these things that the plastic radiator tends to crack within the radiator and the two mix?

Also, as i'm reading ahead, i noticed that a few documentation call out a "service bolt" to get the camshafts off. I didn't get this part unless i encounter it, can anyone explain what this is? Can i just any bolt as a service bolt or is this something special i'll need to buy?


Another attempt at posting pics... let me know if you guys can't see them.

before the tear-down
iem3vt.jpg


Left as is until next weekend
kxcaa.jpg


Annoying harnesses bundled up..
10cm0lu.jpg
 
If the cam service bolt refers to the bolt you are supposed to thread into the cam gears before removal, I used a couple of the longer bolts that hold the TB backplate (sheet metal plate behind the cam pulleys) to the engine block. Worked for me. I may have talked about it in that tread I linked you above, might have some pictures in there even.

Side note, if you were a little more OCD about crap falling into your motor you might consider taping up those intake ports. I was lazy and threw a smashed paper towel roll over mine. Just something to consider.
 
Thanks for the pointers. I think i know what you're referring to now.. and btw, using your thread as a somewhat timeline for myself. :nicethread:

I didn't have much stuff with me at the garage since i don't live there. I'm going to bring most of my stuff (tools, zip ties, etc) next time i go back so i can have what i need. And yes, i'll definitely cover up those ports.
 
In case you decide to take your heads to a machine shop, inform the guy of those service bolts. Not sure all of them know why will someone put a bolt in that spot. Guys at the machine shop cut them to allow the camshafts to turn.... why they want them to turn? Don't know, maybe to verify valve clearance. In my case I used two of the 8mm bolts to that keep the valves covers in place. Thankfully a guy at a junker had them and gave them to me for free!
 
so it's something i have to leave on? I thought that the service bolts just held the cam gears in place so that i can break the bolt off. Or am i referencing something completely different?

In case you decide to take your heads to a machine shop, inform the guy of those service bolts. Not sure all of them know why will someone put a bolt in that spot. Guys at the machine shop cut them to allow the camshafts to turn.... why they want them to turn? Don't know, maybe to verify valve clearance. In my case I used two of the 8mm bolts to that keep the valves covers in place. Thankfully a guy at a junker had them and gave them to me for free!
 
You should put those bolts in place before removing the camshafts from the heads, first thing to do before removing any other bolt. If you try to remove them without having those in place, those gears will turn in opposite directions... not so sure if there is a way to put them in place once that happens. Look at them carefully and you will notice they're split, like having a gear cut in half, there's a coil inside that is forcing them to turn in opposite directions, I guess it is to compensate for clearance. The bolt should be tight (hand tight) and kept in place till you get both camshafts in place during the assembly step. I am looking for pics I took of those bolts already in place.
 
Charlie - this sounds like something i'm underestimating as it appears that it needs to be done correctly. I'm going to search up how to approach this step but any additional additional advice would be a big help. Thanks in advance.

You should put those bolts in place before removing the camshafts from the heads, first thing to do before removing any other bolt. If you try to remove them without having those in place, those gears will turn in opposite directions... not so sure if there is a way to put them in place once that happens. Look at them carefully and you will notice they're split, like having a gear cut in half, there's a coil inside that is forcing them to turn in opposite directions, I guess it is to compensate for clearance. The bolt should be tight (hand tight) and kept in place till you get both camshafts in place during the assembly step. I am looking for pics I took of those bolts already in place.


HoRunner - No pun intended.. lol thats a great documentation page, i haven't run across is before but saved in to my favorites now.

I've been using this one.. eLibrary.mel.org that i found from this forum page..

Chilton Manual Downloads Free

Also pretty helpful but very technical and not enough pictures, which yours seem to have a lot of! what phase are you on now by the way? I have the crank pulley bolt to remove (waiting for air gun/compressor from friend), and the exhaust manifolds to take off. From there i will proceed to open the valve covers. Going to try and figure out the do's and don't with that service bolt first though.


Doing this job myself right now. If you haven't already found this link 1996 to 2002 Toyota 4Runner OEM Repair and Wiring Manuals I highly recommend it. It's the full factory service manual.

Good Luck!
 
Thanks for the link! Already added to my favorites :biggrin2:

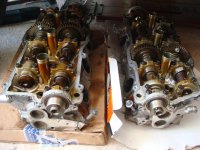
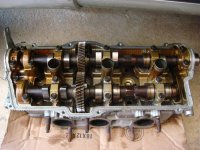
Check the following pics. Heads side by side, notice the bolts on the exhaust shafts. Also notice the detail on the single head pic, bolt is passing through the split gear.

Hope that helps and don't forget about those before trying to rotate the camshafts once in place in case you use long bolts just as I did. It's better to use the bolts on the TB cover as they are shorter (was already mentioned before).

Also suggest you to align timing marks on the front camshaft pulleys and take pics on the marks on the camshafts gears as they have marks on the front and the back. Could get confusing later on.
 

Attachments

  • DSC04623.jpg
    DSC04623.jpg
    138.5 KB · Views: 1,869
  • DSC04608.jpg
    DSC04608.jpg
    138.5 KB · Views: 1,828
Thanks for clarifying!

Just to confirm so i'm not missing anything..

1. i put that service bolt through

2. remove the collars that hold the cam shafts down
3. carefully lift the cam shafts off and place them in a safe place (service bolt still in).
4. Send the heads in to get resurfaced (without cam shafts).
5. install fresh heads in and place the cam shafts in as i took them out.
6. bolt down the collars
7. remove service bolt.

So that the service bolt should stay in until i have the cam shafts back on the heads, buckled down?


Thanks for the link! Already added to my favorites :biggrin2:

Check the following pics. Heads side by side, notice the bolts on the exhaust shafts. Also notice the detail on the single head pic, bolt is passing through the split gear.

Hope that helps and don't forget about those before trying to rotate the camshafts once in place in case you use long bolts just as I did. It's better to use the bolts on the TB cover as they are shorter (was already mentioned before).

Also suggest you to align timing marks on the front camshaft pulleys and take pics on the marks on the camshafts gears as they have marks on the front and the back. Could get confusing later on.
 
Charlie - this sounds like something i'm underestimating as it appears that it needs to be done correctly. I'm going to search up how to approach this step but any additional additional advice would be a big help. Thanks in advance.


HoRunner - No pun intended.. lol thats a great documentation page, i haven't run across is before but saved in to my favorites now.

I've been using this one.. eLibrary.mel.org that i found from this forum page..

Chilton Manual Downloads Free

Also pretty helpful but very technical and not enough pictures, which yours seem to have a lot of! what phase are you on now by the way? I have the crank pulley bolt to remove (waiting for air gun/compressor from friend), and the exhaust manifolds to take off. From there i will proceed to open the valve covers. Going to try and figure out the do's and don't with that service bolt first though.

From what it sounds like I'm on the same step you are. I'm currently looking for an easy way to get the crank pulley off without buying a Special Service Tool or "making" my own. Any ideas?

Also, the bummer about my tear-down is that I'm 40 miles away from the garage I'm using and can only work on it about 1 day a week for now. So it's gonna be a while.
 
Thanks for clarifying!

Just to confirm so i'm not missing anything..

1. i put that service bolt through

2. remove the collars that hold the cam shafts down
3. carefully lift the cam shafts off and place them in a safe place (service bolt still in).
4. Send the heads in to get resurfaced (without cam shafts).
5. install fresh heads in and place the cam shafts in as i took them out.
6. bolt down the collars
7. remove service bolt.

So that the service bolt should stay in until i have the cam shafts back on the heads, buckled down?

Call the shop before sending the heads without the camshafts. In my case, the guy asked to have them assembled in order to check clearances, etc. Be very, but very careful of not mixing up those valves shims. They come calibrated from factory and mixing them up means to machine all of them again and that will add some extra bucks to your repair costs. You can make a mark on them using some permanent ink if you are skeptical about someone not doing the right thing. Do the same thing or the camshafts and collars. Everything should go back in the same place it was from the beginning. The guy on the shop should tell you what he needs. Take pictures of everything as well, that's my advice to you. :thumb3:
 
Thanks for the link! Already added to my favorites :biggrin2:

Check the following pics. Heads side by side, notice the bolts on the exhaust shafts. Also notice the detail on the single head pic, bolt is passing through the split gear.

Hope that helps and don't forget about those before trying to rotate the camshafts once in place in case you use long bolts just as I did. It's better to use the bolts on the TB cover as they are shorter (was already mentioned before).

Also suggest you to align timing marks on the front camshaft pulleys and take pics on the marks on the camshafts gears as they have marks on the front and the back. Could get confusing later on.

I had to replace the valve seals in my 2UZ and uses very similar exhaust cam set up. I put the locking bolt in, removed the cam shafts worked on one valve at a time not to mix up components.

I put everything back together and forgot about those little SOB's. Had to take everything apart pull them out and put it back together
 
From what it sounds like I'm on the same step you are. I'm currently looking for an easy way to get the crank pulley off without buying a Special Service Tool or "making" my own. Any ideas?

Also, the bummer about my tear-down is that I'm 40 miles away from the garage I'm using and can only work on it about 1 day a week for now. So it's gonna be a while.


I used a large slot head screwdriver (you can also use a small pry bar) and placed it between the transmission housing and the flywheel (need to remove bottom flywheel cover). Be sure to have the tip of the screwdriver/pry bar placed between two of the teeth of the flywheel in a position that it won't allow the engine to turn. Kinda difficult for me to explain as I usually don't speak english :ybrick: but I think I made the point... I hope :bravo:

I did it myself and actually is kinda tricky as I was placing the screwdriver with one hand in place and turning the crankshaft bolt with the other one so I can leave it placed. Once in place, I just turned the wrench to loose the bolt; used a 36" with a 1/2" drive flex handle wrench, an impact socket, and a piece of pipe to reach higher torque. Thankfully, the screwdriver never got out of place. Careful with you hands and fingers, not to smash them with the surroundings. :sobbing:
 
Last edited:
From what it sounds like I'm on the same step you are. I'm currently looking for an easy way to get the crank pulley off without buying a Special Service Tool or "making" my own. Any ideas?

Also, the bummer about my tear-down is that I'm 40 miles away from the garage I'm using and can only work on it about 1 day a week for now. So it's gonna be a while.

I have Easiest method for holding the harmonic balancer.


There are threaded holes in the Harmonic Balancer. I uses a chain (bike lock chain) and bolt it to the Balancer using a 8mm bolt. I then but the other end of the chain to something else on the engine ( alternator bolt or power steering bracket. The engine will not spin. Use a breaker bar, remove the harmonic balancer bolt.

Installation is reverse.
 
Last edited:
O man, i am in the same shoes. I can only work on the car once a week so it'll be a couple weeks before i get this thing back.

I'm going to use an airgun and compressor to get that bolt off. It'll make the crank turn a little and get it off the TDC but once i loosen the bolt, i'll just hand tight and put it back to TDC. Since it's loose, i was going to hit the ratchet wth a hammer for a quick impact then loosen with fingers.

Haven't figured out how i'll put it back together but probably just use airgun as well. You know the torque spec by any chance?

From what it sounds like I'm on the same step you are. I'm currently looking for an easy way to get the crank pulley off without buying a Special Service Tool or "making" my own. Any ideas?

Also, the bummer about my tear-down is that I'm 40 miles away from the garage I'm using and can only work on it about 1 day a week for now. So it's gonna be a while.
 

Members online

Forum statistics

Threads
278,316
Messages
3,554,120
Members
248,016
Latest member
Advally Service

Trending content

Back
Top