Head Gasket symptoms starting to show...

Thanks for the tips. Good point about marking the shims. Do you think i should just sharpy numbers on them? Any suggestions?

Call the shop before sending the heads without the camshafts. In my case, the guy asked to have them assembled in order to check clearances, etc. Be very, but very careful of not mixing up those valves shims. They come calibrated from factory and mixing them up means to machine all of them again and that will add some extra bucks to your repair costs. You can make a mark on them using some permanent ink if you are skeptical about someone not doing the right thing. Do the same thing or the camshafts and collars. Everything should go back in the same place it was from the beginning. The guy on the shop should tell you what he needs. Take pictures of everything as well, that's my advice to you. :thumb3:
 
O man, i am in the same shoes. I can only work on the car once a week so it'll be a couple weeks before i get this thing back.

I'm going to use an airgun and compressor to get that bolt off. It'll make the crank turn a little and get it off the TDC but once i loosen the bolt, i'll just hand tight and put it back to TDC. Since it's loose, i was going to hit the ratchet wth a hammer for a quick impact then loosen with fingers.

Haven't figured out how i'll put it back together but probably just use airgun as well. You know the torque spec by any chance?

217 ft-lb (300 nm) per the maintenance manual.
 
I used a large slot head screwdriver (you can also use a small pry bar) and placed it between the transmission housing and the flywheel (need to remove bottom flywheel cover). Be sure to have the tip of the screwdriver/pry bar placed between two of the teeth of the flywheel in a position that it won't allow the engine to turn. Kinda difficult for me to explain as I usually don't speak english :ybrick: but I think I made the point... I hope :bravo:

I did it myself and actually is kinda tricky as I was placing the screwdriver with one hand in place and turning the crankshaft bolt with the other one so I can leave it placed. Once in place, I just turned the wrench to loose the bolt; used a 36" with a 1/2" drive flex handle wrench, an impact socket, and a piece of pipe to reach higher torque. Thankfully, the screwdriver never got out of place. Careful with you hands and fingers, not to smash them with the surroundings. :sobbing:

I have Easiest method for holding the harmonic balancer.


There are threaded holes in the Harmonic Balancer. I uses a chain (bike lock chain) and bolt it to the Balancer using a 8mm bolt. I then but the other end of the chain to something else on the engine ( alternator bolt or power steering bracket. The engine will not spin. Use a breaker bar, remove the harmonic balancer bolt.

Installation is reverse.

Thanks guys!
 
Just wanted to provide an update and also need some advice

I have an error that i've encountered now. Need advice please!!!


So since my last update, i removed the A/C compressor, power steering pulley, and alternator, as well as all the brackets. It was tough getting the crankshaft bolt off. I used a chain on the harmonic balancer to the alternator bracket, then a solid one piece 19mm to a breaker bar. Ended up bending the breaker bar. Plan B, torched the bolt for a few minutes til super hot, then tried a new breaker bar, success.

The error here, (before i had the chain) i initially tried using the top right cam gear bolt and had a friend hold that tight with a ratchet while i tried to loosen that crank on the bottom. Bad move.. we heard two pops that sounded abnormal. From where exactly? Not sure. But the outcome is that I believe the timing is off. When i turn the crank and the bottom indicator is at TDC, the top cam pulleys are off by a little. Though we only held the top right cam gear bolt, strangely, both the left and right timing indicators are the same. I THINK i might've skipped two belt teeth at the bottom crank gear instead. With the story I explained, can anyone shed some light or confirm that i did that? I am thinking that the lower crank has turned two notches to the left, therefore, turned it so that the top cams are at TDC and the lower crank is off to the left by a little bit.

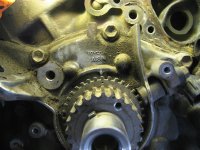
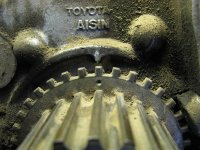
I tried to confirm myself and with the harmonic balancer off and timing belt off, i turned the crank back towards the right slightly (maybe 1/2 and inch) so that if i slip the harmonic balancer back on, it lines up again with the TDC indicator at the bottom. Are there any other markings on the crank gear itself (not the harmonic balancer) that shows me if its at TDC?

Anyways, i now need to get the cam gears off. Is there a technique or tool i need to use to lock down the cam gear in place while i loosen that bolt?

Crank at TDC mark
2771ed79.jpg~original


Left cam
006117cd.jpg~original


Right cam
b8f8e9f8.jpg~original


Where is sits
123b6171.jpg~original


My "organization" method.
cfb48ed3.jpg~original


Thanks!

:bigok::cheers::biggrin2::thanks:
 
You shouldn't have to pull the cam pulley's. Just realign all the marks and reinstall the belt.
 

Attachments

  • IMG_8666 (Medium).JPG
    IMG_8666 (Medium).JPG
    85 KB · Views: 1,875
  • IMG_8667 (Medium).JPG
    IMG_8667 (Medium).JPG
    99.1 KB · Views: 1,714
I wouldn't have gone with the torch technique as (if I'm not wrong), the crankshaft pulley is a 2 piece part glued together by means of a vulcanized rubber bushing/ring. Check it for damage. You should also replace the crankshaft oil seal as it was subjected to excess heat, anyway it's time to replace all of them seals as you are already there. Carefull not to break one of the timing belt pulley/harmonic balancer teeth. Happened to me, outcome, $50.00 unnecessarily spent.

Regarding the timing issue, yeap, the timing belt crankshaft pulley/harmonic balancer tells you exactly where the TDC. As per pics, you're ok.

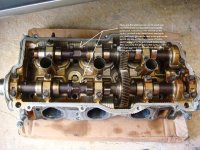
You will need to remove both camshafts pulleys to replace the oil seals. The right way to do it is by using a wrench to keep them from turning. Check them and you'll see at some point along the shafts that there is an hexagonal shaped section. Put a wrench (don't remember the size) or an adjustable wrench at that point, let the wrench to make contact to a safe spot on the head, and then try to loose the pulleys bolts. Careful! Happened to me that the wrench went flying and hit one of the fenders. Two dents! Thankfully didn't hit my face. Could have been worse.

Try using the pry bar or large flat screwdriver in the flywheel to keep it from turning when adjusting the crankshaft pulley bolt. You'll see is faster and safer as you have someone giving you a hand. I did it myself alone, no issues whatsoever, no parts broken or bent.

Hope that helps :)
 
Just about to take the crank pulley off myself. Thanks for the updates. Good luck!

Quick question...What other parts are you going to replace while you're in there? I'll be putting in a new radiator and thermostat for example (water pump and TB were done less than 20k ago) so I'll leave those alone.

I'm mainly wondering about the fuel injectors. Anyone have experience with failures on these things and whether it would be smart to swap them now?
 
Last edited:
I replaced my runner's injectors (199,500 miles on it). Found 2 of them leaking, actually my problem started with open injectors. Noticed the problem once I removed the intake manifold... lines and wires disconnected and 2 of them dripping fuel; not a good sign. Found a seller on eBay, about $35.00 each. I am no expert on injectors but they come balanced, cleaned, all o-rings and tips replaced, even clear coated, something I didn't like cause they applied the clear with the new o-rings on. Anyway no leaks and no problems 5,500 miles later.

There they are:

99-04 TOYOTA TACOMA 4RUNNER TUNDRA 3.4 FUEL INJECTORS SET 23250 62040 | eBay

And, got this TB/WP kit from eBay too. Aisin pump and japanese made bearings and belt. Better deal I found overall:

Toyota Pickup 3.4 DOHC 5VZFE Timing Belt Water Pump Kit | eBay
 
@kball - thanks for the pictures, i'll look for that mark when i realign the pulleys. Reason why i'm worried to turn anything on the motor at this point is because i read a timing book that said not to turn the motor while belt is off. I'm afraid to turn the pistons while the valves are in a certain position which would lead to crushing the valves, yeah? I'll have to pull the cam pulleys nonetheless as i'm doing the head gasket.

You should also replace the crankshaft oil seal as it was subjected to excess heat, anyway it's time to replace all of them seals as you are already there.

Planning on doing that seal. My old jeep had that leaking and i sold the car before the headache got bigger but this is my chance to replace one.

Carefull not to break one of the timing belt pulley/harmonic balancer teeth. Happened to me, outcome, $50.00 unnecessarily spent.

funny you mentioned this because i actually chipped the the outer edge of the balancer.. see pics below. HoRunner, if not done already, borrow a harmonic balancer puller from Autozone or a shop. I didn't know i needed this while working on the car. :happens:

You will need to remove both camshafts pulleys to replace the oil seals. The right way to do it is by using a wrench to keep them from turning. Check them and you'll see at some point along the shafts that there is an hexagonal shaped section.

So for this, i can take the valve covers off before the cam pulleys and the plate behind it? And is there anything i should look out for when taking this bolt off? I don't want to have another error as i did before with the crank pulley.

Quick question...What other parts are you going to replace while you're in there? I'll be putting in a new radiator and thermostat for example (water pump and TB were done less than 20k ago) so I'll leave those alone.

plan on getting this..

OEM water pump timing belt kit

Koyo Radiator

Transmission cooler (and bypass the radiator)
Need to find one, any recommendations?

PCV valve (mine is leaky, my manifolds were oily on the inside)

Gasket kit that includes head gaskets, manifold, exhaust, throttle body, etc
any recommendations?

I also broke this little black thing mounted on the firewall that controls the cabled heater temperature. I pulled a hose out and the plastic was so brittle, it crumbled into pieces.

Where i chipped my harmonic balancer... going to reuse it as i think it should be fine since it's not the actual teeth....
e4803796.jpg~original


Thanks!!!
 
Last edited:
The 3.4 is a non-interference motor. Which means you can spin all three pulley systems independently when your timing belt is off with no worries of component damage. Timing only matters again when its time to close everything back up. Match your pulley and belt marks and youre good to go.
 
The 3.4 is a non-interference motor. Which means you can spin all three pulley systems independently when your timing belt is off with no worries of component damage. Timing only matters again when its time to close everything back up. Match your pulley and belt marks and youre good to go.

thanks for confirming!
 
@kball -
So for this, i can take the valve covers off before the cam pulleys and the plate behind it? And is there anything i should look out for when taking this bolt off? I don't want to have another error as i did before with the crank pulley.


Check on the following pic. Is an easy task, just be careful the wrench you use don't slip from its place while applying torque, they just go flying away! And don't use the flat surface where the valve cover gasket makes contact as it could create deformations that will lead to leaks.
 

Attachments

  • camshaftslooseningtech.jpg
    camshaftslooseningtech.jpg
    139.4 KB · Views: 4,820
Check on the following pic. Is an easy task, just be careful the wrench you use don't slip from its place while applying torque, they just go flying away! And don't use the flat surface where the valve cover gasket makes contact as it could create deformations that will lead to leaks.

Thanks! I'm going to give it a try this weekend. Hopefully will have the heads off on Saturday if everything goes to plan.

From what it looks like, i only have the remaining actions..

1. Take off the valve cover.
2. Take off the cam pulleys.
3. In a pattern, remove the camshaft collars.
4. In a pattern, remove the head bolts.

I also left the exhaust manifolds on as someone said i can wiggle them out with the manifolds on as long as i have an extra hand pulling the other pipe back. At this point, the heads can come off, correct?

Will there be heavy duty prying needed? Are there safer methods like hitting it with a mallet and cloth?
 
If I am not wrong, exhaust cam goes out first, and then the intake one (reverse process when installing those back in the heads). Remember to notice the camshafts gears marks before removing them. They have marks on both sides, take notice of that as I got confused at some point during installation, take pictures of every detail. Also remember to put the locking bolt in the exhaust camshaft gear (detail in the previous picture). Avoid mixing parts. Every camshaft, collar, shim, goes back in the same position they were removed. When removing heads bolts, check for this one different bolt, allen type. Torque on this one is less than the rest of the remaining bolts. Haynes manual provides you the detail on torques sequence and torque spec. Check on the picture, on that head, it should go to the right, in the center.

I didn't do much prying, just a couple of hits with a piece of wood and a hammer and that was enough to unstick them.

Regarding manifolds, I detached them from the heads prior to removal as I was doing everything by myself. I guess you can remove them with the manifolds attached but you could have some trouble during installation as you have to be sure gaskets are not damaged when placing heads on the engine block. Reconnecting manifolds and exhaust pipes are not an easy task, require a lot of patience and some tricks.
 
Got the OEM gasket kit from Toyota as I wanted to avoid any issues specially with the head gaskets and valve stem seals as it will require to remove everything back again to replace them. I got the water pump and TB kit from mizumoauto, no complaints. From the pic on their site, head gaskets look identical to OEM's. My advice is to ask him about their origin/manufacturer.
 
Hmmm i think i'll stick with the oem actually. Can't go wrong with that.

Got a good source beside the dealer on this one? My local dealer has the set on back order. Anyone got a good link to get the OEM gasket set for a good deal online? Thanks.

PS. Getting the heads off Sunday. Wish me luck!
 
Update! Heads are off!!

Got the heads off last night and going to bring it in to the machine shop on Monday. In the meantime, i got some cleaning to do on the block since there's lots of sludge and grease from the leakages. Got my scraper tool and some engine degreaser ready to go. Anyone have recommendations on best products or ways to clean the pistons? They are uneven surface so using a blade might be hard.

Quick note that the Cam Pulley bolts were pretty hard to loosen. Had a friend holding the wrench on the shaft while i used a breaker bar for the pulley bolt. Both our elbows smashed into engine bay when they popped loose..

Mid-way through, snap a photo with the valve covers off.
0dc1e202.jpg~original


8f54757b.jpg~original


Then got around getting the heads off.
1f0b7fa2.jpg~original


I noticed that the passenger side middle piston was a little cleaner. That's where coolant might've got in? Plus the side walls weren;t as smooth as the rest..
498b5a00.jpg~original


3cf9f75e.jpg~original


Getting these ready for tomorrows shop.
3a7e4788.jpg~original


Discovered the valve cover gaskets were leaking too.
13364e2c.jpg~original


Other valve cover gasket leak. Good thing i'm changing these gaskets out as well..
d0cf1c99.jpg~original


Pictures from this morning
b000f656.jpg~original


Going to get to work on some of these pulleys. Got new parts coming in..
d67cadc8.jpg~original


Driver side
b1096ff8.jpg~original


Passenger side
966341d4.jpg~original


As it sits today..
3ee8afe4.jpg~original
 
Last edited:
Nice! Made me remember those days, seemed to me like a never ending story! But requires time and patience to do it well. Question... Did you id those camshaft collars? Don't see them in the pics. Don't mix them. Same thing with the camshafts...

Take the window to replace those water seals right on the middle top of the block. They get very corroded underneath and are hard to reach once everything is in place. Flush your engine with water to remove that old coolant but careful not to let water go into the oil passages. Put some cloth or something inside them.

A cleaner piston means water intrusion into that chamber. Check that gasket, head, block surface for damage. Check my thread. Also had a middle piston washed out but in my case it was almost clean. Very noticeable.

Regarding cleaning out the pistons heads, I started by using a wire brush, then did some rubbing with gasoline and finally some thinner. It is actually not recommended to clean them and don't ask me why, in some cases some engines start to blow heavy white smoke once they're fired up for the first time. Happened to me with my brother's in law Toyota Tercel, LOL! I turned it on and got far from the car to get something in my house and when coming back, I thought it was on fire! :D. Took about 2 days for the car to stop blowing smoke. Several mechanics have told me so, still don't know the reason but my T4R didn't do that, just a little bit of smoke at the beginning for a minute or so, and then it was ok. Careful also not to let any hard debris into the gap around the pistons as damage can be inflicted on the pistons rings and/or cylinder walls. Use some vacuum cleaner while you do the scrapping/cleaning.
 

Members online

Forum statistics

Threads
278,316
Messages
3,554,120
Members
248,016
Latest member
Advally Service

Trending content

Back
Top