
Help! Middle of HID install - wiring not making sense

msommers

New member
Hey all,

Finally getting around to installing these guys and well, things aren't going super smooth. I opted for a bixenon setup which is making things a little more confusing maybe. Here is what I have:
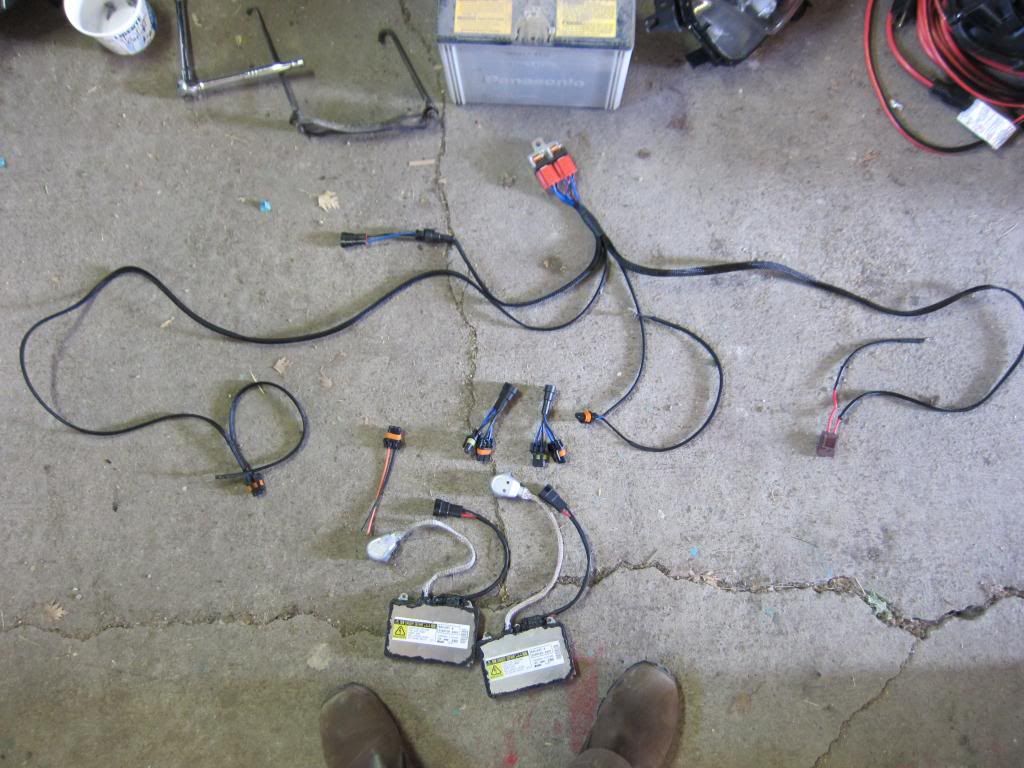
IMG_0510.jpg~original


IMG_0511.jpg~original


With the headlight reinstalled

IMG_0512.jpg~original


The easy stuff like the silver wirings from the ballast to the xenon bulb and battery terminal/grounds etc is fine.

The big issue I'm having is making the inputs connect properly. And like an idiot, I can't remember which is the LB and HB (though I taped the inner one on each side which I think is HB but not 100% confident).

Any help would be greatly appreciated!
 
Register to hide this ad
Who did the retrofit? It looks like they wired it up so you don't need to use those high beam splitters on the floor. I'm not 100%, but I think you need to install the high beam bulb. Take the connector that is already on the headlight assembly and plug it to the hb bulb. The high beam power wire from the truck should plug in to the other connector that was installed on the headlight assembly. When you turn your highs on the hb bulb will light up and the shroud on your hids will pop up.

Also, what is up with those ballasts? Were they opened up and resealed?
 
I had Lightwerkz do the retrofit and got all the parts from TRS.

I've managed to get the low-beams to work. The stock HB bulbs also will light up when I turn that on, however nothing changes for the xenon bulb.

I've taken the input from the relay, hooked it to the driver's side LB harness which signals the relays on. The two inputs are each going to a ballast and the power cable from the ballast to the projector.

I'm not really sure how to get the HB functionality on the projectors yet. They're LS460 which are supposed to be bixenon and it looks like they've been wired that way from Philsey's post awhile back about bixenon but I can't seem to relate that to what I have in front of me.
 
Did you install your hb bulb and try to plug in one of those wires hanging out of your headlight assembly?
 
I am almost positive that one of those two wires goes to the back of the high beam bulb and the other goes to the original high beam power. ( the wire that originally went to the high beam). You'll know if it is working as you'll hear a loud click from the projectors
 
I am almost positive that one of those two wires goes to the back of the high beam bulb and the other goes to the original high beam power. ( the wire that originally went to the high beam). You'll know if it is working as you'll hear a loud click from the projectors

Correct.

Your wiring harness has four parts coming out of the relays. 1) driver ballast & ground, 2) passenger ballast & ground, 3) input / stock connection, and 4) power / battery. The wire you're holding in the pic of the back of the retrofit (comes out of HID / low beam and split into two) is the high beam splitter already attached. You do not need the high beam splitters on the floor. [edit for future searches -- other setups may require the high beam splitters. This particular setup already has them built into the retrofit]

If you have the low HIDs working and the high bulbs working, you need to make the connection between the high bulbs and the HID solenoid. The objective is to split the stock high beam power so that it connects to both the stock high bulb and the HID solenoid. Connect one end of the high beam splitter to the stock high beam cable. Connect the other end of the high beam splitter to the high beam bulb. Now, powering on the high beam bulb should also power the solenoid and you should hear the click of the solenoid moving.

At the end of it, you should have high cable on each side connected to the high beam splitter and low cable on one side connected to the harness. the low cable on the other side should be capped off, but it should be the only cable not in use.

If you can't visualize it, check out the install guides at The Retrofit Source. The High Beam Splitter guide should answer your questions. The other guides may also be helpful if you want to check your install to make sure nothing got off.
 
Last edited:
nothing will change with the HID bulb, the high beam function is all in the projector assembly. the wiring harness that you show coming out from below the HID bulb socket needs to be tied into the stock high beam circuit to control the cut-off flap in the projector.
 
The issue I'm having is that there are 4 male connections and 2 female connections on each side. I'm not sure if this was an error or not but even by trial and error I should have got it to work by it's not looking like it's physically possible right.

The LBs are good to go, I've tidied everything up and reinstalled the bumper. I'll have to monkey around with it tomorrow and see what I can come up with.

One thing I've noticed is that there is quite an audible hum from the ballasts when I initially turn on the lights for about 10 seconds and then subsides. I never had this on my Infiniti. Given I opted for the Denso ballasts, hopefully they are as reliable as I'm led to believe!
 
The issue I'm having is that there are 4 male connections and 2 female connections on each side. I'm not sure if this was an error or not but even by trial and error I should have got it to work by it's not looking like it's physically possible right.

Do you mean the 4 male connections that were the driver high cable, driver low cable, passenger high cable and passenger low cable? If so, passenger low is capped off. driver and passenger high go into the female side of high beam splitter (in your hand in second pic) and then the male side goes into high bulb. the driver low goes into the female connector of the wiring harness.

Your stock driver low cable will connect to the female connector of the wiring harness. That will then go to both driver and passenger ballasts (male plug wiring harness into female plugs ballasts). The stock driver and passenger high cables will connect to the high beam splitters (male high cable into female of high beam spltter). The male of the high beam splitter connects to the high bulb. passenger low beam is left unused.

You have stock headlight cables: one male high and one male low on each side.

You have your headlight housings with the high beam splitter coming out. Each splitter leads to one male and one female.

You have your wiring harness: four cables coming out of the relays: one long male & ground, one short male & ground, one power & fuse, one female input.

Step 1: connect ballasts:
a) Connect the long male to the passenger ballast. The ballast then plugs in HID bulb.
b) Connect short male to the driver ballast. The ballast plugs in HID bulb.
c) connect the power to battery.
d) connect the female input on wiring harness to the male low on your driver side.
At this point, you have a male high driver, a male high passenger, and a male low passenger free.

[note, this is not in order of connection, just listing each connection that you should have]

Step 2: high beam connection
a) Cap off the male low passenger, you don't need it.
b) Connect male high driver to the female connection on driver high beam splitter. Connect the male connection of driver high beam splitter to the high bulb and plug into driver headlight.
c) Connect male high passenger to the female connection on passenger high beam splitter. Connect the male connection of passenger high beam splitter to the high bulb and plug into passenger headlight.

The only thing unplugged will be the female passenger low beam, which you capped
 
Last edited:
I figured the power or input from the stock HB male plug had to activate the HB (or likely the solenoid) in the HID bulb and also the stock reflector bulb. However, the male and female ends from the HID bulb need to plug into something. This is what I have so far (feel free to save-as and draw your connections on this):

PassWiring.png~original
 
Go to your drawing and cross out the area that is labeled "splitter" then write a post that you are giving the splitter away for free for good karma as you don't need it. They essentially built you a splitter into your housing with those two leads. Have you tried hooking it up as we have stated, which included not using the splitter?
 
Go to your drawing and cross out the area that is labeled "splitter" then write a post that you are giving the splitter away for free for good karma as you don't need it. They essentially built you a splitter into your housing with those two leads. Have you tried hooking it up as we have stated, which included not using the splitter?

Agreed.

In your first picture, you have a wiring harness, a test lead, two high beam splitters, and two ballasts. You do not need those splitters as your retrofits have splitters built in to them (see your second pic).

In your diagram, Passenger HB Plug [M] will connect to the [F] coming out of the HID Bi-Xenon (see green in image below). The [M] coming out of the HID Bi-Xenon will connect to the high bulb, which goes into the HB Side (see blue in image below).

So instead of HB plug going into HB side, it goes into the splitter in Bi-Xenon, then out from there into HB side.

59cf.png
 
Last edited:
I feel like I tried that yesterday but couldn't get it working. I'll try again tonight and see how it goes. Thanks for the assistance :)
 
No problem. If you try that and can't get it to work, make sure your connections are good and you don't have anything bent in the male/female plugs.
 
Sorry about that, forgot to update. It was just as simple as you guys mentioned so I must not have tried it before, so thank you for the information! I just need to aim them as I think the cutoff is a little low right now.

I also must have messed up putting the fender liners back on as I'm getting some scrapping on the one side. One of the screws is probably somewhere on the highway lol.
 

Members online

No members online now.

Forum statistics

Threads
278,316
Messages
3,554,120
Members
248,016
Latest member
Advally Service

Trending content

Back
Top