HID upgrade, which one to go with?

Do your DRLs still work after installing this kit?

Who is the question directed to?


My DRL's do as the DRL uses low voltage to the high beam bulb thru a relay. We are doing the HID kits on the low beams.
I don't know of anyone having DRL adverse issues with the kits installed.

Hope this helps.
 
I just installed the same kit on my 2014 low beams, and noticed that now the DRLs are not working. I went back and checked everything and still can't find a cause. High beams still work, but no DRL. Weird...
 
I just installed the same kit on my 2014 low beams, and noticed that now the DRLs are not working. I went back and checked everything and still can't find a cause. High beams still work, but no DRL. Weird...

That is wierd!
Double check all of your connections.
When you find the cause, please post.

side note: I wish I could get mine not to work and all others function properly!:lmao::snacker:
 
The 2014 DRLs are part of the high beam... Make sure that you select DRLs on the stalk, start it up and put it in drive, otherwise the system won't turn the DRLs on.
 
It's not tied to auto headlights (I don't have auto headlights either). I guess what I'm saying is that I couldn't figure out how to turn on my DRLs (flip stalk switch while vehicle is on and in P, walk in front of vehicle and they aren't on = fail). The DRLs only switch on when the stalk obviously set to DRL, but I believe the vehicle also needs to be on, in drive, and I'm not sure if the parking brake needs to be disengaged. Easiest way to check the DRLs is to go for a night time drive with standard headlights on, pull off the road behind a parked car or some other obstacle and switch the DRLs on. You should see some illumination.
 
[MENTION=112119]mo_mo[/MENTION],
Yes, the Parking Brake needs to be dis-engaged prior to starting the engine. Otherwise, the DRL will not come on!
I think this is in the manual as well!

BTW, I don't have Auto headlights either.
 
Last edited:
:ybrick: So yeah it was the parking brake.I had only tested it real quick in the driveway last night and didn't realize that I had the parking brake on the whole time.lol. Thanks for all the info anyways.
 
But on a second note, the kit is awesome. Very clean and factory looking install. You can really see the better quality in these over those cheaper ebay ones.
 
So I finally installed the kit I had laying around for some time now. The only thing I want to comment about Saker's install is that you do not need to file the notch as he did on the grey cover.

What you can do instead is depin the connector. Then pass the harness through the cover and repin it (pay attention to polarity...) How the Toyota is wired up and how TRS has it setup the black wire goes to the (+) marking on the weatherpak connector. I don't know why... maybe TRS chose a generic cheap connector... but pay attention where black goes and where red goes.

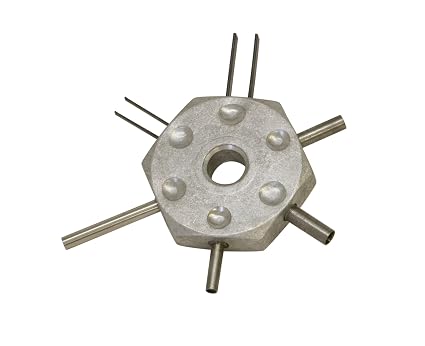
Use this to depin... Use the two thin smaller prongs. Wiggle it into the mating side, juggle it around, while gently tugging on the wire in the back. Once you have it out... check the tab and gently bend it out a touch so that when you go and reinstall it will snap back into the plastic body tightly.

Amazon.com: Lisle 56500 Terminal Tool: Automotive

61leSG8yekL._SX425_.jpg


And yes there is a tiny bit of glare... and a whole lot if you come up behind a sports car. Wtih my 4runner about 3 feet behind my s2000, my s2000's interior is lit up by my 4runner's HID (in stock projector). Then again the stock 4runner halogen's lit up and glared my s2000's interior since she is so low.

I figure I might as well run this kit while I source a pair of 2014 headlight. I bought a pair of GS350 HID projectors off of ebay, but need to find a pair of 2014 headlights to begin the retofit. THat way all the relays and ballasts are roughed in. I'll just use this TRS kit's ballast and buy new ignitors and D2S bulbs for the Lexus GS350 projectors (note you will need to file/dremel the tab off of the lexus projectors to allow you to use D2S bulbs as it is setup for D4S bulbs.
 
Last edited:
So I finally installed the kit I had laying around for some time now. The only thing I want to comment about Saker's install is that you do not need to file the notch as he did on the grey cover.

What you can do instead is depin the connector. .....Use this to depin... Use the two thin smaller prongs. Wiggle it into the mating side, juggle it around, while gently tugging on the wire in the back. Once you have it out... check the tab and gently bend it out a touch so that when you go and reinstall it will snap back into the plastic body tightly.

Amazon.com: Lisle 56500 Terminal Tool: Automotive

61leSG8yekL._SX425_.jpg

[MENTION=112670]Cheers![/MENTION]

Thanks for giving others the heads up for the Terminal tool.....
I didn't have access to one at the time and just posted a easy work around.
Also, once the grommet is installed, it covers the slot I cut in the cover and seals it from any moisture.

Thanks again!
 
Reviving this thread.
I'm in the same boat as you guys, just a quick question on how to mount the ballast and relay. Did you have to drill holes for the bolts? checked mine and there was no holes available. thanks
 
Try industrial strength Velcro. You can pick it up from home depot. Just make sure to clean the mounting surface with alcohol first
 
I've thought about that but wondering if the shocks and vibration from driving will prevent it from being mounted. I've had luck with using brackets on my Tacoma but this seems limited.
 
I've always used it in all my vehicles and never had any issues with it falling off so I wouldn't worry about it too much
 

Members online

Forum statistics

Threads
278,316
Messages
3,554,110
Members
248,016
Latest member
Advally Service

Trending content

Back
Top