Homemade....Let's see what you've made

That looks like a pretty involved project. It gives the rest of us some inspiration to follow through on a detailed job to its completion! I love the touch of class it adds to the truck too.

Wait till you see my fenders when I get done with them :smokin:

Might even start a build thread more focused on function than form
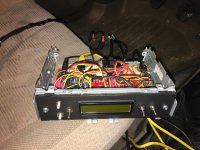
 
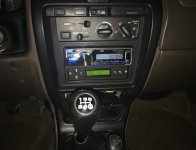
I made this in-dash obd2 pid reader from an Arduino and my old oem radio chassis. Not sure what I was thinking... Seems like something a crazy person would build.
 

Attachments

  • IMG_0129.jpg
    IMG_0129.jpg
    133.8 KB · Views: 1,342
  • IMG_0178.jpg
    IMG_0178.jpg
    128 KB · Views: 1,342
I made this in-dash obd2 pid reader from an Arduino and my old oem radio chassis. Not sure what I was thinking... Seems like something a crazy person would build.

This deserves more attention. Crazy? Absolutely. But very, very cool.

Sent from my Nexus 9 using Tapatalk
 
I completely removed all parts of the factory rack...only kept the screws. This where I started the whole project - laying down a couple flat pieces of steel cut to the length of the old mounts. Drilled holes to line up with the screw holes and built from there.
 
I made this in-dash obd2 pid reader from an Arduino and my old oem radio chassis. Not sure what I was thinking... Seems like something a crazy person would build.
Is that the Sparkfun OBDII board? I did a similar build and we might've used almost exactly the same parts:

171120d1441075594-0xfdeds-build-thread-unit-iii-img_0392.jpg


How does that LED display hold up in sunlight? Mine doesn't do very well in daylight. Want to rebuild it with a better display someday... wish there were more commodity OLEDs available already. :(
 
I completely removed all parts of the factory rack...only kept the screws. This where I started the whole project - laying down a couple flat pieces of steel cut to the length of the old mounts. Drilled holes to line up with the screw holes and built from there.

My rack is 98"x50" i stood it up on 6 legs that i bolted through the roof just inside the drip rail bodyline on the roof. Rear legs are about 6 inches from the back of the roof, middle legs are pretty centered, then the front legs are on each side of the sunroof.
 
Something I have been working on for a little while now, not done yet but I think you get the idea. Next I need to fill all the spaces... :usa2:

9adb0c27baf0d56a7ddc31703701a4eb.jpg
 
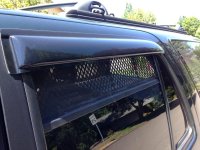
I just made some rear window screens for warm weather camping in the back of the 4Runner.
They simply slide over the top of the door frame and a magnetic strip seals them closed on the bottom. They roll up real neatly while on the road, too.
8c3f1388cd1cd354d26d9f5372140aa3.jpg
e999252ba3cb63ba8b1c33dd09ab5d43.jpg

They could be a little neater, but I didn't feel like spending too much time on them and since I work at a clothing company, I might bring them into the office to have our sample makers re-sew them up nice and strong.


Sent from my iPhone using Tapatalk
 
Is that the Sparkfun OBDII board? I did a similar build and we might've used almost exactly the same parts:

How does that LED display hold up in sunlight? Mine doesn't do very well in daylight. Want to rebuild it with a better display someday... wish there were more commodity OLEDs available already. :(

Yeah, It's a OBD2 Sparkfun board. First I tried to make a CAN BUS shield work, but failed.
The display is a Parallax serial 2x16 backlit lcd. It is easy to see in daylight/sunshine.
I also wired up a ftdi breakout board. One of the toggles is three position so I can select between SparkfunOBD2-arduino (for normal operation), SparkfunOBD2 isolated (for uploading new code to the Arduino) and SparkfunOBD2-ftdi (for direct serial communication).
 
I just made some rear window screens for warm weather camping in the back of the 4Runner.
They simply slide over the top of the door frame and a magnetic strip seals them closed on the bottom. They roll up real neatly while on the road, too.
8c3f1388cd1cd354d26d9f5372140aa3.jpg
e999252ba3cb63ba8b1c33dd09ab5d43.jpg

They could be a little neater, but I didn't feel like spending too much time on them and since I work at a clothing company, I might bring them into the office to have our sample makers re-sew them up nice and strong.


Sent from my iPhone using Tapatalk
That is an awesome idea

Sent from my SAMSUNG-SGH-I747 using Tapatalk
 
Thanks. I've seen a few other versions of this, with magnets all the way around, but the B pillar isn't metal on 4th gens and storing a magnetic rectangular square sounded like a real pain. My version rolls right up!


Sent from my iPhone using Tapatalk
 
Yeah, It's a OBD2 Sparkfun board. First I tried to make a CAN BUS shield work, but failed.
The display is a Parallax serial 2x16 backlit lcd. It is easy to see in daylight/sunshine.
I also wired up a ftdi breakout board. One of the toggles is three position so I can select between SparkfunOBD2-arduino (for normal operation), SparkfunOBD2 isolated (for uploading new code to the Arduino) and SparkfunOBD2-ftdi (for direct serial communication).
Ah, I was wondering what the little one was there for. Neat setup! Every time I have to plug in the computer and remember arcane serial port commands, I regret not building in some faceplate controls like you have. MkII is going to have something to reset codes at the very least.
 
As featured under the heading of " my 4 dollar window screen"


image.jpg

Basically it's a piece of gutter screen cut so that it fits into the groove of the window on the top side and has a channel that the window slides into one the bottom side.
 

Attachments

  • image.jpg
    image.jpg
    135.3 KB · Views: 2,843
[MENTION=88597]MyHigh[/MENTION], did you post this elsewhere? I love the idea and was hoping that I could do it on my tailgate window, but of course, it's not square, so the sides would still be open...


Sent from my iPhone using Tapatalk
 
Spod

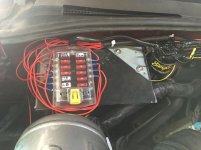
I cant justify the cost of a actual SPOD but the SPOD product is a great idea so I made my own version.

It has been working for about a month now with no issues at all. I have around $100 in it. All of my switched accessories run through this. It sure cleaned up the wire mess under the dash.

Not in the picture is a cover I made from some fake leather so it does not get wet when I hose off the motor compartment.
 

Attachments

  • spod.jpg
    spod.jpg
    35 KB · Views: 2,004
My two year old son made this, again he's two and said I am a robot beep boo beep
661ce9d3b99ed2f81b09339e270292c1.jpg


Sent from my SAMSUNG-SGH-I747 using Tapatalk
 

Members online

Forum statistics

Threads
278,316
Messages
3,554,120
Members
248,016
Latest member
Advally Service

Trending content

Back
Top