Homemade....Let's see what you've made

I'll join. I'm (almost) a dentist, so I work in millimeters. Trying to cut down on pocket bulk between keys, knife, phone, wallet, and usually a tactical light.
8ca65a425b25f4d84116dd138717a25d.jpg
 
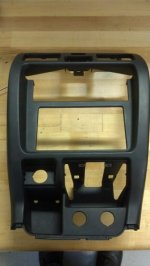
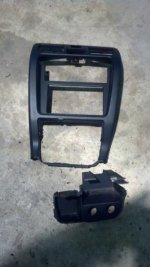
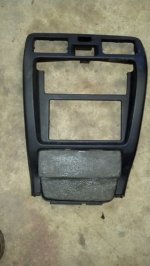
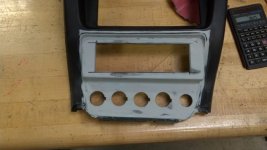
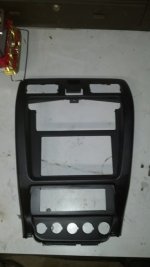
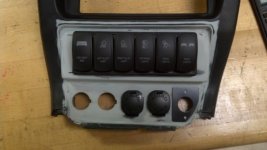
Built a new center piece for my switches and a couple extra 12v plugs.
 

Attachments

  • 143.jpg
    143.jpg
    38.7 KB · Views: 2,751
  • 147.jpg
    147.jpg
    46.2 KB · Views: 2,754
  • 175.jpg
    175.jpg
    47.5 KB · Views: 2,754
  • IMG_20131106_134429_293.jpg
    IMG_20131106_134429_293.jpg
    47.2 KB · Views: 2,777
  • IMG_20140224_181241_291.jpg
    IMG_20140224_181241_291.jpg
    32 KB · Views: 2,736
  • IMG_20131106_134217_776.jpg
    IMG_20131106_134217_776.jpg
    41 KB · Views: 2,767
I'll join. I'm (almost) a dentist, so I work in millimeters. Trying to cut down on pocket bulk between keys, knife, phone, wallet, and usually a tactical light.
8ca65a425b25f4d84116dd138717a25d.jpg

I do believe you owe us a write-up on this. lol


I happen to think its pretty awesome, and it would work for my shop keys because they don't have fobs.
 
I do believe you owe us a write-up on this. lol
I happen to think its pretty awesome, and it would work for my shop keys because they don't have fobs.

Well shoot, I wish I would have taken more pictures of the process. It was actually pretty easy. I saw a kickstarter and the guy wanted $40 for a set of 4. You just need a chain remover tool, Dremel and a steady. I went through quite a few carbide burs (free at dental school). You shape the key and replace the bushing on the chain with your key then put it all back together. Took me about 20 mins to do the first key, then 5 on the others. Works great when I'm wearing the "skinny" (to me) jeans my wife bought me.
 
Cheap DIY full length roof rack. Not the strongest, or prettiest, but it looks good and it works. Also, since I don't have a welder or the skills to weld, it was all done without welding. I have less than $75 in it.

<a href="https://www.flickr.com/photos/125901707@N02/14851638069" title="Untitled by Dakota Sharpe, on Flickr"><img src="https://farm6.staticflickr.com/5555/14851638069_796b6e78a0_c.jpg" width="800" height="600" alt="Untitled"></a>

<a href="https://www.flickr.com/photos/125901707@N02/14837952555" title="image by Dakota Sharpe, on Flickr"><img src="https://farm4.staticflickr.com/3879/14837952555_d5e2aa607c_c.jpg" width="800" height="600" alt="image"></a>

No pictures but I also put expanded metal on the bottom afterwards.
 
I built a roof rack too!

Made from simple EMT Conduit tube, so support was VERY important! me and a buddy 230lbs + ~260+ lbs, both could stand on all parts of it, so i'd say it's damn sturdy!

Half way done ~ish
rackbuild_zps856246e9.jpg~original


Almost done:
rackprepaint_zpsdff41d46.jpg~original


Finished product has worked great!
roofrack_zpse2d99a9d.jpg~original
 
Cheap DIY full length roof rack. Not the strongest, or prettiest, but it looks good and it works. Also, since I don't have a welder or the skills to weld, it was all done without welding. I have less than $75 in it.

Man, that rack looks great! Is it made out of EMT?
 
I made some indestructible tools that i can bolt down.


I had found this axe head on a trail ride a while back and figured I would eventually get a handle. The shovel is new but, I hate splinters, wood or fiberglass. I'll never get a splinter from this one! :wink2:


d8a1adcfd207ec0bca1a716d4f6acdb3.jpg
 
Man, that rack looks great! Is it made out of EMT?

Thanks! And yes, it"s all 3/4 EMT. My dad is an electrician by trade for 15+ years, and I've helped him on jobs for about 6, and this past summer I got a job with him so we used the tools of the trade. We bent all of it. Took about five 10 ft sticks. The loops are held together by 2 set screw couplings for both the upper and lower sections, that are spaced out by some aluminum angle that i had laying around after a job, with more 3/4 EMT for the cross braces. All pop-riveted together, hence the no welds. It does it's job, it's super light weight, but it's still strong enough for my needs.

 
Thanks! And yes, it"s all 3/4 EMT. My dad is an electrician by trade for 15+ years, and I've helped him on jobs for about 6, and this past summer I got a job with him so we used the tools of the trade. We bent all of it. Took about five 10 ft sticks. The loops are held together by 2 set screw couplings for both the upper and lower sections, that are spaced out by some aluminum angle that i had laying around after a job, with more 3/4 EMT for the cross braces. All pop-riveted together, hence the no welds. It does it's job, it's super light weight, but it's still strong enough for my needs.

Thats cool. Im curious how you attached it to the roof rails, just bolts thru the rails? Or did you make some feet to bolt down? I really like how low profile it is.
 
Do BBQ pits count? Not 4runner related, but built it from scratch non the less. Just kind of making up as I go. Almost finished.

8971c5a16023f3bb7eddef46730e17ae.jpg


fb8b38ccc00e396d498fd08064d2d004.jpg


f77680279daf42a1c600df3cd63dda8b.jpg


7aef5f3fdfebaef6237d0f8d41819b16.jpg
 
Bed Rack for my dad's Tacoma


Front Bumper


After paint and lights mounted


Switch panel


Full length roof rack with light bar bracket and backup light
 
Thats cool. Im curious how you attached it to the roof rails, just bolts thru the rails? Or did you make some feet to bolt down? I really like how low profile it is.

I was really stumped at first on how, because I couldn't figure out a way, but I ended up using a 3/4 minerallac strap, with a bolt going into the original bolt holes for the cross members. So I can take 6 bolts out and pick it straight up and off the roof.
 
Love this! Would like some more information on it. I've been looking to make something just like it. Are you running ignition through the red switch?

Thank! I started with a paper template and fit it to how I wanted. Its just a piece of 1/16" (if I remember correctly) steel, that I bent in the bench vise and made to be bolted to the side supports of my single DIN radio. It fits behind the console trim nicely. I cut out the blanks based on the OTRATTW switches I bought.
Here's a better picture for an idea.


The red switch is actually for 2WD low range. It's just an interrupter. I added how I did it to a 2wd low thread that's floating around here. Other guys have had success with it too.
 
Got any other pics of that roof rack? It looks really good.


Thanks! I have a couple kind of crappy shots, hopefully it give you an idea what I did.

Started by building the frame out of Uni-Strut. (Don't mind the dog)


Getting painted.


Different angle.
 

Members online

Forum statistics

Threads
278,316
Messages
3,554,120
Members
248,016
Latest member
Advally Service

Trending content

Back
Top