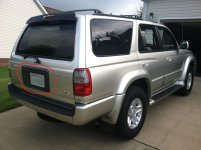
How do I remove this piece of trim?

Majindan

New member
I want to take it off so that I can spray it gunmetal. It's old and has hairline cracking all over it from drying out. I noticed a open tab on the bottom of it like to insert a small flat head to pop it off but don't want to risk breaking it if that isn't the right way.
 

Attachments

  • 4runner3 - Copy2.jpg
    4runner3 - Copy2.jpg
    133.6 KB · Views: 877
Register to hide this ad
I just lightly sanded mine and taped it off with some newspaper around it and sprayed it with plastidip. It only took a few mins to tape it off and then you don't have to worry about braking it. Of course, I took off the lights under it and taped the areas under the plate too.
 
Well I noticed there is a rubber gasket/seal that has sunk in behind it on the lower half so I'd really like to remove it so I can fix the seal and properly paint it. Surely that seal is there for a reason.
 
Well I noticed there is a rubber gasket/seal that has sunk in behind it on the lower half so I'd really like to remove it so I can fix the seal and properly paint it. Surely that seal is there for a reason.

Yeah, mine didn't have that prob... Good idea to put it back in place.
 
Just removed mine recently. You need to open up the panel on the inside of the door to get at it.

There are three nuts and four clips holding it in, and I assume two screws on th lock cylinder (mine was pushed in at the time, so I don't know.) One nut is by the lock cylinder and is easy to reach. The other two are on the handle, and I had to mess with the window assembly a lot to get at them.

The clips are real bastards though. Two on the left side (upper and lower), one in center bottom, and one on lower right. I broke three of them. Good luck. They're dirt cheap to replace though, and you might want to anyways for the fresh gasket.

 
I had the same problem and I too just taped it off and plasti dipped it. You can remove it but you have to go from the back side to remove the fixing bolts.
 
It is a big pain in the ass. First remove the interior panel then remove the panel that exposes the regulator. I had to unbolt the window regulator to have room to get to the clips that holds it on.But first unbolt the tailgate latch because it is connected to the license plate garnish. And you will also need to unplug a bunch of plugs and detach the latch. If you don't have to take it off I wouldn't... If you do take your time and like I said it is a Hugh pain in the ass!
I'm still waiting for my Runner to go into paint so I have not had the pleasure of putting it back together yet and I'm not looking forward to it.
 
Just did mine to replace the whole window regulator mechanism.
Window just dropped one day.
It's a *****. Were rubber gloves because everything in there is greasy for obvious reasons.
I just picked up the appropriate size weather stripping from Home Depot to put around before reinstalling.
Oh and I sprayed rustproofing on all inside seems while I was in there.
 
Last edited:
Well I noticed there is a rubber gasket/seal that has sunk in behind it on the lower half so I'd really like to remove it so I can fix the seal and properly paint it. Surely that seal is there for a reason.

Taping is easiest as stated. I just pulled the rubber gasket off of mine then reinstalled it after paint. Very easy to do and it will jhst pop right back in
 

Members online

Forum statistics

Threads
278,316
Messages
3,554,107
Members
248,016
Latest member
Advally Service

Trending content

Back
Top