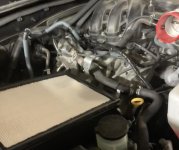
How-To-Guide (TRD CAI) Installation

with the 20% sale going on , parts individually are about $188 plus tax without the air filter. Complete package with air filter is about $100 more at $305 or so.

What did you do for the MAF sensor , did you extend it or split the wiring? Is it a worth while upgrade or just keep the stock intake?

I also took advantage of this sale...unknowingly. Lol. Also got the free shipping, but I missed a part on my initial order. So I called the dealership that I ordered from this morning, and they said they would add the new item to my original order for shipping purposes. All I had to do was order it and select 'pickup in store'. So cool of them!

For the MAF sensor, I ordered an extension harness from URD. Supposed to make it way easier to hook up. No splitting the stock MAF Sensor wires!
 
I also took advantage of this sale...unknowingly. Lol. Also got the free shipping, but I missed a part on my initial order. So I called the dealership that I ordered from this morning, and they said they would add the new item to my original order for shipping purposes. All I had to do was order it and select 'pickup in store'. So cool of them!

For the MAF sensor, I ordered an extension harness from URD. Supposed to make it way easier to hook up. No splitting the stock MAF Sensor wires!


Yes I saw the extension for the MAF sensor and book marked it. I read through the entire thread and feedback on this mod is good. My take aways from it all:

Cheaper to order all parts individually, with the TRD sale you save another $40, can usually be bought at about $220 -240.
Use stock air filter to avoid a whistle sound
At (WOT) there is a noticeable sound, 2-3k rpm nothing too bad
TRD intake is tad bigger about 4" vs stock 3"
Toughest part of install is the MAF wiring stripping it down
clips on fender side can be tough to lock into place
increase in performance isn't noticeable but has been documented at plus 5HP & 19 TQ


Extra parts
Silicone
rubbing tubing (size?)
2 plugs (lowes or somewhere else)
 
Before you tell the parts store people you need 5/32" hose, make sure it is ID not OD as most is measured now.

I took my small nipple (yes I said NiPpLe) to the store and ended up purchasing 1/8" ID hose as it was a perfect fit!
Check your OEM vacuum hose for sizing!
 
Before you tell the parts store people you need 5/32" hose, make sure it is ID not OD as most is measured now.

I took my small nipple (yes I said NiPpLe) to the store and ended up purchasing 1/8" ID hose as it was a perfect fit!
Check your OEM vacuum hose for sizing!

So I would need both the 5/32 and 1/8" tubing , how much, 2 plugs as well. Just placed my order for the parts a few minutes for $200 OTD for pick up.
 
Before you tell the parts store people you need 5/32" hose, make sure it is ID not OD as most is measured now.

I took my small nipple (yes I said NiPpLe) to the store and ended up purchasing 1/8" ID hose as it was a perfect fit!
Check your OEM vacuum hose for sizing!

So I would need both the 5/32 and 1/8" tubing , how much, 2 plugs as well. Just placed my order for the parts a few minutes for $200 OTD for pick up.

No, one or the other....the correct size is 5/32" ID as noted above.
They didn't have that so I used 1/8" ID as noted.
I think I bought 2' and cut the excess off!
 
When buying parts separately (2015 & up):
1. I have found good use for the elongated metal wire harness bracket. Installed it on top of engine as shown on Fig 3-1 of official install guide, then removed the plastic wire support clip from old intake manifold cover and pressed into the metal bracket’s slotted hole.
2. Instead of completely removing the resonator bracket I rotated it to provide support for the excess wire harness (ran zip tie thru threaded hole on top).
3. I tried multiple plugs from Lowe’s, part# 881202 was the best fit. The head is a bit too large but at least the surface pattern matches the intake housings’ and most importantly the ribbed body fits snug in the hole.
4. I cut the new vacuum hose to 20” length, it was hard to find a tie down location without pulling sideways on the 1/8” plastic nipple. About 21” hose length would have been better.

Install guide:
Page Not Found | Toyota Parts Deal

Did you seal the grommet where there is a little gap on the bottom case? I'm thinking of a rubber washer could help seal it some but is it really needed?
 
Did the TRD pro intake this morning taking my time and it was a simple install. Took about a hour of work if prepared and following instructions.

Toughest part was couplers from intake box to tube. I didnt buy the URD MAF wiring extension, that could've save 10-15 minutes. The wiring isn't difficult just be careful and take your time. Initial restart of the car there was no stalling of it, it fired right up. There is a deeper growl now when hitting the gas above 3k RPM.
 

Attachments

  • Screen Shot 2022-02-22 at 12.50.25 PM.jpg
    Screen Shot 2022-02-22 at 12.50.25 PM.jpg
    94.7 KB · Views: 432
I just installed a TRD Cold Air Intake on my 4runner last night (I couldn't wait until my days off, and I couldn't sleep, so...why not?). Here are my thoughts.

1. Super easy to install. While the write up at the beginning of this thread is great, I am a visual person and needed images. I used a great video I found on youtube by a member here (youngwas?). Start here - 【27】TRD Cold Air Intake CAI Parts & Install ‣ 5th Gen 4Runner Mod [4K] - YouTube, and end here - 【28】TRD Cold Air Intake CAI Install ‣ 5th Gen 4Runner Mod [4K] - YouTube. He posted somewhere in this thread.

2. The plastic trim piece that people say to get at Lowe's is the wrong part number. I think HIllman changed the item since it was posted. I used the same one as this (https://www.toyota-4runner.org/2992095-post400.html) and it was a perfect fit. No silicone needed.

3. My install took me a couple of hours (total time, start to finish), because I am new at this and wanted to make sure I didn't mess anything up. That was me working solo, and included opening everything, laying everything out (parts and tools), waiting for my friend to text me the password for his computer (I used his sign shop, three garage bays! It's also where I installed my roof rack), trying to get his wireless mouse working and instead using a wired one from a different computer, watching an install video on youtube that included ads (yuk!), walking back and forth from vehicle to computer, cleaning up, and magnetically fishing a dropped bolt out of the bottom of the engine bay (don't ask).

4. I did not trim my 24" vacuum hose. I just routed it with some other hoses/looms and zip tied it down. PC style. ;)

5. Spend the $30 for the URD MAF Sensor Extension Harness for DENSO MAF. You get more than you need, lengthwise, but you don't have the hassle of unwrapping, splitting, and re-wrapping the stock loom and wires.

All in all, it was easy peasy. And I had fun doing it. If any of my friends were to do this to their 4runner, I can help them and it would take way less time. I'll edit in some pictures later.

Coming soon...Magnaflow exhaust install (ordered, just waiting on arrival).

EDIT 1
I forgot to mention performance. I don't know if it's just psychological, but I can kind of hear a faint growl when I floor it. Very faint. But overall it feels like it has a little more pep. ??? I don't know. We'll see after driving it for a while.

 
Last edited:
I just installed a TRD Cold Air Intake on my 4runner last night (I couldn't wait until my days off, and I couldn't sleep, so...why not?). Here are my thoughts.

1. Super easy to install. While the write up at the beginning of this thread is great, I am a visual person and needed images. I used a great video I found on youtube by a member here (youngwas?). Start here - 【27】TRD Cold Air Intake CAI Parts & Install ‣ 5th Gen 4Runner Mod [4K] - YouTube, and end here - 【28】TRD Cold Air Intake CAI Install ‣ 5th Gen 4Runner Mod [4K] - YouTube. He posted somewhere in this thread.

2. The plastic trim piece that people say to get at Lowe's is the wrong part number. I think HIllman changed the item since it was posted. I used the same one as this (https://www.toyota-4runner.org/2992095-post400.html) and it was a perfect fit. No silicone needed.

3. My install took me a couple of hours (total time, start to finish), because I am new at this and wanted to make sure I didn't mess anything up. That was me working solo, and included opening everything, laying everything out (parts and tools), waiting for my friend to text me the password for his computer (I used his sign shop, three garage bays! It's also where I installed my roof rack), trying to get his wireless mouse working and instead using a wired one from a different computer, watching an install video on youtube that included ads (yuk!), walking back and forth from vehicle to computer, cleaning up, and magnetically fishing a dropped bolt out of the bottom of the engine bay (don't ask).

4. I did not trim my 24" vacuum hose. I just routed it with some other hoses/looms and zip tied it down. PC style. ;)

5. Spend the $30 for the URD MAF Sensor Extension Harness for DENSO MAF. You get more than you need, lengthwise, but you don't have the hassle of unwrapping, splitting, and re-wrapping the stock loom and wires.

All in all, it was easy peasy. And I had fun doing it. If any of my friends were to do this to their 4runner, I can help them and it would take way less time. I'll edit in some pictures later.

Coming soon...Magnaflow exhaust install (ordered, just waiting on arrival).

EDIT 1
I forgot to mention performance. I don't know if it's just psychological, but I can kind of hear a faint growl when I floor it. Very faint. But overall it feels like it has a little more pep. ??? I don't know. We'll see after driving it for a while.


Good write up and info, debated the URD MAF extension but decide not to. Didnt really need a razor blade to take apart the tape and harness, just some time and patience. I reseted my MPG and drove normally and I'm still at the 17.5 range on a 5 mile city trip.
 
Good write up and info, debated the URD MAF extension but decide not to. Didnt really need a razor blade to take apart the tape and harness, just some time and patience. I reseted my MPG and drove normally and I'm still at the 17.5 range on a 5 mile city trip.

Thank you. How do you reset the MPG?
 
Ah, cool. Thanks!

how has your MPG been? Mine seems to be about the same and does seem to have little more pickup during on ramps above 4k RPM. For $200 it was a fun simple project to do. Still considering the OV tune or KDmax tune for about $300-400 range.
 
how has your MPG been? Mine seems to be about the same and does seem to have little more pickup during on ramps above 4k RPM. For $200 it was a fun simple project to do. Still considering the OV tune or KDmax tune for about $300-400 range.

Same as before (I have a Gobi Ranger so it is shit now anyway). But yeah, it's quick as **** from the line, and response is good also.
 
I like mine. Definitely added some grunt.

My mpgs now with the TRD intake/exhaust and URD maf controller box with the truck on 3” lift at 33’s is slightly higher than it was stock. So, im happy.
 
I kind of want to do this mod just as another project to do. don't care if the HP gains are disputed, spring is around the corner, winter is coming to and end and am looking for projects to do and starting to make my list

don't plan on using the oiled filter though , I will stick with OEM. this thread has been helpful
 
I like mine. Definitely added some grunt.

My mpgs now with the TRD intake/exhaust and URD maf controller box with the truck on 3” lift at 33’s is slightly higher than it was stock. So, im happy.

debating if I want to add a borla muffler, not sure i need the entire system. How is the URD MAF controller, did that help much and what does it do?
 
debating if I want to add a borla muffler, not sure i need the entire system. How is the URD MAF controller, did that help much and what does it do?

Alters the maf signal to correct fueling at the ecu. I didnt dyno it to know what the actual number gain was. I base it on drivability feel at the pedal; and downshifts. A route through hills Ive driven about 100 times, the addition of the MAF controller eliminated the downshifts to 3rd gear that used to happen. Once it goes to 4th, it iust pulls up the hill from there instead of doing the dance from 3rd to 4th and back, which is exactly what I wanted from it.
 
Last edited:
Alters the maf signal to correct fueling at the ecu. I didnt dyno it to know what the actual number gain was. I base it on drivability feel at the pedal; and downshifts. A route through hills Ive driven about 100 times, the addition of the MAF controller eliminated the downshifts to 3rd gear that used to happen. Once it goes to 4th, it iust pulls up the hill from there instead of doing the dance from 3rd to 4th and back, which is exactly what I wanted from it.

what octane do you run w/ the MAF controller installed?
 
what octane do you run w/ the MAF controller installed?

Just 87.

I havent seen the ignition advance tables or the tables for closed loop fueling authorities over global fueling to know how much of a benefit running 93 is. Heck, i dont even know for sure where the cross over point is on TPA and RPM to know when it switches from closed to open loop.

Im sure there would be some benefit to premium fuel, but i havent messed with it. I guess i could do a set driving loop on 87 with a hand calc on economy; then switch to premium for a couple tanks and do the same loop on a similar weather day. If there was a bump in MPG it would indicate adjustments to fuel trim and ignition advance.
 
Last edited:

Members online

Forum statistics

Threads
278,311
Messages
3,554,082
Members
248,016
Latest member
Advally Service

Trending content

Back
Top