How to Replace Front Brake Pads on TBU

Rock_Rat

Senior Member
If this is your first time replacing front pads or doing your own brakes, then this thread is for you. Since these are on a 231 TBU then you're already proficient.

Changing out front brake pads is an inexpensive preventive maintenance measure. If overlooked, what should only cost you about $32 for new pads could end up costing you a fortune in unnecessary repairs.

It was time to change out my front brake pads. They were getting down to less than a ¼” of pad left yet they still weren’t hitting the wear indicator, so it was time. There’s no hard and fast mileage for brake pad changes as each driver has a driving style all of their own.

Since it was just the front pads, it should only take about an hour total, 30 minutes per side with everything in place and ready to go.

Tools/Materials Needed
  • Jack
  • Jack stand
  • Impact wrench with socket
  • Torque Wrench that goes to 85’ Lbs
  • “C” Clamp
  • Needle nose Pliers
  • 21mm Socket
  • Synthetic Caliper grease
  • New Brake Pads - I went with the Wagner Thermo Quiet QC976. They've been great on my rig so far.

DISCLAIMER: Prior to beginning this job, thoroughly inspect your rotors for cracks, discoloration from heat, grease, and/or uneven wear. If in question, then perhaps you may need to perform a complete brake job.

Step One
  • Put on your parking brake
  • Chock your rear wheels with a large stone or 4x4 etc.
  • Jack up your rig and ensure your jack is safely locked*
  • If using a Hi-lift - use it correctly
  • Place a jack stand underneath
  • Finally, when you're wheel is removed, slide it underneath your LCA as an extra level of safety

*If you’re using a breaker bar and socket, loosen, but DO NOT REMOVE the lug nuts while the vehicle is on the ground

Step Two
  • Remove two caliper pin “R” retainer clips and discard
  • Remove the two pins
  • Remove the "W" pin and discard

Step Three
  • Using a “C” clamp gently tighten the pad against the brake piston
  • Alternate between top and bottom until you can remove the pad
  • Follow the same procedure on the other side until the pad is free

NOTE: If the pistons do not move freely you may have to remove the caliper.

Step Four
  • Apply synthetic caliper grease on the metal surface of the pad and install on one side
  • Using the two removed pads, work BOTH pistons on the other side until flush or until you can install the second pad
  • Install the second pad, pins with synthetic lube, retainer clips and “W” clip

Total time to complete this job should be less than an hour if you have everything prepared in advance.

As always, whether you change just the pads, rotors, or both you need to "bed" them in correctly.

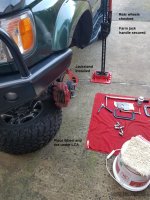
First and foremost, it's important to engage your parking brake, chock your wheels, then raise your rig safely and minimize any potential failure. Placing your wheel and tire underneath your LCA is for added security.
Front Pads_1.jpg

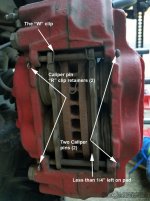
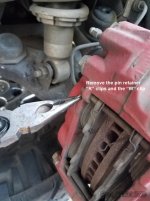
Replacing pads on the TBU is extremely easy. Remove the two "R" clips on the caliper pins and discard. Remove the caliper pins and discard the "W" clip.
Front Pads_2 .jpg

A pair of needle nose pliers should do the trick
Front Pads_3.jpg

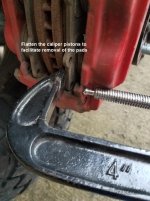
Now use a "C" clamp and steadily and evenly tighten the pad against the caliper piston. Alternate between the top and the bottom until the pad can easily be removed. If the piston doesn't move freely, stop and investigate.
Front Pads_4.jpg

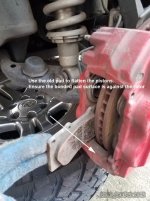
Use the worn pad as a leveraging "pry-bar" applying pressure between the piston and the rotor. Only use the bonded side of the pad next to the rotor. To "flatten" both pistons on one side, you may have to use both pads at the same time.
Front Pads_5.jpg

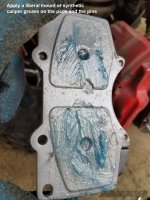
When ready you can use some brake cleaner around the exposed caliper and rotor but do not spray any on the rubber boots. I chose not to clean my calipers. Apply a liberal amount of synthetic caliper grease on the pads and the pins. Install.
Front Pads_6.jpg

Ensure the wear indicator is on top. It needs to be placed in such a way as to go with the rotation of the tire. It doesn't matter whether it's on the inside or the outside.
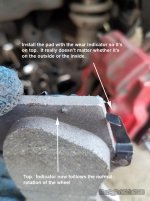
Front Pads_7.jpg

Well, here it is a 20 or 30 minute job per side. I would recommend you install the pins from the outside towards the inside. The caliper is made in such a way as to "protect" the caliper retainer clips. IMHO I don't really think it matters.
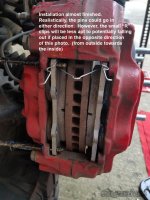
Front Pads_8.jpg
 

Attachments

  • Front Pads_1.jpg
    Front Pads_1.jpg
    141.5 KB · Views: 4,048
  • Front Pads_2 .jpg
    Front Pads_2 .jpg
    104.8 KB · Views: 9,527
  • Front Pads_3.jpg
    Front Pads_3.jpg
    94.8 KB · Views: 5,056
  • Front Pads_4.jpg
    Front Pads_4.jpg
    106.9 KB · Views: 3,894
  • Front Pads_5.jpg
    Front Pads_5.jpg
    112.4 KB · Views: 4,779
  • Front Pads_6.jpg
    Front Pads_6.jpg
    124.9 KB · Views: 5,102
  • Front Pads_7.jpg
    Front Pads_7.jpg
    106.5 KB · Views: 4,696
  • Front Pads_8.jpg
    Front Pads_8.jpg
    124.8 KB · Views: 9,247
Last edited:
Register to hide this ad
Nice job. I am surprised there isn't a "W" imprinted on the caliper, or at least painted in Husky blue.

Did you go OEM for those calipers?

That lower outer piston boot looked a little mushed.
 
Nice job. I am surprised there isn't a "W" imprinted on the caliper, or at least painted in Husky blue.

Did you go OEM for those calipers?

That lower outer piston boot looked a little mushed.

HaHa! Yes, Husky Gold and Purple! I looked at that boot a few times and it's OK. It just didn't seem to "squash" down as evenly as the others. I played whack-a-mole with all four and inspected them pretty good.

Rotors look fine as well. Often times hear about cracks in the drilled rotors.

Here's what I have installed (not OEM - big surprise coming from me I know):

Sport Tech Slotted and Drilled Rotors - 127.44118R and 127.44118L
PowerStop Performance Brake Calipers - S2712 for the pair
 
Step One
  • Put on your parking brake
  • Jack up your rig and ensure your jack is safely locked*
  • Place a chock or a large stone in the back tire
  • Place a jack stand underneath


Thanks for taking the time to write that up.

First thing, I tend to chock my tires before I jack anything up. If the parking brake isn't working jacking up first can really be bad. Change the order in that list quoted.

Second, seeing the hi-lift reminded me of another write-up that should be done. How to use a hi-lift. I've run into way to many folks on the trail that truly have no idea how to operate one safely. Best example was last year. Guy gets a flat on one of the local trails. Him and his buddy use the jack to get the flat off and the spare on. Then they sat there till I came buy. They didn't know how to properly release the pawl to set it in reverse. That 20 minute tire swap cost them close to 2 hours. If I hadn't come along their plan B was to just drive off the jack. lol
 
Thanks for taking the time to write that up.

First thing, I tend to chock my tires before I jack anything up. If the parking brake isn't working jacking up first can really be bad. Change the order in that list quoted.

Second, seeing the hi-lift reminded me of another write-up that should be done. How to use a hi-lift. I've run into way to many folks on the trail that truly have no idea how to operate one safely. Best example was last year. Guy gets a flat on one of the local trails. Him and his buddy use the jack to get the flat off and the spare on. Then they sat there till I came buy. They didn't know how to properly release the pawl to set it in reverse. That 20 minute tire swap cost them close to 2 hours. If I hadn't come along their plan B was to just drive off the jack. lol

Thanks for catching that. I corrected the order. And yes, I've done this once or twice and always chock the tires first.

Hi-lifts can be deadly if not used correctly. I've watched a few videos where guys have had their teeth knocked out. If I recall correctly, Hi-Lift actually has some recovery/winching videos that take place up in Big Bear.

We're having a winching weekend being put on by Warn in March. I might recommend we include the proper use of the Hi-lift.
 
Well done Mike! Thanks for the write up with great pics. I am sure this will come in handy when the time comes to swap out my brake pads.
 
If this is your first time replacing front pads or doing your own brakes, then this thread is for you.

Thanks for the writeup which, along with the nicely detailed Timmy the Toolman video, can be used by noobs like me to do both the non-Tundra fronts and original rears.
285669d1518644605-suv-brake010.jpg


Having just done all four wheels for the first time, I have a few noob questions that I would think others who are new to brake jobs might also have when they follow your wonderful DIY.
285670d1518644610-suv-brake020.jpg


I'll separate the noob questions in respective posts.

Tools/Materials Needed
[*]“C” Clamp
I first tried the normal caliper piston spreader, but it wouldn't fit in deep enough to do the job perfectly.
285675d1518644632-suv-brake070.jpg

I tried a 6-inch pincher, but it didn't push all four pistons evenly either.
285676d1518644690-suv-brake080.jpg

In the end, like you did with your 4-inch "C" clamp, I used an 8-inch "C" clamp but the goal is to push all four pistons in evenly without having to insert the shoes as a backing plate.
285679d1518644738-suv-brake110.jpg

With all my experimentation, I ended up damaging the fragile original caliper piston boots, and now have to figure out how to replace them.
285677d1518644728-suv-brake090.jpg


Hence my first two noob questions are:
1. What specific tool fits better than a 4" or 8" C-clamp for evenly spreading the 4 pistons without tilting them or damaging their boots?
2. Do you recommend users anticipate torn boots in order to purchase them ahead of time & replace the torn caliper piston boots at the same time?
285680d1518644745-suv-brake120.jpg
 
Last edited:
Great write up Mike, how many miles did you have on those pads? Tundra pads should have lasted longer no?
My original OEM pads from 1999 lasted 133,000 miles, 10 years. Then Napa pads that only lasted 3 years. Now I have OEM Tundra pads on my rig & expect them to out live me. ;-)
 
Very helpful, thank you. I'm hoping to do the tundra swap!

If you calipers are warped and you get the "death wobble" when braking down a hill, etc. it's a no-brainer. However if you don't plan on keeping the 4Runner it can be a negative when trying to sell since people don't want to have to remember what kind of brakes to tell the technician to use.
 
Thanks for the writeup which, along with the nicely detailed Timmy the Toolman video, can be used by noobs like me to do both the non-Tundra fronts and original rears.
285481d1518543391-some-pictures-repairs-4runner-i-enjoy-learning-more-about-brake10.jpg


Having just done all four wheels for the first time, I have a few noob questions that I would think others who are new to brake jobs might also have when they follow your wonderful DIY.
285489d1518543598-some-pictures-repairs-4runner-i-enjoy-learning-more-about-brake90.jpg


I'll separate the noob questions in respective posts.


I first tried the normal caliper piston spreader, but it wouldn't fit in deep enough to do the job well.
285482d1518543394-some-pictures-repairs-4runner-i-enjoy-learning-more-about-brake55.jpg

I tried a 6-inch pincher, but it didn't push all four pistons evenly either.
285484d1518543402-some-pictures-repairs-4runner-i-enjoy-learning-more-about-brake70.jpg

In the end, like you, I used an 8-inch "C" clamp but the goal is to push all four pistons in evenly without having to insert the shoes as a backing plate.
285483d1518543398-some-pictures-repairs-4runner-i-enjoy-learning-more-about-brake60.jpg

With all my experimentation, I ended up damaging the fragile original caliper piston boots, and now have to figure out how to replace them.
285485d1518543406-some-pictures-repairs-4runner-i-enjoy-learning-more-about-brake75.jpg


Hence my first two noob questions are:
1. What specific tool fits better than a 4" or 8" C-clamp for evenly spreading the 4 pistons without tilting them or damaging their boots?
2. Do you recommend users anticipate torn boots in order to purchase them ahead of time & replace the torn caliper piston boots at the same time?

I have used silicone paste in the past to help lube the boots. Seems to work well. The dealer does sell a kit to rebuild calipers.

This piston spreader works well:
https://www.cpooutlets.com/lang-279...MIluy2y8aj2QIVlCWBCh3RgQ6kEAQYAiABEgLoBPD_BwE
 
Hence my first two noob questions are:
1. What specific tool fits better than a 4" or 8" C-clamp for evenly spreading the 4 pistons without tilting them or damaging their boots?
2. Do you recommend users anticipate torn boots in order to purchase them ahead of time & replace the torn caliper piston boots at the same time?

The link that [MENTION=69868]LittleCaesar[/MENTION] posted is a great tool for doing exactly what you're looking for. If you work the pistons a little at a time you shouldn't have any problem with torn boots. Those boots don't normally tear. If you do lube the boots, clean them first so the dirt and grime doesn't "cake" up with the silicone paste. I use LPS 1 which is a greaseless lubricant on my CV boots. Do a search and you can find it on amazon or perhaps a specialty paint store.

Great write up Mike, how many miles did you have on those pads? Tundra pads should have lasted longer no?
My original OEM pads from 1999 lasted 133,000 miles, 10 years. Then Napa pads that only lasted 3 years. Now I have OEM Tundra pads on my rig & expect them to out live me. ;-)

Original pads with 133,000 miles on them is pretty damn impressive. If I'm not mistaken, I had a some serious miles on mine when it was original with stock wheels and tires. I've put quite a few miles on the rig since I installed them, including a lot of off-road miles. My guess is about 35-40K. I had enough meat on them to probably go another year, perhaps two with light mileage. I did Canyonlands, Moab, the WABDR and a lot of "local" off road stuff on these the past couple of years.
 
Aahhh, thinking from the other perspective, I like it! Thank you gamefreak, i do have a feeling after I fix and clean it up that I will want to keep it for a while.
 
I guess I could ask also [MENTION=116467]Rock_Rat[/MENTION] if you drained any fluid in the MC before pushing the pistons back in? I always have to.
 
Great write up Mike, how many miles did you have on those pads? Tundra pads should have lasted longer no?
My original OEM pads from 1999 lasted 133,000 miles, 10 years. Then Napa pads that only lasted 3 years. Now I have OEM Tundra pads on my rig & expect them to out live me. ;-)

I've got about 80k on my TBU, I think there's still plenty of pad left. I take a look at them when I'm down there and it crosses my mind. I've got a lot of hard miles on mine, but also a lot of highway miles and I am not someone who comes flying up to traffic lights and slams on the brakes, in fact I normally do the opposite... I'm running Akebono pads.
 
I've got about 80k on my TBU, I think there's still plenty of pad left. I take a look at them when I'm down there and it crosses my mind. I've got a lot of hard miles on mine, but also a lot of highway miles and I am not someone who comes flying up to traffic lights and slams on the brakes, in fact I normally do the opposite... I'm running Akebono pads.
That's great mileage. I know you've put on some serious mileage at altitude as well. Any left foot braking?

I guess I could ask also [MENTION=116467]Rock_Rat[/MENTION] if you drained any fluid in the MC before pushing the pistons back in? I always have to.
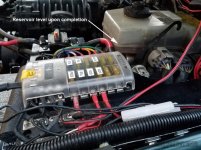
No, I didn't have to. Checked the level before starting and watched it carefully. Picture attached upon completion. It was exactly where I started.
 

Attachments

  • Front Pads_9.jpg
    Front Pads_9.jpg
    81.4 KB · Views: 347
Last edited:
So I completely underestimated the amount of miles I put on my rig since I replaced the front pads. Damn, where does the time go? Seriously, how did I put so many damn miles on my rig in three years? Sheeesh.

Mileage
Total mileage then was - 311,000
Total mileage on Saturday - 376,906

Total miles on pads - 65,906

Breakdown on the Pads
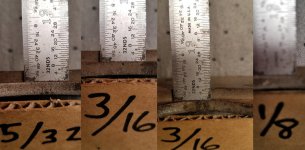
Thickness for the Wagner Thermo Quiet - QC976 are .666 for both inner and outer pads.

Here's what was left on my pads:
1 - .125
2 - .187
3 - .156
4 - .156

Average wear = .156
Total wear over 65,907 miles = .510 out of .666 (about 76% worn)

Personally, I'm OK with that amount of wear over 65K miles. Especially for someone who practices left foot braking a lot more than I ever have.
 

Attachments

  • Front Brake Pads.jpg
    Front Brake Pads.jpg
    60.6 KB · Views: 350
Last edited:
So I completely underestimated the amount of miles I put on my rig since I replaced the front pads. Damn, where does the time go? Seriously, how did I put so many damn miles on my rig in three years? Sheeesh.

Mileage
Total mileage then was - 311,000
Total mileage on Saturday - 376,906

Total miles on pads - 65,906

Breakdown on the Pads
Thickness for the Wagner Thermo Quiet - QC976 are .666 for both inner and outer pads.

Here's what was left on my pads:
1 - .125
2 - .187
3 - .156
4 - .156

Average wear = .156
Total wear over 65,907 miles = .510 out of .666 (about 76% worn)

Personally, I'm OK with that amount of wear over 65K miles. Especially for someone who practices left foot braking a lot more than I ever have.

.666! Those sound like the perfect pads for a Metalhead like myself! :rockon:

I'm actually using Wagner QuickStop ZD787 Ceramic Disc Pads on my Accord along with Bendix rotors. Only $20 a set.
https://www.amazon.com/gp/product/B001O0XE3A/ref=oh_aui_detailpage_o06_s01?ie=UTF8&psc=1

.
 
Last edited:

Members online

Forum statistics

Threads
278,312
Messages
3,554,085
Members
248,016
Latest member
Advally Service

Trending content

Back
Top