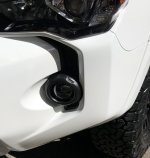
How To: Toyota OEM LED Fog Lamp Installation

year?

Perhaps you might add the years this particular mod covers? Just so there is no confusion.

Not all 5th gens are created equally. On my 2011 TE, I can reach the fog light housings from underneath, no need to even touch the fender liner.... I suspect its the same for 2010-2012 or whenever they changed the nose to look like the sad clown with crying eyes.:cry2:

Pretty steep price tp pay for LED fog lights

I think Toyota uses basically the same design on loads of models. I haven't pulled them off to see if they are an exact swap yet, but the wifes RAV4 and our 2019 Highlander have the same looking housing. Probably Lexus models as well.
 
Last edited:
I think those are the same ones my wife’s 14 ES350 has in them. We got it that way but I’m happy for the LED’s. When I look up that part number some eBay listings come up and it shows different Lexus models.

eBay
 
Nice write-up. I went with Morimoto XBs in true amber color. Had a hard time with removing old one on passenger side and decided to drop the bumper, much easier. I had to raise mine a lot. Both factory ones and new ones were way to low compared to heights shown on aiming procedure.

Any issues with a gap from lens to housing frame?
 
Perhaps you might add the years this particular mod covers? Just so there is no confusion.

Not all 5th gens are created equally. On my 2011 TE, I can reach the fog light housings from underneath, no need to even touch the fender liner.... I suspect its the same for 2010-2012 or whenever they changed the nose to look like the sad clown with crying eyes.

Pretty steep price tp pay for LED fog lights

I think Toyota uses basically the same design on loads of models. I haven't pulled them off to see if they are an exact swap yet, but the wifes RAV4 and our 2019 Highlander have the same looking housing. Probably Lexus models as well.
Thank you for the suggestion. I added some Application details to the original post.
 
Note: always finish the adjustment using a clockwise turn. If you go too far, turn counterclockwise and then finish by turning clockwise. Why? I don’t know, but this is what Toyota says to do.

This is due to the tolerances for the adjustment screws. I'm sure someone can explain it better, but there will always be a space between the thread of a nut and a bolt. When you rotate the bolt to position the thread of the lamp, the lamp thread engages slightly after you start rotating the bolt. Once you stop rotating, the nut is at the end of the thread. If you rotate the opposite direction, the nut will engage once the thread engages the opposite side of the nut. If you rotate the bolt counter-clockwise, the nut will have a different min/max position than can shift up/down on the thread. It's now in the Max position so it can shift to the min. I think this is called thread true position.

So, if you adjust your left light using only clockwise to the exact position you want then adjust the right light to slightly over, then back off to be exact, the nut will be in the min position on the left light and max position on the right light on the thread.

Hopefully this makes a little sense.
 
Nice write-up. I went with Morimoto XBs in true amber color. Had a hard time with removing old one on passenger side and decided to drop the bumper, much easier. I had to raise mine a lot. Both factory ones and new ones were way to low compared to heights shown on aiming procedure.

As someone else asked above did you have an issue with them fitting up correctly in the mounts, like a big gap. If I put the mounting feet into the slots I have a large gap. If I put them in front of the bracket and then put the screws they fit perfectly. Ran them last night but the beam pattern was very low and way off to the sides. Probably due to the way they are mounted. Working nights so I haven't had a chance to call HID Pros to ask about this yet.
 
I just installed the Morimoto XBs and ended up using the stock brackets. The brackets that come with the Morimotos is off by just enough that the inside tabs do not fully seat into the tabs on the bumper. Only thing I modded when using the stock brackets was to remove the plastic adjustment screw and replaced it with a longer M5 button head screw and a 1/2 nylon spacer to take up the space since the spring that came with the Morimotos was to short to create the tension needed.
 
Any issues with a gap from lens to housing frame?

Yes, it is not even but it doesn't bother me that much. I did notice Morimoto mounting tabs are a bit bigger and thicker, this is what cause the gap around to be uneven. I may try to shave them a bit down the road. I was thinking about reusing brackets from original fogs but decided to mount them as they came.

20181228_115338_zpssjkherrj.jpg
 
Last edited:
I just installed the Morimoto XBs and ended up using the stock brackets. The brackets that come with the Morimotos is off by just enough that the inside tabs do not fully seat into the tabs on the bumper. Only thing I modded when using the stock brackets was to remove the plastic adjustment screw and replaced it with a longer M5 button head screw and a 1/2 nylon spacer to take up the space since the spring that came with the Morimotos was to short to create the tension needed.

I remounted my Morimotos today by modifying the feet that slip into the factory slots. HID Kit Pros actually sent me a link on the forum on how to do it. Basically just grind down the outside edges of the feet about 1/8" on each side and they slipped right in. They fit much nicer now. They still have some gap between the lenses and the trim but it's at least even and my OCD self should be able to live with it. I'm working nights so I'll be able to tell this morning when I leave if the beam pattern has improved. I'm sure it has since they are centered in the opening now.
 
I didn't really have any. I had to adjust the angle of the bracket a little to screw the two mounting screws in, but other than that, there wasn't really an issue

LOL We were posting at the same time. If you read my above post I got my fitment issues resolved. Thanks.
 
Oh and I have to give a shout out to HID KIT PROS. Their customer service was excellent!! Ben was on the phone with me for about 20 minutes after they closed, looking for a 4Runner there to check the gaps on and then searching for the link to how to modify the mounts. It's so refreshing to deal with people that actually seem to enjoy their job and care about their customers. Take my word for it and shop with these guys for all of your lighting needs.

Automotive Lighting & Accessories: HID Kits | LEDs | Audio/Video
 
Great info and write up OP.

I wonder what the light output difference is between the ones made in Japan VS the ones made in China. Anyone have any idea? I'm going to be honest, I'm just going to get the chrome China ones due to price.
 

Members online

No members online now.

Forum statistics

Threads
278,315
Messages
3,554,123
Members
248,016
Latest member
Advally Service

Trending content

Back
Top