I found "The One", 2001 Sport Ed. TRD SC'd

blcktpgsr, I'm not sure on the CBI. They said it was supposed to go out this week, but I haven't seen an email yet. I've been so focused on getting the elocker in this week, I keep forgeting to give them a call.

........................................................................

So yesterday I got 90% of the install done on the new axle. By end of day Tuesday, all I had left was to torque the UCA's, LCA's, and the Panhard Bar, refill the diff, bleed the brakes, plug in & route the harness, and put the wheels back on.

As mentioned before, the rear axle seals were leaking, but when I pulled the drums everything was dry as a bone. Not a drop of gear oil had gone through the bearings, so I feel confident that with the new (updated version) seals in place I'll be good to go.

Getting there...

5865ba13.jpg~original


On '01 to '02 4Runners the brake line setup is a little different from earlier model years. There one small modification you have to make to the housing if you are putting a '96-'00 housing into an '01-02.

This is the Upper Link Tower on the driver's side. You have to drill two holes for the brake line bracket that mounts in this location.

Center punched:

a8e215a9.jpg~original


Drilled:

f2f19981.jpg~original


Test fit:

b88dfc1b.jpg~original


Mounted...To mount the bracket, I inserted the bolt from the inside of the link tower and put the nut on the outside. This made it easier to get the nut on, and to torque it all down:

8e5d260e.jpg~original


E-Brake, ABS Sensors, Brake Lines, Rear Diff Breather, and brackets re-installed:

01c6ff34.jpg~original


And she's got legs again!!!

d4e21736.jpg~original


I noticed my driveshaft has been hitting the gas tank skid... notice the areas that are rubbed down to bare metal:

daf81ccf.jpg~original


................................................................................

Today I got back out there and finished everything up. The only thing left to do is bleed the brakes. I tried to do it on my own w/my Motive Power Bleeder, but the damn adapter only works on the '96-'00 brake fluid reserviors.

I took a few shots of how I routed the harness that connects the chassis wiring to the E-locker. I basically zip tied it to my rear differential breather tube, allowing plenty of slack for the axle to droop.

cefcf5f9.jpg~original


In this picture, you can also see the wiring harness that leads forward into the cab and to the ECU in the upper RH corner.

c1ca68aa.jpg~original


In this picture, you can see the wiring harness from the cab, and the harness from the elocker as they go above the rear crossmember. You can also see the breather for the elocker motor, zip tied up high.

473c3cd2.jpg~original


Finally, the two harnesses plug together just behind and above the rear crossmember, protected and out of the way.

c04031e9.jpg~original


ALL DONE!!!

3b9d60e8.jpg~original


Hello, E-Locker! :D

3f4b067a.jpg~original


And that was that. This '01 is officially E-Locked! :reddance:

e8cfbd6d.jpg~original


I took it for a test drive, and everything works beautifully. I have full control over the locker and it engages in any 4WD mode, and 2WD. The new differential ran quiet and smooth up to 70mph, and I had no strange noises or issues relating to the install or the new housing.

I put in some Valvoline 75w-90, which I'm going to run for the next 1000 miles or so, then I'll drain and re-fill with Redline Synthetic.

All focus is now turned to the CBI.
 
Last edited:
BFAD,

You must be having fun with that locker at the moment. As much as I like having mine, it is not used that often. Nice work.

Here is an adapter you can actually use on the end of the Motive to work on the 01-02 instead of the universal adapter. I have used it on my mom's Camry and it works well. All of $8 at the hardware store. Fellow member Durk gives it a two thumbs up.
3rd Gen Cheap Power Brake Flush - YotaTech Forums
 
Congrats on the e-Locker, I'm really jealous. :thumb3: Those are hard to find here in Arkansas.

llennium, I can't tell you how lucky I got on the housing. I have never seen one of them available for sale locally before this one. The 3rds are pretty common, but that housing... :banana: Thanks for following the thread.

Another perfectly done modification. :thumb3:

Thank you kindly!

That is bada$$ man! Very clean install dude!

Thanks for the compliment FM.

BFAD,

You must be having fun with that locker at the moment. As much as I like having mine, it is not used that often. Nice work.

Here is an adapter you can actually use on the end of the Motive to work on the 01-02 instead of the universal adapter. I have used it on my mom's Camry and it works well. All of $8 at the hardware store. Fellow member Durk gives it a two thumbs up.
3rd Gen Cheap Power Brake Flush - YotaTech Forums

You're the man L.C. Always coming through for me! I may not make that exact same adapter, but that got the creative juices flowing. I'll head down to the hardware store tomorrow and see what I can cook up.

RE the use of the E-Locker... Now that I have it, I'll definitely find ways to use. It's something I always wanted, just in case. If it saves my ass even once, it will all be worth it.

Nice moves.... another classy mod by BFAD and ad another notch on the epic-ness of your 4Runner!

Classy, Epic, WHOA! Hold on there man. Well, I guess if you say so. Thanks alot Rick.

Congrats man. Thats awesome! Gotta take it on a shakedown run now..

Thanks Rip, I'm game. Once I get the brakes bled I'll probably head over to Montessa Park for a couple hours and see how it does. I'm going to try the bleeder adaper that LC posted, so I might get it out tomorrow afternoon for a couple hours.
 
Since I've already spent the time doing the research, I'm posting the links & info I used for the swap here for future reference.

LINKS:

WRITE-UPS

How To: DIY Retrofit Elocker Wiring - How To: DIY Retrofit Elocker Wiring - YotaTech Forums

Installing an Electric Locker in a Toyota - Outdoor Recreation Network - Off-Highway, Jeep, & 4x4 Fun

Toyota Differential Info - Erik's Toyota Differential info

Retrofitting a Factory Toyota Elocker - Retrofitting a Factory Toyota Elocker - 4x4Wire.com

E-Locker Install Thread, lots of good ideas and wiring info - UltimateYota.com - 4x4mike's e-locker retrofit

Sonoran Steel Retrofit Page - Retrofit Electric Locker

3rd Gen 4Runner E-locker Retrofit - 4Runners.org - 3rd Gen 4Runner E-locker Retrofit

Elocker converted to cable actuator - Elocker Cable Conversion - YotaTech Forums

WIRING

Wiring Diagrams & Ideas: elocker wiring and switches

OEM Diagram: E-locker ecu applications - YotaTech Forums

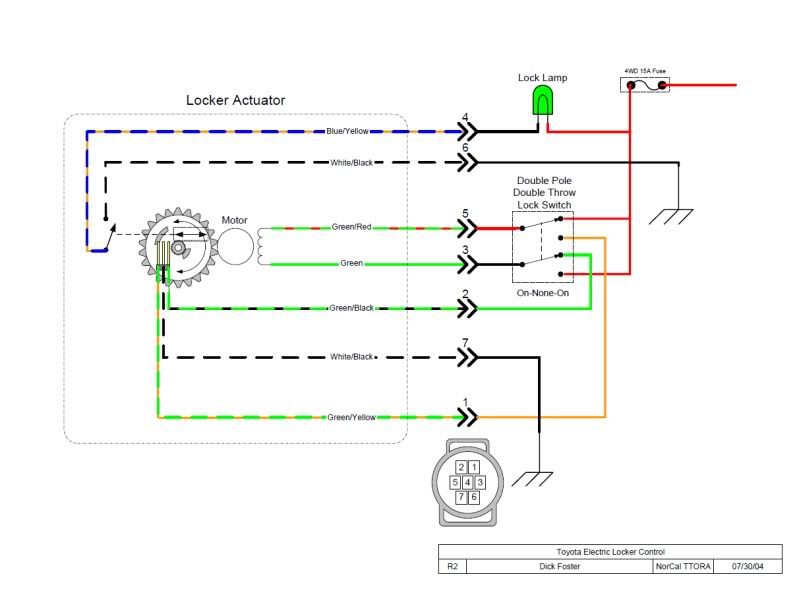
Good E-Locker Info, Excellent wiring diagram - http://www.norcalttora.com/~****/Writeup Stuff/toyota_elock_control.pdf

OEM E-Locker Wiring Diagram (very clear B/W version) - Yankee Toys

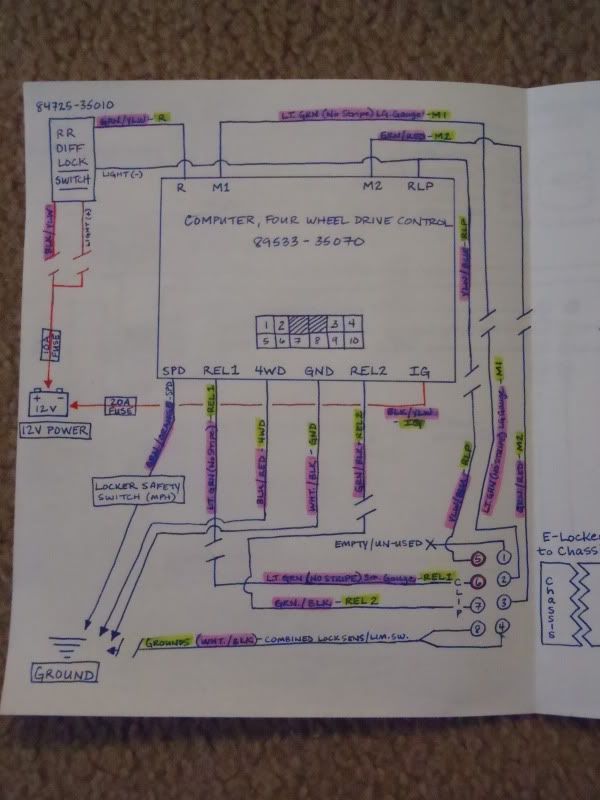
MY WIRING DIAGRAM

793f5afa.jpg~original


17fff230.jpg~original


WIRING DIAGRAMS (from links above, saved to my photobucket account to ensure they remain available)

2f4df17c.jpg~original


817b8f26.jpg~original


01cc9987.jpg~original


798f5d6d.jpg~original


This one is great for doing bench testing on a 3rd member, or wiring using an aftermarket DPDT switch.

9b9c0a30.jpg~original


I posted this in Rickashay's build thread for the "Dirt Duster", but figured I'd repost here for posterity. Wire references are pointing to the wiring diagram above by Mr. Foster of TTORA.

Regarding your E-Locker, I would bypass the ECU and test the motor/actuator first before removing it from the diff. If you can apply power directly to the motor and get it to work, then you can narrow the problem down to the E-locker ECU. If you give it direct power and it still doesn't work, you know the problem is the motor/actuator itself.

There should be a harness that connects the E-locker to the chassis. One end plugs into the E-locker motor, the other plugs into the next section of the harness on the chassis roughly 2 feet up the line. I'd disconnect the plug that connects that short ~2 foot section on the Chassis side, and position it so you have access to the terminals in the plug.

Make yourself three 3-foot sections of wire. On the first, attach female blade connectors on both ends. On the next two attach a female blade connector on one end, and strip back a half inch of sheathing on the other end.

To LOCK the diff manually:

1. using the wire w/two female blade connectors, create a jumper between the plug terminals corresponding to the GREEN wire and the GREEN/BLACK wire.

2. Using one of the other two wires, attach the female blade connector to the terminal on the plug that corresponds to the GREEN/RED wire

3. Using the last wire, attach the female blade connector to the terminal on the plug that corresponds to the WHITE/BLACK wire. Since there are two, in the diagram below, I am referring to the one labled #7. If you can't tell which of the two WHITE/BLACK wires corresponds to #7 (which may be tough because the 4Runner plug is rectangular, not round) just try them both. One is a ground for the E-locker motor, the other is a ground for the locked position switch.

4. Once you've made connections 1-3 above, connect the wire off the terminal corresponding to the BLACK/WHITE wire to 12V battery (-), then connect the wire off the terminal corresponding to the GREEN/RED wire to to 12V battery (+).

If the motor is working properly you should hear it lock the diff.

To UNLOCK the diff manually:

1. using the wire w/two female blade connectors, create a jumper between the plug terminals corresponding to the GREEN/RED wire and the GREEN/YELLOW wire.

2. Using one of the other two wires, attach the female blade connector to the terminal on the plug that corresponds to the GREEN wire

3. Using the last wire, attach the female blade connector to the terminal on the plug that corresponds to the WHITE/BLACK wire. (See addt'l steps above in step 3 to LOCK)

4. Once you've made connections 1-3 above, connect the wire off the terminal corresponding to the BLACK/WHITE wire to 12V battery (-), then connect the wire off the terminal corresponding to the GREEN wire to to 12V battery (+).

If the motor is working properly you should hear it unlock the diff.

(NOTE: I might have mixed up which procedure is lock vs. unlock above. Since your diff is currently unlocked, try the LOCK prodedure first. If it does nothing, I may have mixed them up, so try the UNLOCK prodedure. If neither procedure gives you a result, your E-locker motor is dead. The limit switches will prevent you from damaging anything if for instance you run the UNLOCK procedure on a diff that is already unlocked, or vice versa)

If you test it this way and the motor works as it should, then the problem lies with your ECU or chassis wiring.

There's lots of info on the web RE rebuilding the E-locker motor... Here are a few I've found:

gear install

Toyota Tacoma Elocker Actuator Repair

UltimateYota.com - E Locker motor repair

Rewind your E Locker Electric Motor!
 
Last edited:
Reserved for praise

Reserved for Thanks!

...................................................................................

Thanks to Little Ceasar, I was able to bleed the brakes solo today!

He posted a link a couple posts back that showed how to make an adapter that allows a Motive Power Bleeder to work with the '01-'02 brake fluid reservoirs. I put my own spin on it, and came up with this.

First, I went down to Lowe's, hit the plumbing aisle and picked up one of these for the low, low price of $2.90. The ID of the cap is 1 7/8". It just so happens the OD of the reservoir neck is... you guessed it... 1 7/8".

9eeb4271.jpg~original


I drilled hole in it using a 1/4" bit, and pushed a threaded brass hose barb through the hole from the inside of the cap out. The hex shaped head holds the barb in place, and the 1/4" hole ensures that the rubber seats tightly against the barb, making an airtight seal.

4ef0cf00.jpg~original


Then I simply pushed some 5/8" ID clear vinyl tubing down onto the barb. I made sure to push it all the way down the barb as far as I could. This in effect sandwiches the cap between the hex shaped head on the the barb and the clear vinyl tubing. Put a couple hose clamps on there, and you've got a perfect adapter for the '01-'02 reservoirs.

84025d4f.jpg~original


5e09d314.jpg~original


Works like a champ. The adapter held 10 PSI with ease, and no leakdown. My rear lines really needed a bleed... there was lots of air in there.

b5ba2f03.jpg~original


Also, I added an LED to the E-Locker switch circuit. I did this because while testing everything yesterday, I noticed that the backlighting on the E-Locker switch was impossible to see on a bright sunny day. I couldn't see the light blinking, or when it lit up solid to indicate the diff had locked.

The LED is bright enough that I can see it even in bright sunlight. I simply tapped the LED in parallel into the power/ground wires for the switch light, so the switch light is still active as well.

The green LED is the indicator for the E-Locker, the red button is the calibration button for my Wideband AFR gauge, and the red LED is the status light for the heated 02 sensor that feeds the Wideband.

f4499647.jpg~original
 
Did you get the switch to light up? When I found it at the pick-n-pull, I bought it for such, but good ideas don't always get put into use, at least for me.

I may have to try that ingenuity on my neighbor's 09 Camry. Less parts in the mix usually equals less things to fail IMO.
 
Yeah, the switch lights up. I wired it so that when pressed, it blinks until the locker is fully engaged, at which point it lights up solid. I wanted it to light up w/the interior lights, but I couldn't have it both ways.

The problem is that it's a tiny little bulb inside the switch, and it lights up orange, so it's very hard to see in full daylight, hence the LED.

Now that the LED is in place, I may re-route the wires to the bulb in the switch so that they are connected to the dash lighting, and come on/dim w/the dash lights. I'll have to tear back into the harness for that though, which I don't feel like doing anytime soon.

The adapter worked flawlessly, and because it doesn't have that right angle, the brake fluid drains straight down into the reservior, making for a very easy cleanup of the adapter when you're done.
 
CBI! CBI! CBI! :hungry:

No kidding! I called them today and the holdup is that they are waiting for their laser cutter to deliver a part they use in building the swing-away. The bumper is already done, just waiting on the swing away now. They estimated it will ship mid-week next week.
 
This thread is so full of win! I am in awe of the detail and thought you put into the evolution of this truck.

The detail and the fantastic pictures have really been a help with the planning I've been putting into mine, and thanks to your TBU write-up, I will be tackling that this weekend.

Thanks for all of this incredible content, i really love what you've done with both of your 4runners.
 
super nice dude, that where I want to take mine someday, with all these extra functional mods,

nice work on the e-locker too!
 
This thread is so full of win! I am in awe of the detail and thought you put into the evolution of this truck.

The detail and the fantastic pictures have really been a help with the planning I've been putting into mine, and thanks to your TBU write-up, I will be tackling that this weekend.

Thanks for all of this incredible content, i really love what you've done with both of your 4runners.

It's always rewarding to hear that I've helped someone w/their 4Runner. Thank you very much for the compliments, and good luck with your TBU.

super nice dude, that where I want to take mine someday, with all these extra functional mods,

nice work on the e-locker too!

Thanks alot BlackCat, I appreciate you taking the time to read through the thread.

What I use. Works awesome and no contraptions to keep in the garage or worry about the pressurized brake fluid. Might check them out.

This truck had speed bleeders on it before I bought it. The previous owner installed them & ultimately removed them because he didn't like them very much. I already had my Motive bleeder when I bought the vehicle, so that's what I use.

The problem I see w/the speed bleeders is that it would be very akward to pump the brake pedal while looking under the truck at the same time to make sure that the bubbles have stopped coming out of the bleed line. The Motive bleeder is cake. I just pressurize it, open the bleeder valve and let it run for af few minutes. I'll go back and check on it and once the fluid coming out is bubble free, and I've bled out about 1/2 a quart, I move on to the next one.
 
Today I decided to take the '01 out for a more thorough test drive so I could ensure that everything was road-worthy.

I also needed to pick up a 5th 285/75r16 GY Duratrac for a spare, so I spun the two tasks into one.

Before I left the house I remembered that I had a card to play with Discount Tire. After the debacle with the LC wheels on the '97, the manager of the store had offered me a discount on my next purchase. I decided to call upon the favor and they offered me $100 off the cost of a new Duratrac, so I took them up on it.

There will never, ever, not even for a second, be a dirty old 265/70 stock spare on the back of my CBI!

2d3c5796.jpg~original


While driving around I took a couple pictures of the way bright sunlight affects the visibility of the backlighting on the "RR Diff Lock" switch.

Off...

574cf6e2.jpg~original


On... It's impossible to see the backlighting on the switch in bright sunlight. But that green LED... there's no mistaking that one.

c954c0e4.jpg~original


After the tire shop, I shot over to the local off road park to give the locker a spin, but the road leading to the park was closed to the public due to some kind of special event. My plans thwarted, I just cruised around and put some miles on the new rear end to make sure it checked out. It seems to be :bigok: :driving: :tongue:

When I got home I noticed that this this thing has some rake kickin'. This is minus the stock spare, tow hitch, spare tire winch, and some bracketry, but the new 285 spare is in the back. It's at 41" ground to fender in the back, so it's about 1.5" higher than it was before. A small bit of that is because I put the cone bumpstops back in, but the rest is just weight reduction.

c70202b8.jpg~original


6abaf28d.jpg~original


Finally, I spoke w/CBI. They were in the process of putting the finishing touches on my bumper when I called. It will ship out on Monday, and I should be able to install it the week after next. :pimp:

Then I can figure out what to do about the rear coils.
 
Last edited:

Members online

No members online now.

Forum statistics

Threads
278,316
Messages
3,554,121
Members
248,016
Latest member
Advally Service

Trending content

Back
Top