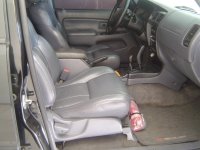
I found "The One", 2001 Sport Ed. TRD SC'd

Alright so when is the box going into production? :hungry:

As soon as I can find some cheap labor to crank 'em out. That thing would not be cost effective to build/sell. If time is money, that thing cost me a good chunk. Thanks though.

BigFish,
I read that you adjusted your Bilstein up front on the SS 1.2 system. I have the same kit, and have been debating doing that to mine. I like the rake, but would prefer another 1/2" to 1" up front to reduce some rubbing. What I have been reading is that the front should not come up any higher as it makes a large amount of stress on all the components up front. What are your thoughts, and was it pretty difficult? I assume it took a spring compressor, etc...spanner wrench?

Thanks

Going up 1 notch on the shock body will get you about 3/4". There should be 5 settings in all, and you don't want to go higher than the middle one. If you looked at them as 1 = lowest, 5 = highest... I started at 2 and went to 3. Don't go any higher than that and you'll be fine.

Did you assemble yours the first time or did you pay SS to do it? If you have not done it before, it will be a little bit of a challenge the first time. Mainly that comes from dealing w/a spring compressor and getting the shock/spring/top plate aligned properly so that it will fit back on the truck once it's re-assembled.

BTW, spanner wrenches are only for coilovers (i.e. ToyTec's design... w/a threaded shock body)
 
Going up 1 notch on the shock body will get you about 3/4". There should be 5 settings in all, and you don't want to go higher than the middle one. If you looked at them as 1 = lowest, 5 = highest... I started at 2 and went to 3. Don't go any higher than that and you'll be fine.

Did you assemble yours the first time or did you pay SS to do it? If you have not done it before, it will be a little bit of a challenge the first time. Mainly that comes from dealing w/a spring compressor and getting the shock/spring/top plate aligned properly so that it will fit back on the truck once it's re-assembled.

BTW, spanner wrenches are only for coilovers (i.e. ToyTec's design... w/a threaded shock body)

Yes, I was not thinking when I wrote spanner. I have the supplement for the SS system, and I was debating doing the '1 notch up' change. I did pay Steve to do the labor when I got the kit, so I am not experienced with a spring compressor. I am not a huge fan of having other people do it, but I also understand that this is a dangerous operation. I may try and take them in to the local shop and try to work a deal where I can watch the work being done and learn at the same time. Unless I convince myself it is self explanatory enough....I have a week to get up the courage!

Thanks for the help
 
Last edited:
The week of the 4Runner....

I spent most of this week wrenching on the stable of 4Runners. My wife's 2000 is like the bas**** child of the group... the one that I never pay attention to or work on. She's been complaining about poor MPG, so I gave it the full "Max MPG" tune up.... Replacing the parts below brought my fuel economy up by 4 MPG on my '97 so I'm hoping it will help out w/her '00...

Spark Plugs
Spark Plug Wires
PCV Valve & Grommet
Fuel Filter
Air Filter
Front O2 Sensor
Drain & Refill Front & Rear Differentials and Transfer Case with Redline 75w90
Lucas Fuel Injector Cleaner
Oil Change & Filter

After that I turned my attention back to the '01 and fixed a bolt hole that I boogered up while installing the ARB. I also had some paint mixed at NAPA so I could do a little mod that I've had my eye on for awhile...

'02 Sport Editions come with color matched license plate trim, and I've always liked that feature. The '01's (like mine) come with the standard off-black license plate trim, so I decided to upgrade the ass end to '02 standards.

Something's missing.... There are alot of hard to reach fasteners involved in getting this thing off...

2366d7b2.jpg~original


0c4d145f.jpg~original


All the parts that get removed...

7a514f58.jpg~original


There it sits in stock form, after a good wash and some work with a scotch-brite pad...

74370dde.jpg~original


1749b11f.jpg~original


Home made paint booth...

a070c1be.jpg~original


Put somethin' in the oven...

54e183bc.jpg~original


It still needs a 1000/2000 grit wet sand and a clear coat, but I think it matched up cherry....

d42f73fb.jpg~original


37f5f228.jpg~original


Add to that, I was driving by a NAPA parts store, and I just couldn't help myself....

518d5f38.jpg~original


Coming soon to a build thread near you... big arse brakes... These things are beef... they're what's for dinner. :hungry:

a9e3b8b8.jpg~original


Ripcord, ALBPM... You guys owe me a...

:rockthrow:

And don't forget the....

:bash:
 
Your rig is ballin' outta control!!

How'd you get the licence plate trim piece off?!?! do you have to remove the interior tail gate panel and unscrew it from the inside?! I cant figure it out.
 
It's a mess getting that thing off... See the pic below, on top of the back seats... That's the interior trim, and the plate that is underneath.

Once you get all that off, there are 3 bolts/nuts and I think 8 plastic mounting tabs holding it on. But to get at those you have to disconnect the arms for the locking mechanisms.

Once you get it all unbuckled you have to remove the harness for the license plate lights and take the door handle off the license plate trim.

All the parts that get removed...

7a514f58.jpg~original
 
Definitely keep us posted on how the new brakes feel. I've never had a complaint on mine personally, but still interested to see/hear the difference.

You also have a little more vroom vroom under your hood...
 
Nice work on the entire truck! The attention to detail in your mods are fantastic and your write-ups are very helpful.

:thumb3:
 
It's a mess getting that thing off... See the pic below, on top of the back seats... That's the interior trim, and the plate that is underneath.

Once you get all that off, there are 3 bolts/nuts and I think 8 plastic mounting tabs holding it on. But to get at those you have to disconnect the arms for the locking mechanisms.

Once you get it all unbuckled you have to remove the harness for the license plate lights and take the door handle off the license plate trim.

Thanks for the info. WOW looks like a major PITA.
 
one word can describe this thread: WINNING !!!!!!!!!!!!!!

Same words also describes this truck's drug habit... It's hooked on my money and it just keeps using.

Definitely keep us posted on how the new brakes feel. I've never had a complaint on mine personally, but still interested to see/hear the difference.

You also have a little more vroom vroom under your hood...

I was never unhappy with my stock brakes either. In fact, I've been on them hard since I got the lift and the bumper and they were always strong enough to pull the truck down pretty fast.

However, they were new. On my '97 the brakes are close to worn out and I can induce SEVERE brake fade with just 3 hard stops from about 50. This tells me that over time I am eventually going to run into performance issues w/the brakes on the '01.

Since the '97 needs brakes anyway, and the '01 has brand new Toyota rotors & pads on it (stock size, before the upgrade), I figured pull the brand new stock stuff off the '01 and install it on the '97. That saves me a $200+ brake job on the '97.

Then I did the TBU on the '01, and the way I look at it, since it saved me $200 on the brakes for the '97, the NET hit to my wallet was only $320.

Now I've got 2 4Runners with fresh brakes and everyone's happy.

Nice work on the entire truck! The attention to detail in your mods are fantastic and your write-ups are very helpful.

:thumb3:

Thanks for the compliments man.

Thanks for the info. WOW looks like a major PITA.

No prob sir.
 
great lookin rig. i feel as if i need to give my rig some TLC soon...

the last pic looks like ur Upper ball joint looks super stressed.
 
great lookin rig. i feel as if i need to give my rig some TLC soon...

the last pic looks like ur Upper ball joint looks super stressed.

Thanks man!

Re the UBJ, I doubt it was under much stress... it was sittin on jackstands, so nothing was moving and there was no weight on it. No worries.
 
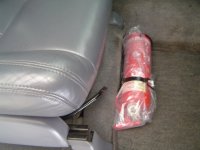
Just for kicks, I put it in a tupperware and I'm going to bake it in the vehicle for a couple days to be sure. If it bursts, it'll burst inside the tupperware and keep my cleanup to a minimum.[/IMG]

BigFish, all cars sold in Brazil, either manufactured here or imported, come with mandatory fire estinguishers, just like that model of yours. They are installed in front of the passenger seat. You should not be worried about them going off by themselves.

Regards,
Gustavo.
 

Attachments

  • DSC01327.JPG
    DSC01327.JPG
    96.5 KB · Views: 6,299
  • DSC01328.JPG
    DSC01328.JPG
    85.3 KB · Views: 5,855
this is my third time going through your build thread, each time I notice something genius about your modification. Keep up the good work!

Jada, thanks for following the build and for the compliments. It's always good to know that the info is helping people out, or at least that it's enjoyable to read through.

BigFish, all cars sold in Brazil, either manufactured here or imported, come with mandatory fire estinguishers, just like that model of yours. They are installed in front of the passenger seat. You should not be worried about them going off by themselves.

Regards,
Gustavo.

Gustavo, thanks for the reassurance. I was pretty confident about it after my research, but it's good to hear from someone with first hand experience on the subject. I sure wouldn't want to get into my 4Runner only to find it covered in fire extinguishing chemicals. :eek:
 
Yeah. And they have a 5 years lifespan (at least over here). I have just replaced a totally good one for a new one. Cops like to check that, and since it is mandatory equipment, if you don't have a valid one it means impound...
 
This is an ACTUAL update.... um, wow.

I finally got the ass end of my 4Runner all trimmed out the way I want it for now. I got some color matched paint from NAPA based on the info in 4runit's thread. The thing he didn't mention, and that NAPA didn't mention, is that they don't put any hardener in the paint when they mix it up and sell it to you in an aerosol can (They told me that they used to, but people let it sit too long and it would harden in the can)..... That means the paint takes 7 days PLUS to harden... PER COAT. My damn 4Runner has been in the garage for 2 weeks waiting for paint to dry.

Next time I'll look elsewhere, but for now it's done.

A throwback picture to when I first got the 4Runner and what the rear end looked like...

98afd128.jpg~original


And how it looks today...

9ae2a792.jpg~original


And one more, just because I thought this pic looked cool. I messed w/the exposure settings on the camera so that the pic would come out darker than it was supposed to, giving it a very dark background.

b99ea2f5.jpg~original


ALSO...

After 11 months, I finally got around to beginning the install of the URD 7th Injector Upgrade Kit. The kit converts the TRD 7th Injector to the URD 7th Injector. It adds the URD Additional Injector Controller (AIC) & Fuel/Timing Calibrator (FTC), some Denso Iridium IK22 plugs, and a Walbro 190 LPH fuel pump. You end up removing the TRD 7th Injector computer and wiring, and re-using the TRD injector w/the URD electronics.

Today I had some time, so I installed the plugs. I also picked up a 2.2" URD SuperGrip pulley for the supercharger, so I put that on too. This helps me commit to getting the computer and fuel pump installed next week rather than next month...or next quarter... or next year.

I pulled the old plugs and took a look at 'em. Turns out the previous owner knew a little bit. These are Denso K20R-U's... the "U" being for "U groove". These are a cheaper plug than the Iridiums, but still offer great performance.

35f97025.jpg~original


Looks like the plugs may have been running a little hot, but otherwise it looks like things are fine in there.

0390af62.jpg~original


The new plugs...

b767aa22.jpg~original


IK22's are gapped at 0.032" right out of the box, and that's how I'm running them. There's no need to screw around with gapping them, you'll only risk damaging the tip of the electrode. See for yourself...

Frequently Asked Questions: DENSO Iridium (There is also some info on the U-grooves here)

Factory gap specs for Denso Iridium plugs >> Spark Plug Specifications: DENSO Iridium

Isn't it beautiful. I love boost. It's only a 2 PSI increase, but they say every PSI equals 10 horsepower, so I can't wait to step on it.

860576b1.jpg~original


88153401.jpg~original


That's it for now. Fuel Pump and URD AIC/FTC install coming soon. There's not a lot of info out there on installing a fuel pump on a 3rd gen, so that may be my next write-up. After all that comes the tuning process.

Stay "tuned"....
 
Last edited:

Members online

Forum statistics

Threads
278,316
Messages
3,554,120
Members
248,016
Latest member
Advally Service

Trending content

Back
Top