Inner Tie Rod Removal and Installation

If I read this correctly, that is why the OP said to mark the threads with white paint before you loosen the outer tie rod from the inner. So you can tighten it back up to the white mark on outer tie rod. No need to count threads.

That didn't work for me since mine were covered in grime and all the paint accidentally rubbed off. I did have the foresight to count it though and got it pretty close at least.
 
There is no reason to ever leave your driveway with the toe adjustment (tie rod length) messed up. If you've gone to all the work to replace your inner tie rods, fixing the toe adjustment to within factory specs is an easy additional step with a tape measure and a helper. Just measure from an easy to identify tread block on the rear of the passenger tire across to the equivalent block on the rear of the driver's side tire. Then make the same measurement across the front. You want them the same to within 1/16 inch, with the front about 1/32 shorter than the rear.

For reference, adjusting a single tie rod changes the front-rear difference by about 3/16 inch per full rotation, so you can sneak up on it pretty accurately.

When you get done, if your steering wheel is cock-eyed while driving straight, just shorten one tie rod and lengthen the other the same amount until you get it straight. A straight steering wheel is less important than the proper toe, however.

The toe adjustment is the most critical from a tire wear standpoint, so you owe it to your tires to fix that quickly, especially since it's so easy.
 
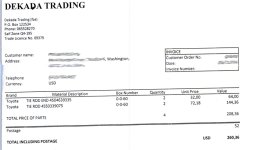
i would like to know if you happen to have these parts numbers, as i am going to do all OEM LBJ, inner and outter tie rods on both sides and looking them up on Toyotapartszone isnt the best with hand drawn pics. or should i just call and have them walk me through it. plus the LBJ bolts as well?
 
"Do your alignment guy a favor and count the turns coming off and match them going back on
That way your alignment is pretty damn close to how it was when you disassembled "

It may go against what everyone else is doing but I just used a tape measure to get it fairly close. I got my alignment done immediately after everything new was on and it was only a 10 minute drive to the shop. The tape measure method might not work for everyone but I found it quicker than trying to count rusty crusty threads :preggers:
 
"Do your alignment guy a favor and count the turns coming off and match them going back on
That way your alignment is pretty damn close to how it was when you disassembled "

It may go against what everyone else is doing but I just used a tape measure to get it fairly close. I got my alignment done immediately after everything new was on and it was only a 10 minute drive to the shop. The tape measure method might not work for everyone but I found it quicker than trying to count rusty crusty threads :preggers:

I just wrap them in tape instead of counting or paint. I'll use tape measure as list resort.
 
"Do your alignment guy a favor and count the turns coming off and match them going back on
That way your alignment is pretty damn close to how it was when you disassembled "

It may go against what everyone else is doing but I just used a tape measure to get it fairly close. I got my alignment done immediately after everything new was on and it was only a 10 minute drive to the shop. The tape measure method might not work for everyone but I found it quicker than trying to count rusty crusty threads :preggers:

to set the toe using some fishing line running from the rear wheel to the front wheel adjust the tie rod so the wheel is parallel to the line . both sides steering wheel straight when its on the ground no lift.

drop the tire down on 2 steel plates so the wheel will turn easy .
This will get you pretty darn close so close you may not want to pay for alignment. a very slight toe in fwd part of front wheels closer than rear gives best steering control.
 
i would like to know if you happen to have these parts numbers, as i am going to do all OEM LBJ, inner and outter tie rods on both sides and looking them up on Toyotapartszone isnt the best with hand drawn pics. or should i just call and have them walk me through it. plus the LBJ bolts as well?

See Post #121
 
I would not trust myself to do a back yard alignment. for $100 I would rather have the a pro take care of it. But I understand this is only to be used a temporary solution until you get around to getting a proper alignment.
 
Thanks for all the helpful info. I was planning on doing just LBJ's with my new front coils and shocks but at 180K on the original suspension I'm now thinking UBJ's, OTREs and maybe ITREs. Has anyone done this at the same time as a front lift kit? What order would you recommending doing these in? Is there anything else I should be looking at or replacing while everything's a part?
 
Great write-up, and I just used it for the second time in about ~30k miles (unfortunately)! Really, super straight forward job, and it's not that bad at all!

Two quick PSA's:

1.) My inner and outer tie rods were Sankei/666 brand from NAPA. I'm not sure if 30k miles is the norm with these with a 3" lift, but I'm just throwing it out there. I'm not sure if the premature wear also has to do with what looks like slightly leaky steering rack seals around the part that connects the rack to the ITRs. It was a reman'd rack put on when I first got the 4Runner 6 years ago, and the leak isn't bad enough to notice steering fluid loss, so it might just have been dirt and crud mixed with the grease on the ITRs. The boots only had zip ties on them, so I'll be replacing those with CV axle bands (if they fit).

At the time I bought the Sankei/666 parts, I really didn't have the money for OEM. I do now, so I got the ITR's from Amayama for $199 for both shipped from Japan. That's about $60-70 less than the best price I could find in the US. The OTRE's I got from Camelback since the price savings was negated by the international shipping.

2.) The OEM OTRE's did NOT come with a lock nut (jam nut?) for adjusting the alignment. I didn't realize this until I had everything pulled off the truck, and I just left the OTRE and the ITR connected since I was replacing them both. Needless to say, it was a pain trying to remove the lock nut from a removed set of tie-rods, and I was only able to get one off. I picked up a new one from a local dealership parts department, and it was very shiny and nice looking. I'd highly recommend getting new OEM ones since they're quality looking nuts (that's what she said).

Anyway, here's to hoping the OEM ones last a bit longer.
 
I borrowed every puller Autozone had to separate my tie rod and upper ball joint. In the end I had to pay to have it done. :(

Tie rod attaches to the spindle, not the upper ball joint. The tool shown on the first page has worked for me. Even on my first rust bucket runner. Glad you were able to get it fixed though.
 

Attachments

  • Tie Rod Ends.jpg
    Tie Rod Ends.jpg
    125.8 KB · Views: 650

Members online

Forum statistics

Threads
278,316
Messages
3,554,113
Members
248,016
Latest member
Advally Service

Trending content

Back
Top