Jhalko's 2011 Limited build/travel thread

If we lived closer things would be good...:biggrin2:

Yep, but honestly having to figure a lot of this stuff out based on pics on the site and being under the truck has been good for me. I do feel good when I finish something, but at this point I want to camp or wheel more and work on the truck less!
 
Next mod, CB antenna and all in one Cobra, nothing exciting about that, I followed someone else thread for the cb and got a CBI ditch bracket. The CB box was mounted under center console by the shifter with the mic connection just hanging out, adequate but not ideal for what I wanted. I had to run an extra ground strap from the bracket under the hood. I used a heat gun to melt the cowl, no big deal and no one would ever notice unless you were looking for it. CB range was minimal, just enough for trail runs, for some reason I keep looking for more... later I'll post the current CB.

Cowl melt spot, true Antman quality:
<a data-flickr-embed="true" href="https://www.flickr.com/photos/140489411@N02/26537958451/in/dateposted-public/" title="image"><img src="https://c4.staticflickr.com/2/1537/26537958451_9a3d592c57_z.jpg" width="640" height="480" alt="image"></a><script async src="//embedr.flickr.com/assets/client-code.js" charset="utf-8"></script>

A later pic of antenna...
<a data-flickr-embed="true" href="https://www.flickr.com/photos/140489411@N02/26840476013/in/dateposted-public/" title="IMG_4945"><img src="https://c6.staticflickr.com/8/7322/26840476013_855d54fc8d_z.jpg" width="480" height="640" alt="IMG_4945"></a><script async src="//embedr.flickr.com/assets/client-code.js" charset="utf-8"></script>
 
About here is where I took a week and a half and traveled to the east coast... I grew up in Asheville NC and decided that for my 40th birthday I wanted a big road trip... it was awesome, except for that hurricane. Overland East was a wash out but I did meet multiple 4runner owners so that was cool, wish it would have been dry. I'm thinking in 2017 I may go down for Overland West.

This field does not normally have water...
<a data-flickr-embed="true" href="https://www.flickr.com/photos/140489411@N02/26000411633/in/dateposted-public/" title="image"><img src="https://c2.staticflickr.com/2/1557/26000411633_45f60588c1_z.jpg" width="640" height="480" alt="image"></a><script async src="//embedr.flickr.com/assets/client-code.js" charset="utf-8"></script>

Even getting into the field to park took 4 low!!!
<a data-flickr-embed="true" href="https://www.flickr.com/photos/140489411@N02/26000412013/in/dateposted-public/" title="image"><img src="https://c6.staticflickr.com/2/1657/26000412013_69b23ae8ca_z.jpg" width="480" height="640" alt="image"></a><script async src="//embedr.flickr.com/assets/client-code.js" charset="utf-8"></script>

Overall I still had fun, learned a few things and got to meet some good 4runner folks. Taylor Ranch is only about 5 miles from my parents so I didn't have to suffer in the rain like everyone else... I spent 5 days mountain biking as it dried out. Not all was lost...
 
The trip from Asheville up to the Cove was pretty amazing, I took the Blue Ridge Parkway all the way to the VA state line. I had been along here several times when I was younger and lived in Asheville, a really special drive and I hit it at an awesome time of year. Camped at the Julian Price Campground and since it was a weekday I scored what was one of the best sites in the whole area!

Not far out of Asheville
<a data-flickr-embed="true" href="https://www.flickr.com/photos/140489411@N02/26537961861/in/dateposted-public/" title="image"><img src="https://c6.staticflickr.com/2/1508/26537961861_1f402cd074_z.jpg" width="640" height="427" alt="image"></a><script async src="//embedr.flickr.com/assets/client-code.js" charset="utf-8"></script>

Craggy Gardens, used to road bike up here from UNC Asheville all the time
<a data-flickr-embed="true" href="https://www.flickr.com/photos/140489411@N02/26603665035/in/dateposted-public/" title="image"><img src="https://c4.staticflickr.com/2/1536/26603665035_9978978166_z.jpg" width="640" height="427" alt="image"></a><script async src="//embedr.flickr.com/assets/client-code.js" charset="utf-8"></script>

That's Grandfather Mtn in the background
<a data-flickr-embed="true" href="https://www.flickr.com/photos/140489411@N02/25998236504/in/dateposted-public/" title="image"><img src="https://c1.staticflickr.com/2/1579/25998236504_22f716732a_z.jpg" width="640" height="427" alt="image"></a><script async src="//embedr.flickr.com/assets/client-code.js" charset="utf-8"></script>

Primo campsite view...
<a data-flickr-embed="true" href="https://www.flickr.com/photos/140489411@N02/26537955411/in/dateposted-public/" title="image"><img src="https://c4.staticflickr.com/2/1604/26537955411_ce500f8d41_z.jpg" width="640" height="427" alt="image"></a><script async src="//embedr.flickr.com/assets/client-code.js" charset="utf-8"></script>

Super peaceful and relaxing
<a data-flickr-embed="true" href="https://www.flickr.com/photos/140489411@N02/26603664405/in/dateposted-public/" title="image"><img src="https://c6.staticflickr.com/2/1691/26603664405_45c931e313_z.jpg" width="640" height="427" alt="image"></a><script async src="//embedr.flickr.com/assets/client-code.js" charset="utf-8"></script>

The site next to me was occupied by some 20 somethings, chatted with them around breakfast, they were up from Wilmington to camp and hike. Gave some recommendations and was on my way to the Cove!
 
Rolled into the Cover after a rough drive, the Interstate was brutal to drive on and it took a lot longer than I had hoped due to a big accident. Anyway, had a blast with Antman, 4RnRGirl and all the others. I was so glad I went up, anyone that is anywhere near should go up, even if you don't want to hit the trails the camping was a blast. The drive from the Cove to CO was brutal and I did it in two days, but it was worth it and I'd do it again in a heartbeat!

4RnRGirl highcentered
<a data-flickr-embed="true" href="https://www.flickr.com/photos/140489411@N02/26000410053/in/dateposted-public/" title="image"><img src="https://c6.staticflickr.com/2/1462/26000410053_ed07c7dd8c_z.jpg" width="480" height="640" alt="image"></a><script async src="//embedr.flickr.com/assets/client-code.js" charset="utf-8"></script>

My truck next to the legends... Antman
<a data-flickr-embed="true" href="https://www.flickr.com/photos/140489411@N02/26603665585/in/dateposted-public/" title="image"><img src="https://c2.staticflickr.com/2/1705/26603665585_804116fd04_z.jpg" width="640" height="480" alt="image"></a><script async src="//embedr.flickr.com/assets/client-code.js" charset="utf-8"></script>

The line up (minus jstim who decided to take something apart at the wrong time)
<a data-flickr-embed="true" href="https://www.flickr.com/photos/140489411@N02/26537961311/in/dateposted-public/" title="image"><img src="https://c8.staticflickr.com/2/1694/26537961311_95607fcc2d_z.jpg" width="640" height="427" alt="image"></a><script async src="//embedr.flickr.com/assets/client-code.js" charset="utf-8"></script>

Again, totally worth a miserable drive home... wish I could have spent more time there with everyone.
 
It was after the Cove I decided to go ahead with the rear CBI bumper, didn't get the swing out, sometimes I regret that, maybe next time. Did the install myself, hacking off the factory bumper was fun, my friend asked why I was smiling as I cut, it really was fun. Best part is that I had been rear ended during my first year of ownership and the new CBI was paid for by insurance...

What's under there..
<a data-flickr-embed="true" href="https://www.flickr.com/photos/140489411@N02/26603667535/in/dateposted-public/" title="image"><img src="https://c8.staticflickr.com/2/1462/26603667535_3d7655b671_z.jpg" width="640" height="480" alt="image"></a><script async src="//embedr.flickr.com/assets/client-code.js" charset="utf-8"></script>

Finished product
<a data-flickr-embed="true" href="https://www.flickr.com/photos/140489411@N02/26537957991/in/dateposted-public/" title="image"><img src="https://c8.staticflickr.com/2/1647/26537957991_2378a66b93_z.jpg" width="480" height="640" alt="image"></a><script async src="//embedr.flickr.com/assets/client-code.js" charset="utf-8"></script>

Note, I had the rear SAW coils, they were great, until I got the rear bumper, at that point with gear and kids and all I had reverse rake. Swapped them out for Toytec Superflex HD springs, they are perfect and I did it myself so even better!!!
 
I had a leaking rear Bilstein 5100 as well so decided to try the Boss rear shocks, the combo is nice and it does feel more balanced with the front, even compared to how things were before the rear bumper. It's subtle but there is a difference in my opinion.

Leaking shock
<a data-flickr-embed="true" href="https://www.flickr.com/photos/140489411@N02/26537956711/in/dateposted-public/" title="image"><img src="https://c8.staticflickr.com/2/1490/26537956711_9130b56659_z.jpg" width="480" height="640" alt="image"></a><script async src="//embedr.flickr.com/assets/client-code.js" charset="utf-8"></script>

New stuff
<a data-flickr-embed="true" href="https://www.flickr.com/photos/140489411@N02/26537953271/in/dateposted-public/" title="image"><img src="https://c8.staticflickr.com/2/1611/26537953271_991daf7617_z.jpg" width="480" height="640" alt="image"></a><script async src="//embedr.flickr.com/assets/client-code.js" charset="utf-8"></script>
 
Next up, Indel B fridge, I ran the ARB wire kit from the battery to the back and put in a constant on 12v, this has been awesome. The fridge is such a luxury...

Driver sills off, was installing Spod at same time
<a data-flickr-embed="true" href="https://www.flickr.com/photos/140489411@N02/27348742702/in/dateposted-public/" title="P4021008"><img src="https://c7.staticflickr.com/8/7781/27348742702_d6468ea939_z.jpg" width="480" height="640" alt="P4021008"></a><script async src="//embedr.flickr.com/assets/client-code.js" charset="utf-8"></script>

Driver rear sills off, NOTE, you do need to take off the B pillar, it's easy, just take the plastic cover of the seatbelt bolt, unbolt and it pops off like just about every other clip. You shouldn't try to force the wire through, there is a lot of stuff under there.
<a data-flickr-embed="true" href="https://www.flickr.com/photos/140489411@N02/26838727984/in/dateposted-public/" title="P4021009"><img src="https://c1.staticflickr.com/8/7583/26838727984_0f710e2187_z.jpg" width="480" height="640" alt="P4021009"></a><script async src="//embedr.flickr.com/assets/client-code.js" charset="utf-8"></script>

Another second row shot
<a data-flickr-embed="true" href="https://www.flickr.com/photos/140489411@N02/27171473430/in/dateposted-public/" title="P4021010"><img src="https://c7.staticflickr.com/8/7455/27171473430_e3cfa0e77d_z.jpg" width="640" height="480" alt="P4021010"></a><script async src="//embedr.flickr.com/assets/client-code.js" charset="utf-8"></script>

Rear, I used a hole saw to make the hole, used a awl to punch the center for the drill bit, easy peasy. I also soldered the connectors, apparently I am better at soldering than crimping wires I learned!
<a data-flickr-embed="true" href="https://www.flickr.com/photos/140489411@N02/26604320825/in/dateposted-public/" title="P4031015"><img src="https://c2.staticflickr.com/2/1688/26604320825_572a843198_z.jpg" width="640" height="480" alt="P4031015"></a><script async src="//embedr.flickr.com/assets/client-code.js" charset="utf-8"></script>

Done!
<a data-flickr-embed="true" href="https://www.flickr.com/photos/140489411@N02/26604319215/in/dateposted-public/" title="P4051019"><img src="https://c8.staticflickr.com/2/1696/26604319215_6bb79bb0b2_z.jpg" width="640" height="480" alt="P4051019"></a><script async src="//embedr.flickr.com/assets/client-code.js" charset="utf-8"></script>
 
Time running thin and work stuff picking up, I made the simplest and cheapest fridge mount that I could still take in and out for third row access. This also allows accessing one side of the third row if needed for flexibility. Next spring I'll make something better, but it is adequate for now.

<a data-flickr-embed="true" href="https://www.flickr.com/photos/140489411@N02/26604314375/in/dateposted-public/" title="P4231030"><img src="https://c8.staticflickr.com/2/1565/26604314375_9ba347d4db_z.jpg" width="640" height="480" alt="P4231030"></a><script async src="//embedr.flickr.com/assets/client-code.js" charset="utf-8"></script>

All together, I've been off road a couple times and it holds it in place, all I need for now.
<a data-flickr-embed="true" href="https://www.flickr.com/photos/140489411@N02/27447952975/in/dateposted-public/" title="IMG_4929"><img src="https://c8.staticflickr.com/8/7319/27447952975_99d858c07d_z.jpg" width="640" height="480" alt="IMG_4929"></a><script async src="//embedr.flickr.com/assets/client-code.js" charset="utf-8"></script>
 
Next up was the Spod, I SUCK at electrical, and once I got the rear bumper I knew putting new back up lights in it was going to start a squirrels next if I kept going straight off the battery. So since I didn't want to blow anything up, I threw a little money at the problem. Yes there are cheaper ways to do this, but I don't have the time, patience, or skill to do it. So thank you Spod!!!

Mounting it under the hood, easy as it looks, two bolts, used one existing hole and a punch and the supplied self tapping screw for the other side.
<a data-flickr-embed="true" href="https://www.flickr.com/photos/140489411@N02/26604328205/in/dateposted-public/" title="P4021004"><img src="https://c6.staticflickr.com/2/1469/26604328205_b501f6c638_z.jpg" width="640" height="480" alt="P4021004"></a><script async src="//embedr.flickr.com/assets/client-code.js" charset="utf-8"></script>

In, essentially I go the Tacoma unit, I also followed their instructions for running it through the firewall and it was tight but got the wire plug through.
<a data-flickr-embed="true" href="https://www.flickr.com/photos/140489411@N02/26604326175/in/dateposted-public/" title="P4021006"><img src="https://c8.staticflickr.com/2/1661/26604326175_1f6235a80a_z.jpg" width="640" height="480" alt="P4021006"></a><script async src="//embedr.flickr.com/assets/client-code.js" charset="utf-8"></script>

Front rigid lights hooked up since they were already in place
<a data-flickr-embed="true" href="https://www.flickr.com/photos/140489411@N02/26604317755/in/dateposted-public/" title="P4051023"><img src="https://c4.staticflickr.com/2/1648/26604317755_6ba132df01_z.jpg" width="640" height="480" alt="P4051023"></a><script async src="//embedr.flickr.com/assets/client-code.js" charset="utf-8"></script>

Next up switches! The AOB are not great quality, I like the Contura, installing the 3 switch plate was easy, with my dremel!
<a data-flickr-embed="true" href="https://www.flickr.com/photos/140489411@N02/27376210991/in/dateposted-public/" title="IMG_4917"><img src="https://c8.staticflickr.com/8/7338/27376210991_8ba931a986_z.jpg" width="480" height="640" alt="IMG_4917"></a><script async src="//embedr.flickr.com/assets/client-code.js" charset="utf-8"></script>

Upon hooking up and trying to turn on, no juice, this was beyond frustrating but even after troubleshooting with a couple members it didn't work. I called Spod, after some phone tag I spoke with the man himself, John the Spod guy! He walked me through item by item to check only to realize my harness had been assembled backwards, I am NOT an electrical idiot! (well I am but THIS time it wasn't me)
<a data-flickr-embed="true" href="https://www.flickr.com/photos/140489411@N02/26331079180/in/dateposted-public/" title="P4231027"><img src="https://c5.staticflickr.com/2/1467/26331079180_8c0910e1ec_z.jpg" width="640" height="480" alt="P4231027"></a><script async src="//embedr.flickr.com/assets/client-code.js" charset="utf-8"></script>

Picture of AOB switch wired in for testing, note RED does NOT go to RED even though it looks like it in pic, green is ground on the Spod harness.
<a data-flickr-embed="true" href="https://www.flickr.com/photos/140489411@N02/26604313345/in/dateposted-public/" title="P4231032"><img src="https://c2.staticflickr.com/2/1533/26604313345_b0faf01c26_z.jpg" width="640" height="480" alt="P4231032"></a><script async src="//embedr.flickr.com/assets/client-code.js" charset="utf-8"></script>

NOTE: I have zero connections of my added accessories to the factory wiring, the only link is the battery and that's how I like it. Maybe I have nightmares of all the electrical gremlins for my previous trucks but this works for me and other than cutting holes in the dash and such it's all easily reversible. Plus if there is a problem it's easier to isolate, I think, haha.

 
A week or two ago I finally took out my center console and went crazy with my dremel to put a Bearcat 980SSB in... as of now I'm not thrilled with the fit so I need to work on it. Also my SWR is awful, so won't be using the CB until I get all that worked out... anyway a couple shots. Taking out the center console took me like 3 minutes, much easier than you might think.

What's underneath your center console
<a data-flickr-embed="true" href="https://www.flickr.com/photos/140489411@N02/27171464990/in/dateposted-public/" title="P5281039"><img src="https://c7.staticflickr.com/8/7417/27171464990_86ae5d58cf_z.jpg" width="480" height="640" alt="P5281039"></a><script async src="//embedr.flickr.com/assets/client-code.js" charset="utf-8"></script>

Cut this hole... it's ok and holds the Bearcat in place, if I can get SWR I can live with it like this. I can close the console lid with mic attached once I took out the tissue holder thingy
<a data-flickr-embed="true" href="https://www.flickr.com/photos/140489411@N02/26838717894/in/dateposted-public/" title="P5281042"><img src="https://c7.staticflickr.com/8/7397/26838717894_cd8aba9b0c_z.jpg" width="640" height="480" alt="P5281042"></a><script async src="//embedr.flickr.com/assets/client-code.js" charset="utf-8"></script>

In...
<a data-flickr-embed="true" href="https://www.flickr.com/photos/140489411@N02/27376207641/in/dateposted-public/" title="IMG_4964"><img src="https://c2.staticflickr.com/8/7141/27376207641_7150af8e04_z.jpg" width="480" height="640" alt="IMG_4964"></a><script async src="//embedr.flickr.com/assets/client-code.js" charset="utf-8"></script>

Power is from the fuse box behind hood latch, used an add a fuse as documented elsewhere, I think I need to move my ground... we'll see.
 
Latest and greatest was the Awning and Tepui Roof Top Tent, it took a while to mount as I didn't choose wisely in my tightening down order, but it's up and I really like it. With a big road trip starting tomorrow we will see, we've had all four of us in there, it's tight but works, keep in mind both my kids are small, one is 5 and the other about to turn 7 and my wife is only 5'2". We sleep with our daughter perpendicular on an end, it works.

First test, not a bad view!
<a data-flickr-embed="true" href="https://www.flickr.com/photos/140489411@N02/26840484273/in/dateposted-public/" title="IMG_4953"><img src="https://c2.staticflickr.com/8/7425/26840484273_7250c1c66b_z.jpg" width="640" height="480" alt="IMG_4953"></a><script async src="//embedr.flickr.com/assets/client-code.js" charset="utf-8"></script>

Is this a truck or an RV?
<a data-flickr-embed="true" href="https://www.flickr.com/photos/140489411@N02/27413737916/in/dateposted-public/" title="IMG_4966"><img src="https://c5.staticflickr.com/8/7063/27413737916_d198a7dc5f_z.jpg" width="480" height="640" alt="IMG_4966"></a><script async src="//embedr.flickr.com/assets/client-code.js" charset="utf-8"></script>

After setting all that up and building the campfire, a well earned treat!
<a data-flickr-embed="true" href="https://www.flickr.com/photos/140489411@N02/27376203101/in/dateposted-public/" title="IMG_4981"><img src="https://c6.staticflickr.com/8/7674/27376203101_89cb7e04aa_z.jpg" width="640" height="480" alt="IMG_4981"></a><script async src="//embedr.flickr.com/assets/client-code.js" charset="utf-8"></script>

The kids love it!
<a data-flickr-embed="true" href="https://www.flickr.com/photos/140489411@N02/26840470563/in/dateposted-public/" title="IMG_4975"><img src="https://c4.staticflickr.com/8/7402/26840470563_93c77f212f_z.jpg" width="480" height="640" alt="IMG_4975"></a><script async src="//embedr.flickr.com/assets/client-code.js" charset="utf-8"></script>
 
Ok, that should be the highlights for now... I'll go back an edit a few things later, add some links and fix the spelling errors, haha. For now gotta go finish packing for my trip! Now I have a thread to post this stuff too and well, anything I didn't post about or a pic of has probably been covered by someone else anyway!
 
Last edited:
Yes, yes, I deserved that... I just need more local friends that like to mod and drink beer, it's sitting in my garage!

You gotta cut me some slack though I'm trying to build a thread covering the last 5 years in like two days!

:bolt:

Ha-ha-ha, you know I couldn't let that slide :fencing:, it's all good buddy!


Love the build thread marathon, great job.
 
Ha-ha-ha, you know I couldn't let that slide :fencing:, it's all good buddy!


Love the build thread marathon, great job.

Of course... :flamewar:

Yeah and honestly I am still mad at myself for not having finished the light bar and compressor install by now. This trip was the goal to have all the stuff sitting in my garage done. A month ago when I had it laid out to do p, luck just didn't go my way, my old Dremel died and my main ratchet even stopped working. In that two week period I got one of the 5 projects done I had planned, such is life.
 
Of course... :flamewar:

Yeah and honestly I am still mad at myself for not having finished the light bar and compressor install by now. This trip was the goal to have all the stuff sitting in my garage done. A month ago when I had it laid out to do p, luck just didn't go my way, my old Dremel died and my main ratchet even stopped working. In that two week period I got one of the 5 projects done I had planned, such is life.

Don't beat yourself up, can look forward to finishing upon your return.

Enjoy your trip and have a great time!!!!!!!!! :cheers:
 
A few last minute essentials for camping... [MENTION=65614]Antman[/MENTION]
 

Attachments

  • image.jpg
    image.jpg
    123.2 KB · Views: 1,539
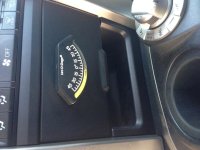
Last minute mod, bought this thing when I ordered the RTT, then I saw someone else mounted the same thing in this spot. Can't remember who to give them credit, door functions perfectly though! Edit: I'm testing it with the truck on the side, must be defective. Or maybe my pic is sideways, haha
 

Attachments

  • image.jpg
    image.jpg
    137.2 KB · Views: 1,502
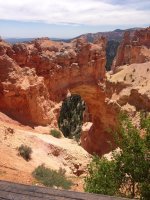
Drove past this today... Well into my road trip, having great adventures, more when time and Internet allows...
 

Attachments

  • image.jpg
    image.jpg
    138.9 KB · Views: 1,497
Ok, as with the rest of this thread I'm going to hammer through the pics and background of the trip I just completed. We drove from Colorado to San Diego via Utah and Nevada and returned through Arizona and SW Colorado, total trip was 2814.8 miles, according to the car I averaged 16MPG's. Keep in mind that is loaded to the gills, with RTT, Awning and Hilift on the top. With all of us and the stuff and the armor I would guess the truck is 6500lbs and I FELT it!!!

Anyway in 18 days we covered...

Capital Reef NP
Bryce Canyon NP
Zion NP
Big Bear Lake
San Diego Zoo
Sea World
Legoland (9 hrs... 9 HOURS... father of the year here!)
A record breaking hot day in Phx
Grand Canyon NP
Four Corners (LAME!)
Great Sand Dunes (CO)

This was not a camping trip, nor an offroading trip even though both were incorporated, I guess it's Overlanding, however you might define that. My wife made so many Griswald Summer vacation references it was hilarious.

Most importantly the 4runner performed flawless, at 80mph, down country lanes, off road, 120 degree heat, etc.
 

Members online

No members online now.

Forum statistics

Threads
278,316
Messages
3,554,120
Members
248,016
Latest member
Advally Service

Trending content

Back
Top