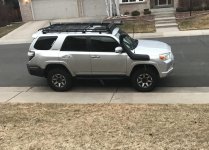
Jhalko's 2011 Limited build/travel thread

Next up, Indel B fridge, I ran the ARB wire kit from the battery to the back and put in a constant on 12v, this has been awesome. The fridge is such a luxury...

Driver sills off, was installing Spod at same time
<a data-flickr-embed="true" href="https://www.flickr.com/photos/140489411@N02/27348742702/in/dateposted-public/" title="P4021008"><img src="https://c7.staticflickr.com/8/7781/27348742702_d6468ea939_z.jpg" width="480" height="640" alt="P4021008"></a><script async src="//embedr.flickr.com/assets/client-code.js" charset="utf-8"></script>

Driver rear sills off, NOTE, you do need to take off the B pillar, it's easy, just take the plastic cover of the seatbelt bolt, unbolt and it pops off like just about every other clip. You shouldn't try to force the wire through, there is a lot of stuff under there.
<a data-flickr-embed="true" href="https://www.flickr.com/photos/140489411@N02/26838727984/in/dateposted-public/" title="P4021009"><img src="https://c1.staticflickr.com/8/7583/26838727984_0f710e2187_z.jpg" width="480" height="640" alt="P4021009"></a><script async src="//embedr.flickr.com/assets/client-code.js" charset="utf-8"></script>

Another second row shot
<a data-flickr-embed="true" href="https://www.flickr.com/photos/140489411@N02/27171473430/in/dateposted-public/" title="P4021010"><img src="https://c7.staticflickr.com/8/7455/27171473430_e3cfa0e77d_z.jpg" width="640" height="480" alt="P4021010"></a><script async src="//embedr.flickr.com/assets/client-code.js" charset="utf-8"></script>

Rear, I used a hole saw to make the hole, used a awl to punch the center for the drill bit, easy peasy. I also soldered the connectors, apparently I am better at soldering than crimping wires I learned!
<a data-flickr-embed="true" href="https://www.flickr.com/photos/140489411@N02/26604320825/in/dateposted-public/" title="P4031015"><img src="https://c2.staticflickr.com/2/1688/26604320825_572a843198_z.jpg" width="640" height="480" alt="P4031015"></a><script async src="//embedr.flickr.com/assets/client-code.js" charset="utf-8"></script>

Done!
<a data-flickr-embed="true" href="https://www.flickr.com/photos/140489411@N02/26604319215/in/dateposted-public/" title="P4051019"><img src="https://c8.staticflickr.com/2/1696/26604319215_6bb79bb0b2_z.jpg" width="640" height="480" alt="P4051019"></a><script async src="//embedr.flickr.com/assets/client-code.js" charset="utf-8"></script>

Thanks for the pics on how to route your fridge wiring. I wired my ARB fridge with ARB wiring harness following the same route.

37qt ARB fridge installed in my 2015 4Runner Limited. Wired with 12 gauge wire from the battery to the fridge with the ARB wiring harness. The ARB has battery protection which keeps it from draining my starting battery. The cargo cover behind the second row seat shields it from the hot sun.


62198740_1398351413638064_2232793659982479360_n.jpg
 
Thanks for the pics on how to route your fridge wiring. I wired my ARB fridge with ARB wiring harness following the same route.

37qt ARB fridge installed in my 2015 4Runner Limited. Wired with 12 gauge wire from the battery to the fridge with the ARB wiring harness. The ARB has battery protection which keeps it from draining my starting battery. The cargo cover behind the second row seat shields it from the hot sun.
It looks great in there, glad my pics were helpful. Now you get to enjoy the fridge! I assume you got the new battery? You were getting a batteries plus deep cycle right?
 
Big updates coming here in the next couple months...

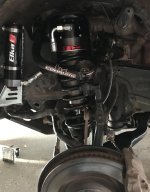
Hidden winch plate, winch, new rear springs, some other small stuff, and a complete remote resi Elka suspension with compression adjusters!!! Also started trailer shopping...

:boom:


About 100,000 miles on my Toytec Boss coilovers. No one could complain about that! :

:usa2:
 
Big updates coming here in the next couple months...

Hidden winch plate, winch, new rear springs, some other small stuff, and a complete remote resi Elka suspension with compression adjusters!!! Also started trailer shopping...

:boom:


About 100,000 miles on my Toytec Boss coilovers. No one could complain about that! :

:usa2:

Damn! You win the lottery?
 
Damn! You win the lottery?

Group buy on suspension just in the nick of time! The other stuff I have accumulated over the summer. Not sure if we will pull the trigger on a trailer, I’m out of space and need to do something. Cheaper than a bigger vehicle, haha! Sadly now I have to install it all when the suspension comes in, yuck.
 
Group buy on suspension just in the nick of time! The other stuff I have accumulated over the summer. Not sure if we will pull the trigger on a trailer, I’m out of space and need to do something. Cheaper than a bigger vehicle, haha! Sadly now I have to install it all when the suspension comes in, yuck.

If you need a hand let me know. I'd be happy to stop by, drink your beer, provide some worthless anecdotal advice, and bail out before the jobs done.
Just kidding, I'd be happy to help. An extra floor jack and jack stands never hurt.
 
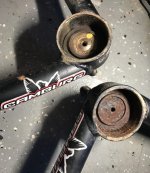
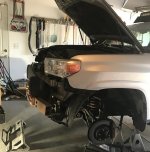
Truck is apart... after thinking we’d get the new Elka suspension in easily we found quite of bit of wear on stuff in the front end. So more parts ordered and hopefully I’ll get it all done next week. Winch, new suspension, rebuilding UCA’s, replacing LCA’s, a few random other items as well.
 

Attachments

  • 20A10D6C-812D-44BC-AF2A-CD1FC8FAB9A4.jpg
    20A10D6C-812D-44BC-AF2A-CD1FC8FAB9A4.jpg
    121.7 KB · Views: 539
You want to see what abuse and neglect do to a UCA ball joint...
 

Attachments

  • 9B7B2CF5-3990-482E-B6B5-C424C4C9F169.jpg
    9B7B2CF5-3990-482E-B6B5-C424C4C9F169.jpg
    125.3 KB · Views: 509
Suspension is done and truck is driving straight. What a PITA this project was. I’ll compile everything and post it up next week, given the age of my truck I’m sure others will hit some of the issues I did. New suspension is riding nice, I’ll discuss that after I get more miles on it. So happy to be driving the truck again... this beats by 3 day snorkel install with almost a 3 weeks to get the suspension start to finish. :ranger:
 

Attachments

  • C1717BBC-0751-4968-A407-22D51BAE71FD.jpg
    C1717BBC-0751-4968-A407-22D51BAE71FD.jpg
    134.7 KB · Views: 484
I ended up swapping out Camburg UCA for SPC to get able to get enough caster and align it. PITA.
 

Attachments

  • 1EB00380-51A0-40E8-89B4-21A3AA02D270.jpg
    1EB00380-51A0-40E8-89B4-21A3AA02D270.jpg
    122.8 KB · Views: 433
Was it the age of the Camburgs or can they simply not provide enough adjustment?

They have some extra caster but not enough. I had stock UCA’s when the Boss suspension went in and it was at the low end of range for caster with about 2 1/4” of lift, I added Camburgs a little later and got more. With just a little more lift on the front the Camburgs just didn’t have enough, they looked solid though after clean up considering 5-7 years of use and mag chloride here in CO. Which was frustrating since I just rebuilt them and all the time I spent cleaning them up. :der:

Knowing I’ve got some more weight changes coming for the front (battery/electrical wise) I needed the flexibility if I need to adjust things. :couch2:
 

Members online

No members online now.

Forum statistics

Threads
278,316
Messages
3,554,120
Members
248,016
Latest member
Advally Service

Trending content

Back
Top