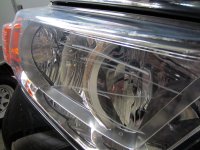
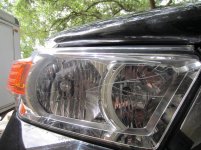
Just badly scratched my headlight lens

:dammit:

Was using the windshield washer from the gas station today and didn't realize it was broken under the pad...the thing was missing a screw. Is there any way to get out a scratch this bad?? I have a headlight lens restoration kit, but it is only for surface stuff and fog, etc.

IMG_0285.jpg

IMG_0286.jpg
 

Attachments

  • IMG_0285.jpg
    IMG_0285.jpg
    138.4 KB · Views: 44,311
  • IMG_0286.jpg
    IMG_0286.jpg
    144.5 KB · Views: 35,977
Register to hide this ad
I think you should go clean the gas station's window with that washer. Ouch.

I would use this as an excuse to swap in trail headlights.
 
Trail headlight HIDS

Some of you guys really help out around here with this type of advice don't you. :ybrick:

I can't tell by the pictures how deep the scratch really is, but here is how you can attempt to fix it before having to buy a new headlight housing. Go to an auto store and buy a sheet of each of these grit sandpaper:
220 grit 3M wet/dry
400 grit 3M wet/dry
600 grit 3M wet/dry

And
Heavy cut compound.
Cleaner wax.

First thing you want to do is fold each sheet as you get ready to use it in half. Fold it several times to make a good crease and then tear it along the crease. You then take that half and fold it into thirds and leave it folded to use. This will effectively take one full sheet and give you six smaller sanding surfaces that are small enough to use in the area you are sanding.

Next step is get a bucket with clear water and a few rags. Now you are ready to begin.

Start with the 220 grit. Drop it down in the bucket to get it good and wet and start sanding ACROSS (perpendicular) to the scratch. You are really going to scratch the $hit out of your lens but don't worry: It's already scratched. According to your pics only the "face" of the headlamp lens is scratched so this is the only place you will have to sand. Continue to sand with 220 until you cannot catch your fingernail on the scratch. Use a wet rag to wipe off periodically to check your progress. Getting the white residue that will run down onto the paint is no big deal. It will wipe off with a wet rag.

Now move to 400 grit. Using the same process you are now going to sand across the grain of the scratches you made with the 220 paper using the bucket and water method outlined above. You will notice the scratches are getting smaller. Again use wet rag to check progress. You will know you are through with this step when all your scratches are running along the plane you are using with your 400 paper.

Next go to 600 grit paper ussing the wet method. Again, go across the grain of the 400 grit scratches. You will see the scratches getting even finer. When you are through with this step your headlight should look hazy. You now have two choices: You can go with your headlight restorer kit OR you can get some heavy cut compound and proceed to the next step.

I would use the heavy cut compound to "polish" the lens to where it is clear with just some hazing. Next I would use the cleaner wax to polish it out completely.

As I said, I do not know how deep your scratches are. I know what I wrote above sounds time consuming but It should only take 30 minutes or so from start to finish, depending on how deep the initial scratch was. Just remember not to go deeper than necessary on each step or it will take you longer. You are just trying to get rid of the scratches you created on the previous step.

Good luck, and even if you eventually have to buy a new headlight assembly you have just learned how to get rid of scratches on your 4Runner's painted surfaces if they are only on the clearcoat. Don't start with 220 there though lol start with 600!

 
^ that's all very good advice. I usually put a small drop of dish soap in my water when wetsanding. helps lubricate.
 
having cleaned up a big acrylic fish tank or 2 (ok, more like 10) in my life, I can say that you can use the advice 1engineer posted with 100% confidence. You can then look into Novus with 1k, 2k, and 3k. By the time you get to 3k you'll be good as new. With a small area, it won't be too bad.

Currently, I've got a 375g I put in wall and a 125g sump for filtration. I have other tanks, but that's the only acrylic one.
 
I would drop a few dollars on a 3m headlight restoration kit, which should take that out easily with a power drill.

Only problem is once you've polished you've now taken off the clear coat, so you'll have to apply a sealant or protectant every so often (which is a good idea anyway to prevent them from yellowing).
 
My 1st step would be to contact the gas station, they should pay for it. If they are providing a service for you to use they are responsible for making sure that service does not damage your vehicle. Obviously if you used their service in an improper way they will not cover it, but if showed them the screw doing the damage when used properly their insurance company should covers your cost for repair. If you walked out without saying anything then the chances of this working are about 1%, hopefully you brought it to someone attention inside before you left (not to mention so they could remove it before the guy behind you does the same thing!).
 
Thanks Everybody for encouraging me to splurge on TE HID retrofit...today I just put carbon fiber wrap over all of my chrome strips on all four sides. While doing this, I really badly felt the urge to purchase TE headlights and do a HID retrofit...thanks to you all now I might have to do that...douh!

My 1st step would be to contact the gas station, they should pay for it. If they are providing a service for you to use they are responsible for making sure that service does not damage your vehicle. Obviously if you used their service in an improper way they will not cover it, but if showed them the screw doing the damage when used properly their insurance company should covers your cost for repair. If you walked out without saying anything then the chances of this working are about 1%, hopefully you brought it to someone attention inside before you left (not to mention so they could remove it before the guy behind you does the same thing!).

I was in a huge hurry...and it is a station that sells 100% 89 octane fuel, offering a decent price point...so I probably won't try to make any claims...but I just went in there with the wet window wiper tool, splattered it on the counter, told her it effed up my headlight and showed her why, and she said "well it isn't for headlights"...I almost exploded, and then my phone rang with an important call and I just left (blessing in disguise because I probably would have gotten real nasty). Later on today I used a headlight restore kit that I already had in the garage, just to see if it would work, and it did a little. I think using your suggestion may indeed work since it uses more aggressive paper to get deeper...I just wasn't sure about getting more aggressive...now thanks to you...I just may try that! Thanks! This forum rules!
 
Whatever you do to remedy this situation, I would recommend installing a clear headlight film over the lenses. That's what I have done on mine to prevent as much damage as possible.
 

Members online

No members online now.

Forum statistics

Threads
278,316
Messages
3,554,114
Members
248,016
Latest member
Advally Service

Trending content

Back
Top