Some of you guys really help out around here with this type of advice don't you. :ybrick:
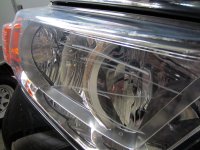
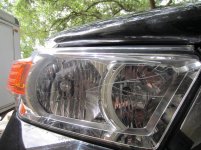
I can't tell by the pictures how deep the scratch really is, but here is how you can attempt to fix it before having to buy a new headlight housing. Go to an auto store and buy a sheet of each of these grit sandpaper:
220 grit 3M wet/dry
400 grit 3M wet/dry
600 grit 3M wet/dry
And
Heavy cut compound.
Cleaner wax.
First thing you want to do is fold each sheet as you get ready to use it in half. Fold it several times to make a good crease and then tear it along the crease. You then take that half and fold it into thirds and leave it folded to use. This will effectively take one full sheet and give you six smaller sanding surfaces that are small enough to use in the area you are sanding.
Next step is get a bucket with clear water and a few rags. Now you are ready to begin.
Start with the 220 grit. Drop it down in the bucket to get it good and wet and start sanding ACROSS (perpendicular) to the scratch. You are really going to scratch the $hit out of your lens but don't worry: It's already scratched. According to your pics only the "face" of the headlamp lens is scratched so this is the only place you will have to sand. Continue to sand with 220 until you cannot catch your fingernail on the scratch. Use a wet rag to wipe off periodically to check your progress. Getting the white residue that will run down onto the paint is no big deal. It will wipe off with a wet rag.
Now move to 400 grit. Using the same process you are now going to sand across the grain of the scratches you made with the 220 paper using the bucket and water method outlined above. You will notice the scratches are getting smaller. Again use wet rag to check progress. You will know you are through with this step when all your scratches are running along the plane you are using with your 400 paper.
Next go to 600 grit paper ussing the wet method. Again, go across the grain of the 400 grit scratches. You will see the scratches getting even finer. When you are through with this step your headlight should look hazy. You now have two choices: You can go with your headlight restorer kit OR you can get some heavy cut compound and proceed to the next step.
I would use the heavy cut compound to "polish" the lens to where it is clear with just some hazing. Next I would use the cleaner wax to polish it out completely.
As I said, I do not know how deep your scratches are. I know what I wrote above sounds time consuming but It should only take 30 minutes or so from start to finish, depending on how deep the initial scratch was. Just remember not to go deeper than necessary on each step or it will take you longer. You are just trying to get rid of the scratches you created on the previous step.
Good luck, and even if you eventually have to buy a new headlight assembly you have just learned how to get rid of scratches on your 4Runner's painted surfaces if they are only on the clearcoat. Don't start with 220 there though lol start with 600!






 I hate when that kind of stuff happens....


