LFX_T4R
New member
So, some of you might know me from the Facebook group or from me buying your stuff, or maybe just because someone you know in the community was talking about this pretty cool contraption that Andrew Keisler over at Keisler Automation and I put together throughout 2019 and now into 2020. This picture is the most recent photo I have of the vehicle, and some recent swap photos after that, but I'll get into the overview of the vehicle and try to answer some of those "why?"s ahead of time.
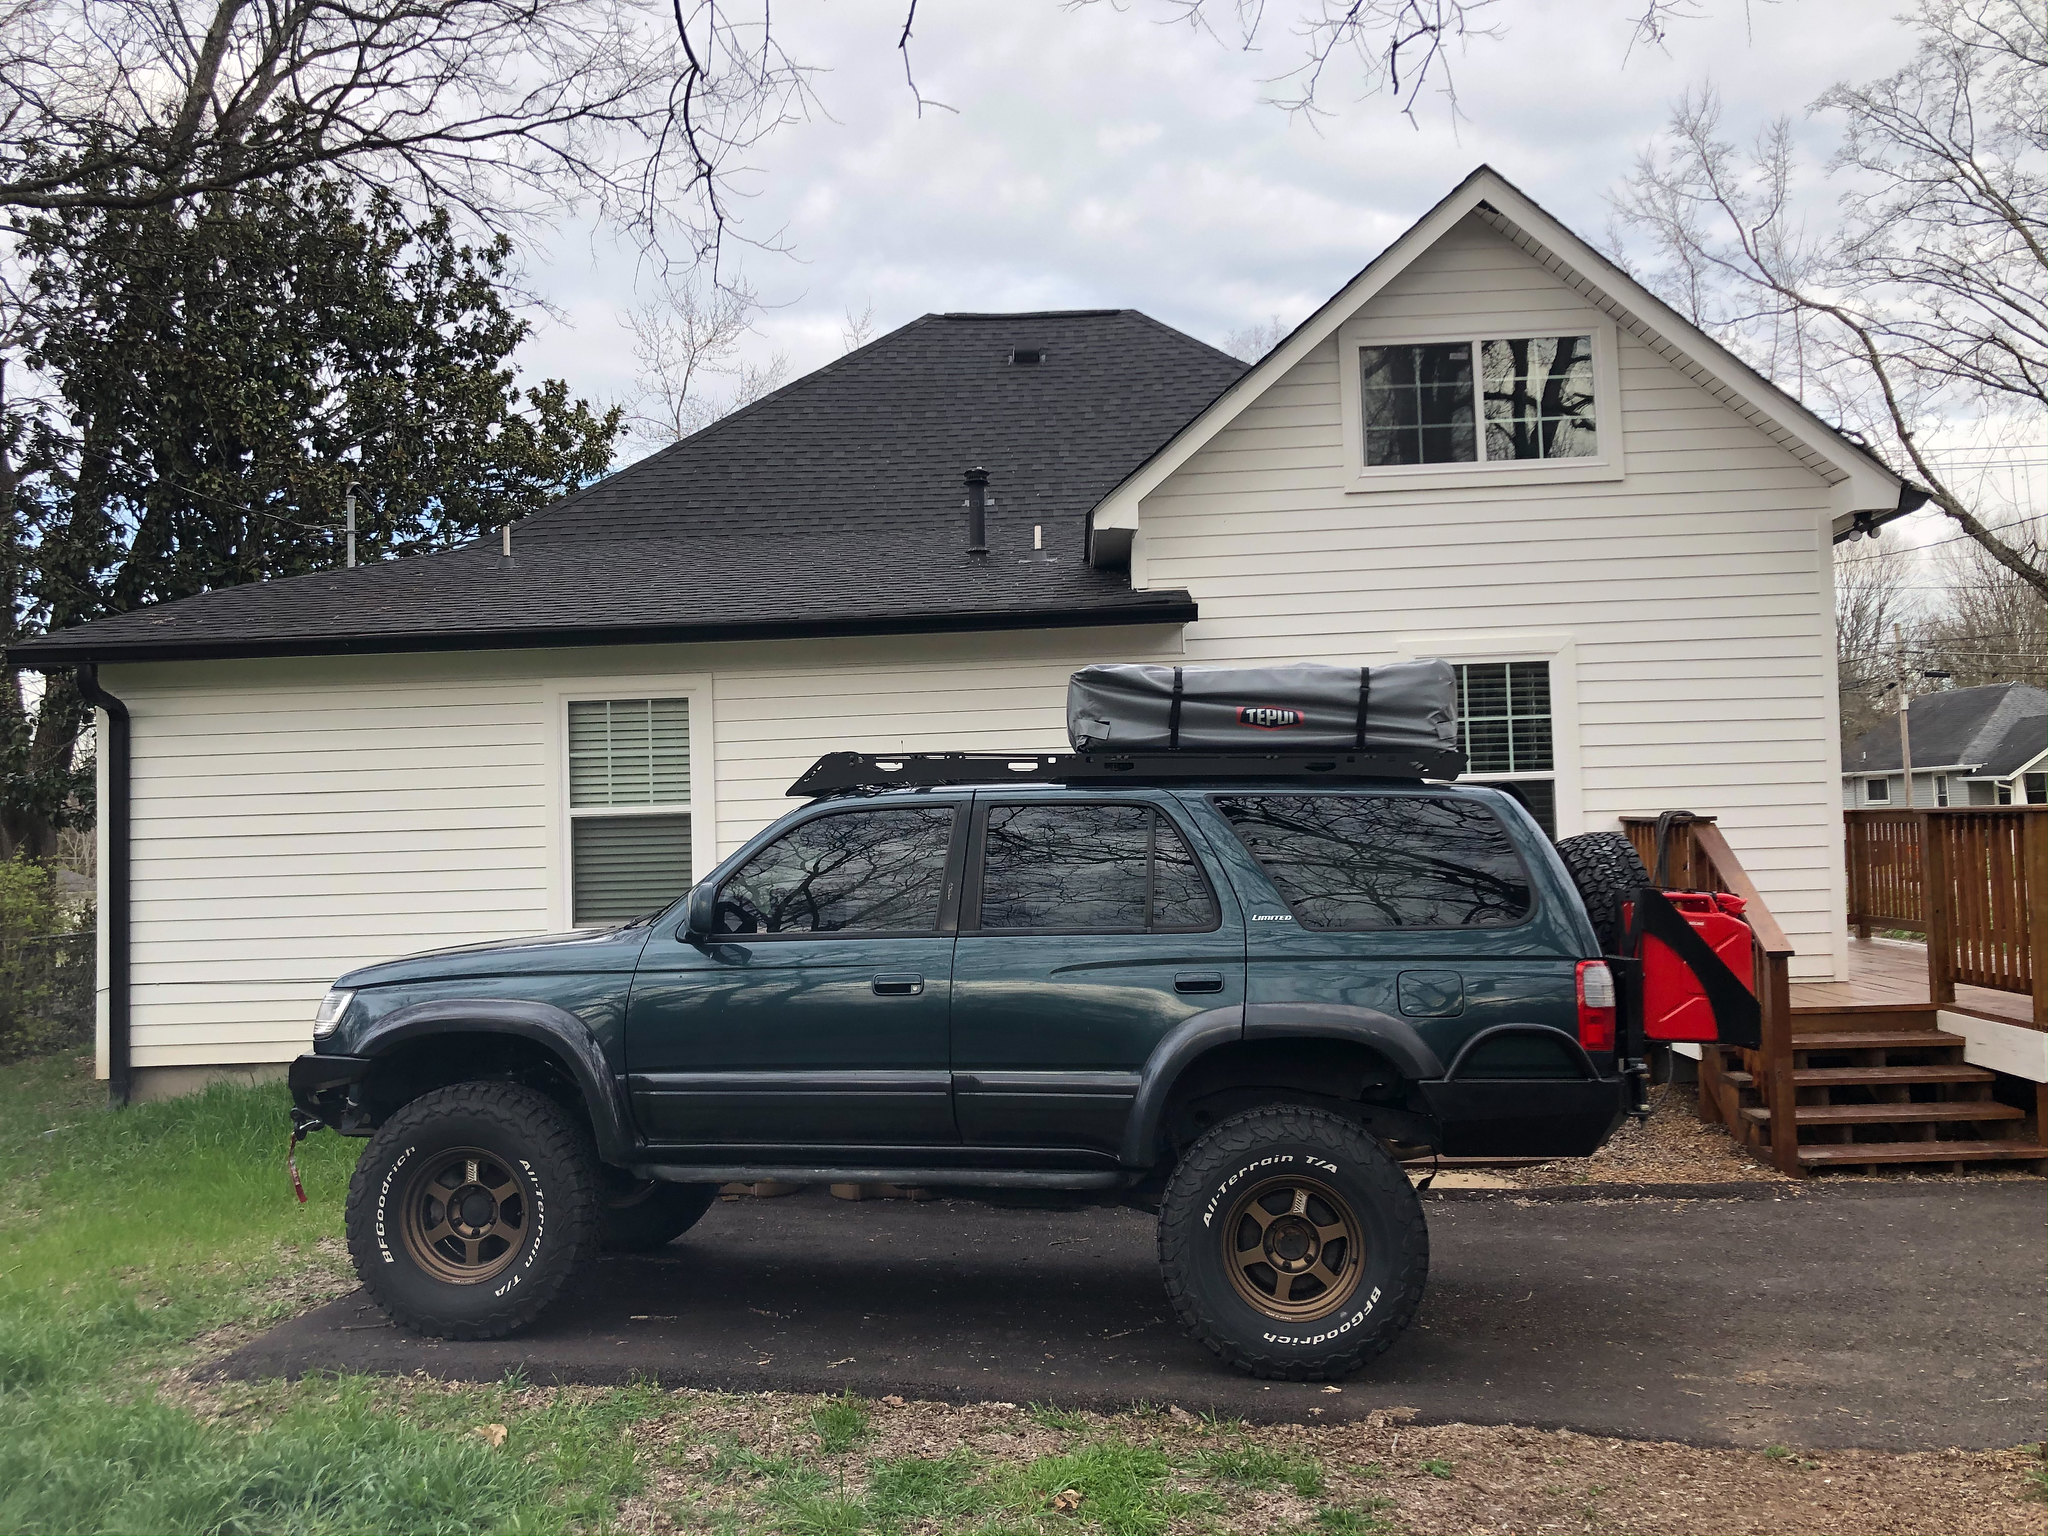 IMG_3716 by LFX T4R, on Flickr
Overall Build List:
Now, for the swap. Why would you do that? "It's a toyota, man-- swap the 4.7 in it! Bro, you could have 1 tons or long travel for that kind of money. Bro please bro :cry2: "
Yes-- it's a Toyota. Yes, I could have LT or Danas for that kind of money. I didn't build this for instagram clout or really any other reason than I really wanted to set out a plan to build a platform up enough to "comfortably" overland from Alaska to Argentina. This is not a rock bouncer build, hate to disappoint you guys. I built this to be efficient, easy to maintain, and a very capable (but not something I wanna destroy every weekend at the local offroad park) vehicle. (and it will still get that long travel kit that it wants, just not at this particular COVID moment).
Why would you choose the LFX over the 4.7 UZ?
Well, this answer is actually quite simple. I have Keisler Automation in my corner and when Drew comes to you with a suggestion that might seem odd at first, you listen. He's been swapping the LFX into Rx8's in racing applications as a replacement for the poor performing OE rotaries, so when I asked him "Man, what do you think the best swap for a dedicated overlander would be?" his answer was simple-- the 3.6L General Motors LFX.
Aside from Drew being one of the most hardworking dudes I know, he's completely self-taught which requires a special kind of brilliance (or evil genius) when you're taking on a task like this. Newer swaps (even at a communications protocol level, think CAN vs Modbus etc) are an absolute nightmare if you're merging older standards with new. This is typically the reason that folks stick with the 4.7. However, given the R&D that he's invested in the Rx8 swaps (Mazda to GM in that case) we felt comfortable with our local connections to the GM dealer (this is a must have) to continue down the path.
The main difference between the two, obviously, is that the 4.7L is a V8 and the 3.6L is a high-feature V6. Also, I should probably mention that KA has dyno'd a few similarly set up Rx8s and we estimate that we're somewhere between ~360-70hp/290-300tq. Shoutout to Fastech, the best tuner in TN, for throwing a tune at this contraption
LFX Overview
BONUS REASONS
1.) My fuel economy tests are still on-going but so far I'm averaging 17-19MPG with a full load (tent, recovery gear, armor, people, etc) but haven't gotten on a scale to tell you what my current weight load on a daily basis/trip basis is. I actually have a friend that just bought some corner scales so I might go over there and corner balance it for no other reason than to be a PITA and say I did it.
2.) I saved a ton of room in the engine bay. I can comfortably fit a compressor + my spare battery and winch controller with no problems whatsoever. You do not have this luxury with a 4.7. With the limited space in the cargo area of our smaller, prettier 3rd gens (sorry 5T4Rs, y'all drive tanks) this was a huge factor for me. I didn't want to pick between having to mount a compressor in the rear panel area or throwing a big marine battery back there for my electronics.
3.) Overall weight. Drew and I's initial estimates (with his revamped exhaust manifold design & engine mount set up) were somewhere near 300lbs in weight savings over the front axle. It was enough weight savings that I had to swap front springs twice because I thought I'd need heavy duty due to winch/bumper, but I didn't, and it was sky-jacked lmao.
4.) EXTREMELY HIGH AVAILABILITY AND EXTREMELY LOW MILEAGE RESULTS IN EXTREME SAVINGS: What I mean by this is that GM figured out somewhere along the line that they really nailed the design on this motor, and then they were smart enough to mass produce it and throw it in 13+ different chassis platforms. I got my 20k mile drivetrain (engine and trans) for like 3k total. If I blew this motor up tomorrow, I could walk to the nearest Pull-a-part and find one of those fleet colorados from Advanced Auto with 20-80k miles on it for 500-1300$. I could do this anywhere in the US, because again, this motor is literally everywhere. They even twin turbo'd it in the new Caddy ATS-Vs (the LF4).
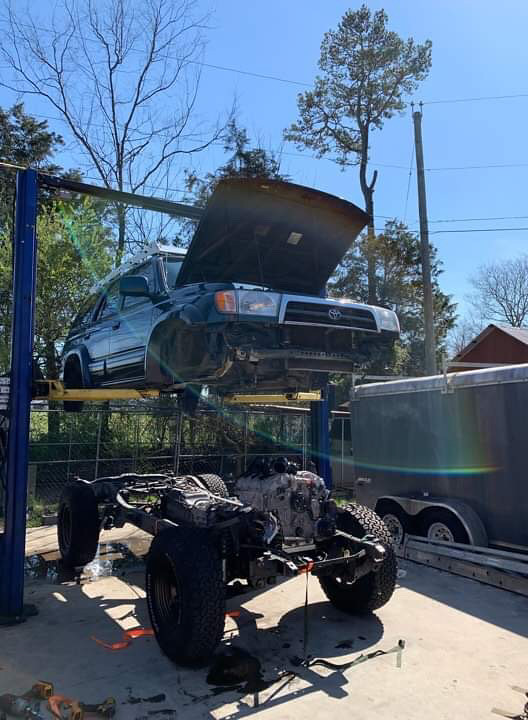
Here's some pics of the drivetrain!
 IMG_2094 by LFX T4R, on Flickr
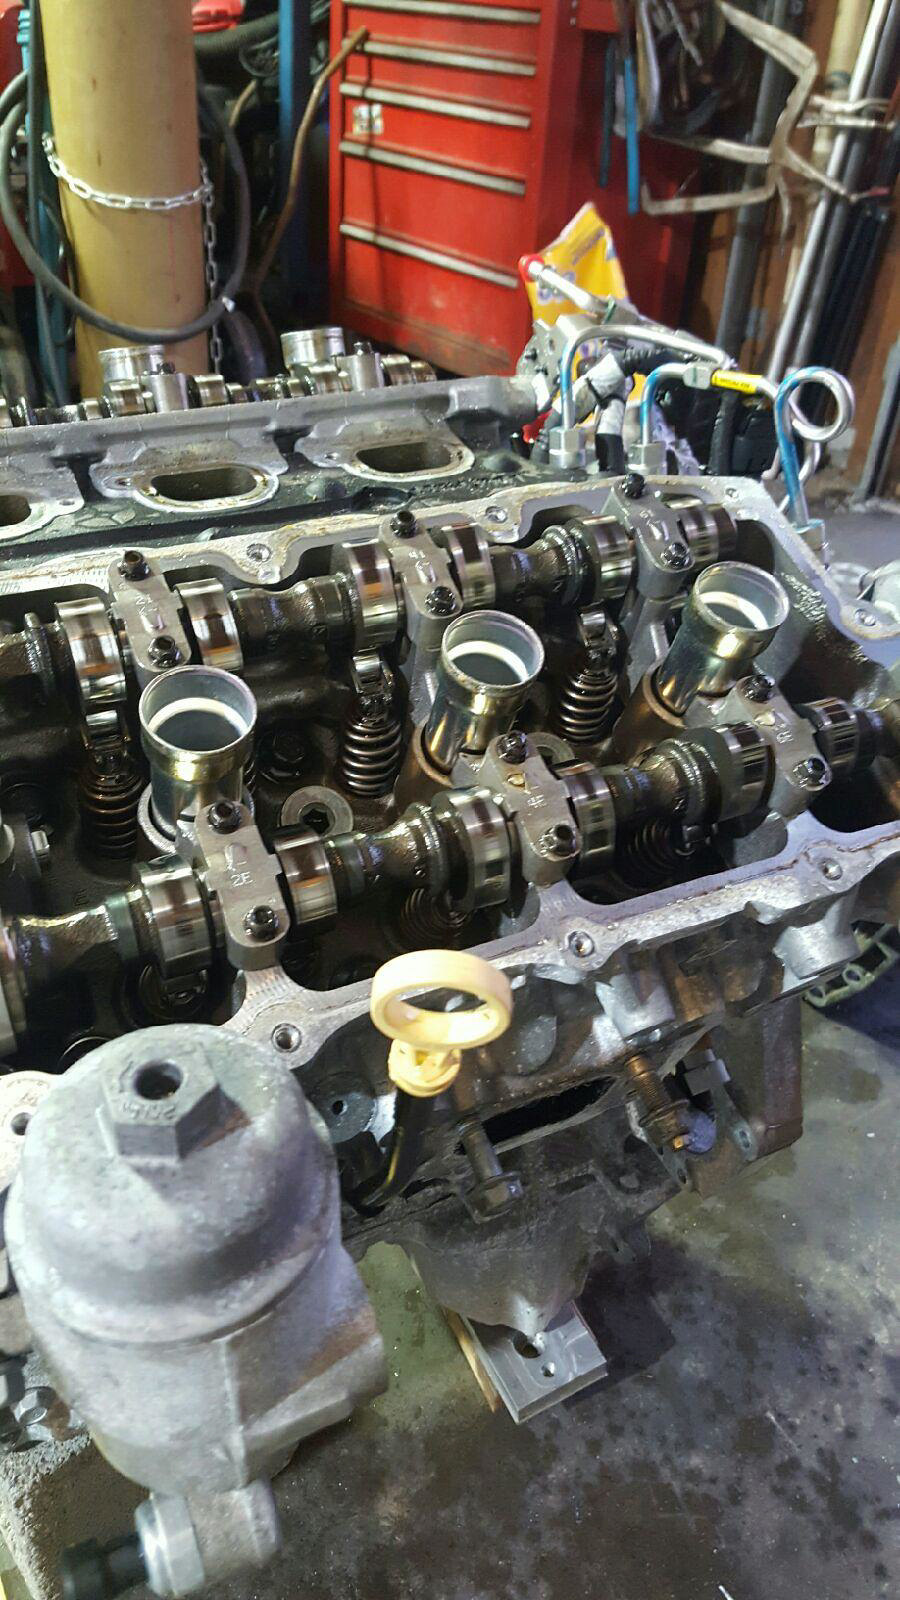 IMG_2093 by LFX T4R, on Flickr
 IMG_2098 by LFX T4R, on Flickr
 IMG_2101 by LFX T4R, on Flickr
Okay, I know why you chose that platform now. How did you do it?
Well, as I mentioned before, although this is a new chassis for this powerplant to be thrown on, Keisler Automation (KA for the rest of this thread) has been doing this for awhile on the Mazdas. https://www.keislerautomation.com/ has lots of product guides and photos on specific components, but I'll start by highlighting the things that are required for this swap to perform as advertised.
Wiring Highlights
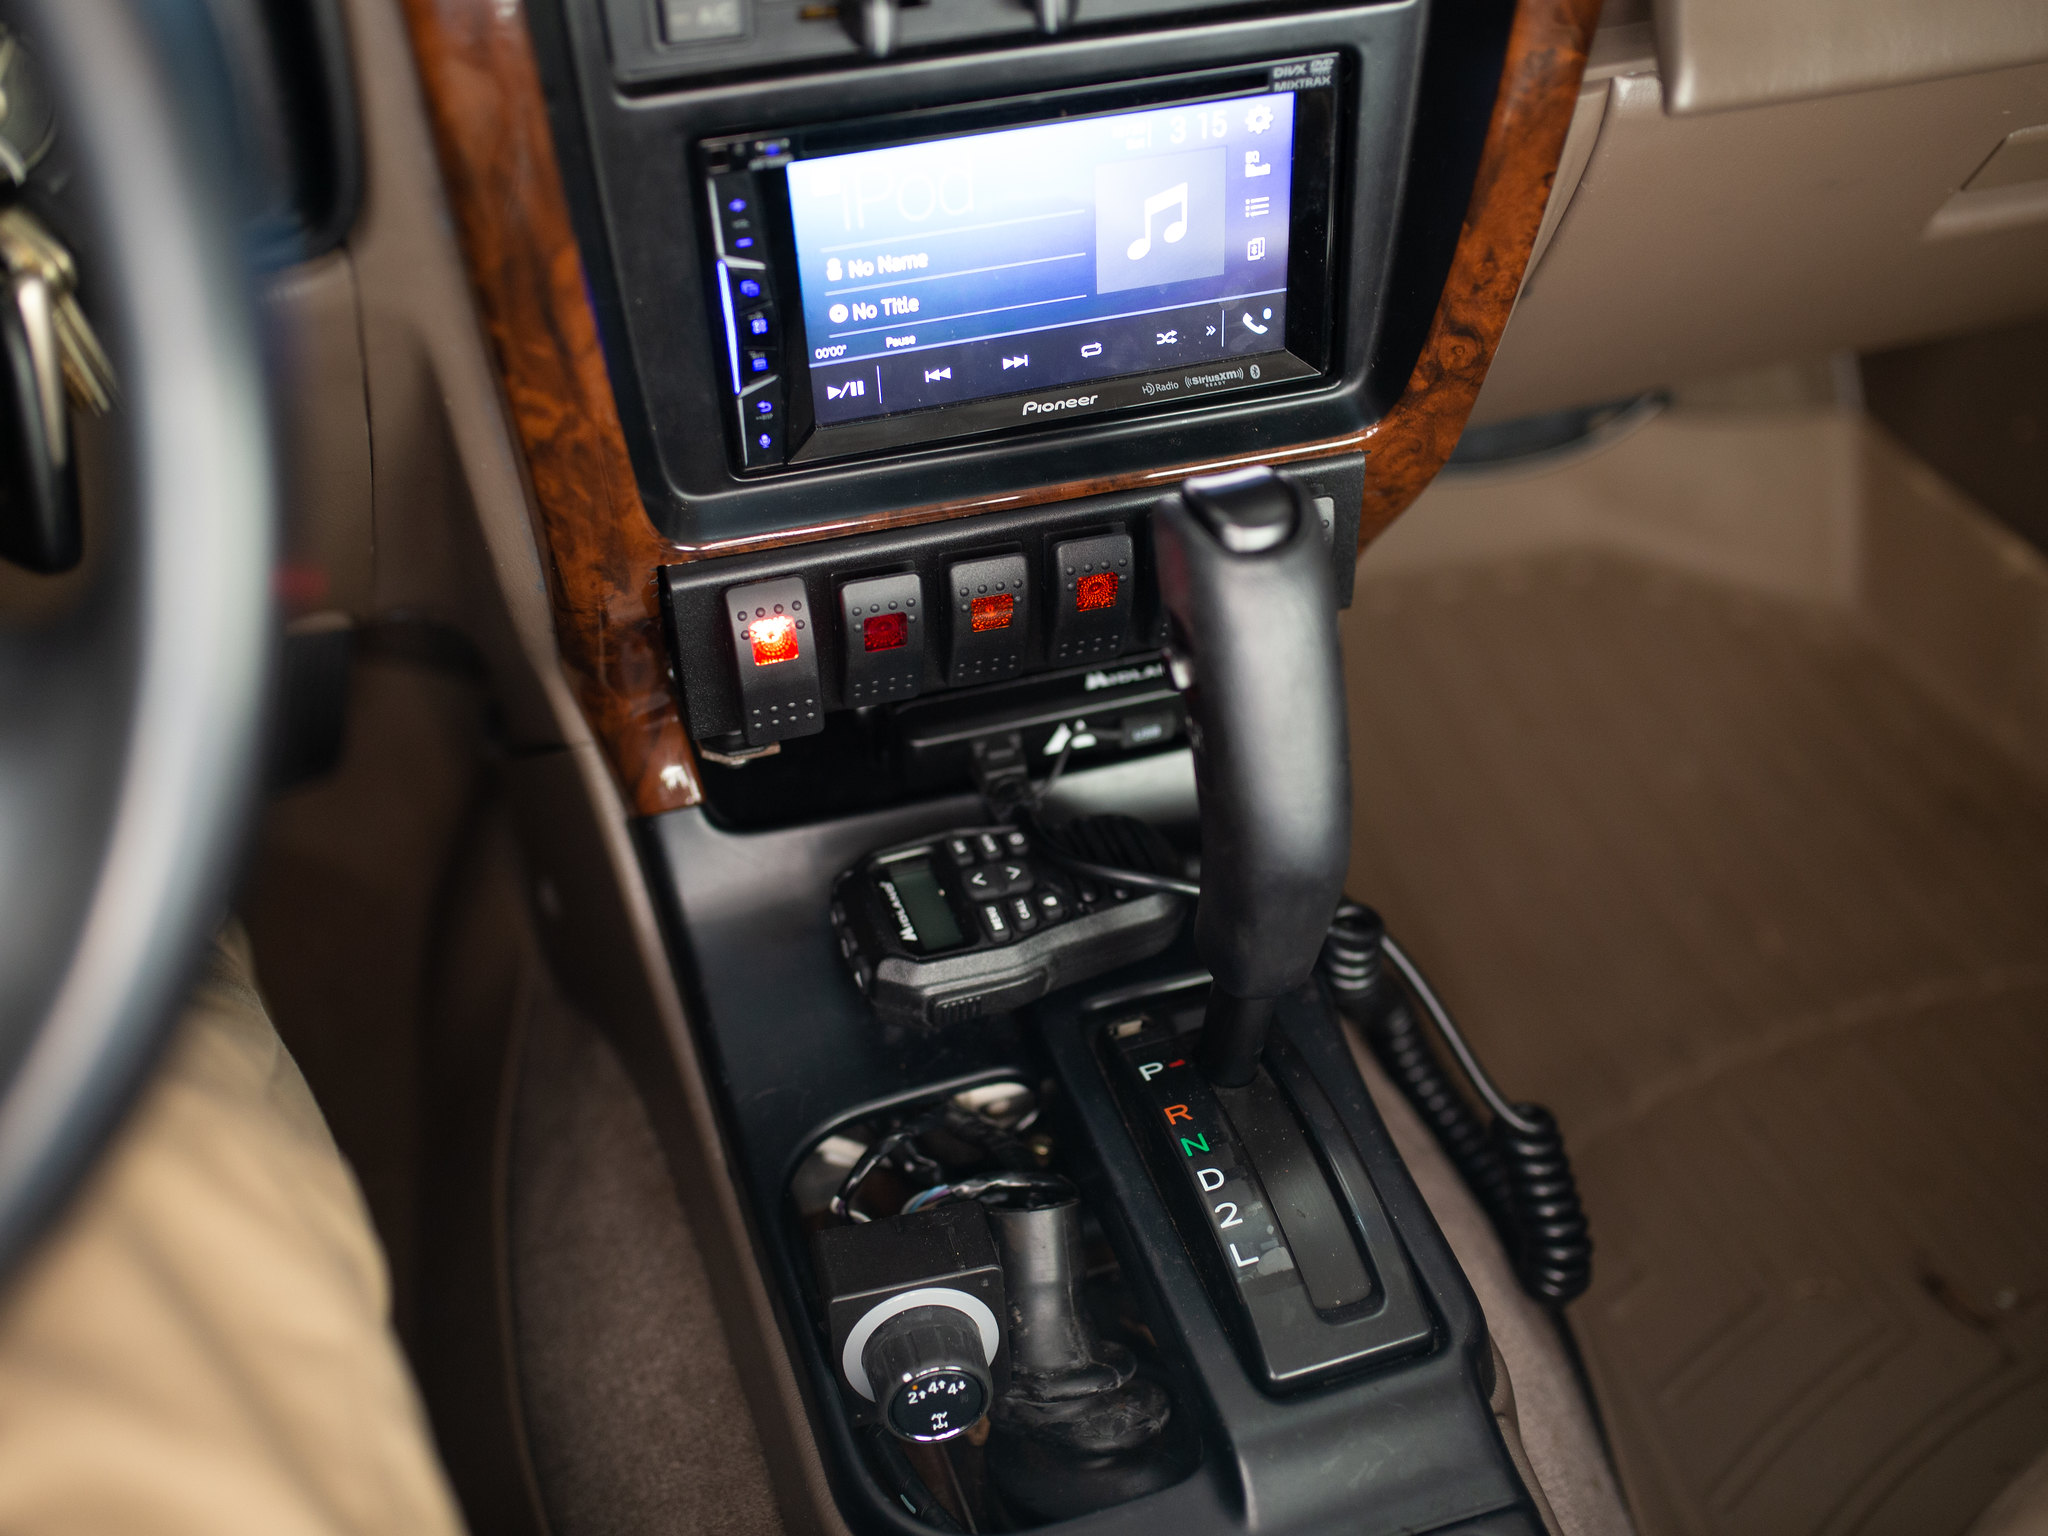
My J-shift went away because the transmission is like 14 inches longer than the factory toyota one, so in order to keep a manual case I would have to cut and create a significantly wider center column. Electronically assisted has worked great so far with no issues. Bobby Patel has a pretty sweet 3D printed cover for that area that I've been nagging him about for awhile so that it looks a little cleaner, so that's probably what I'll do to finish that area up. DoubleDin/Radio pictured with sPOD panel.
 IMG_2744 by LFX T4R, on
Flickr
Since I kept toyota axles under her, I wanted to make sure that I could still get the vacuum actuated 4L to work so I opted for a factory-esque switch for that.
 IMG_2726 by LFX T4R, on Flickr
Here's my National Luna solenoid location....
 IMG_2725 by LFX T4R, on Flickr
And my cluster replacement! I need to re-do the background and cut a spot out for mileage, because sometimes when I update my unit the history drops from it.
 IMG_2743 by LFX T4R, on Flickr
The KA fuse block that you add to power the LFX is pictured here.
 IMG_2719 by LFX T4R, on Flickr
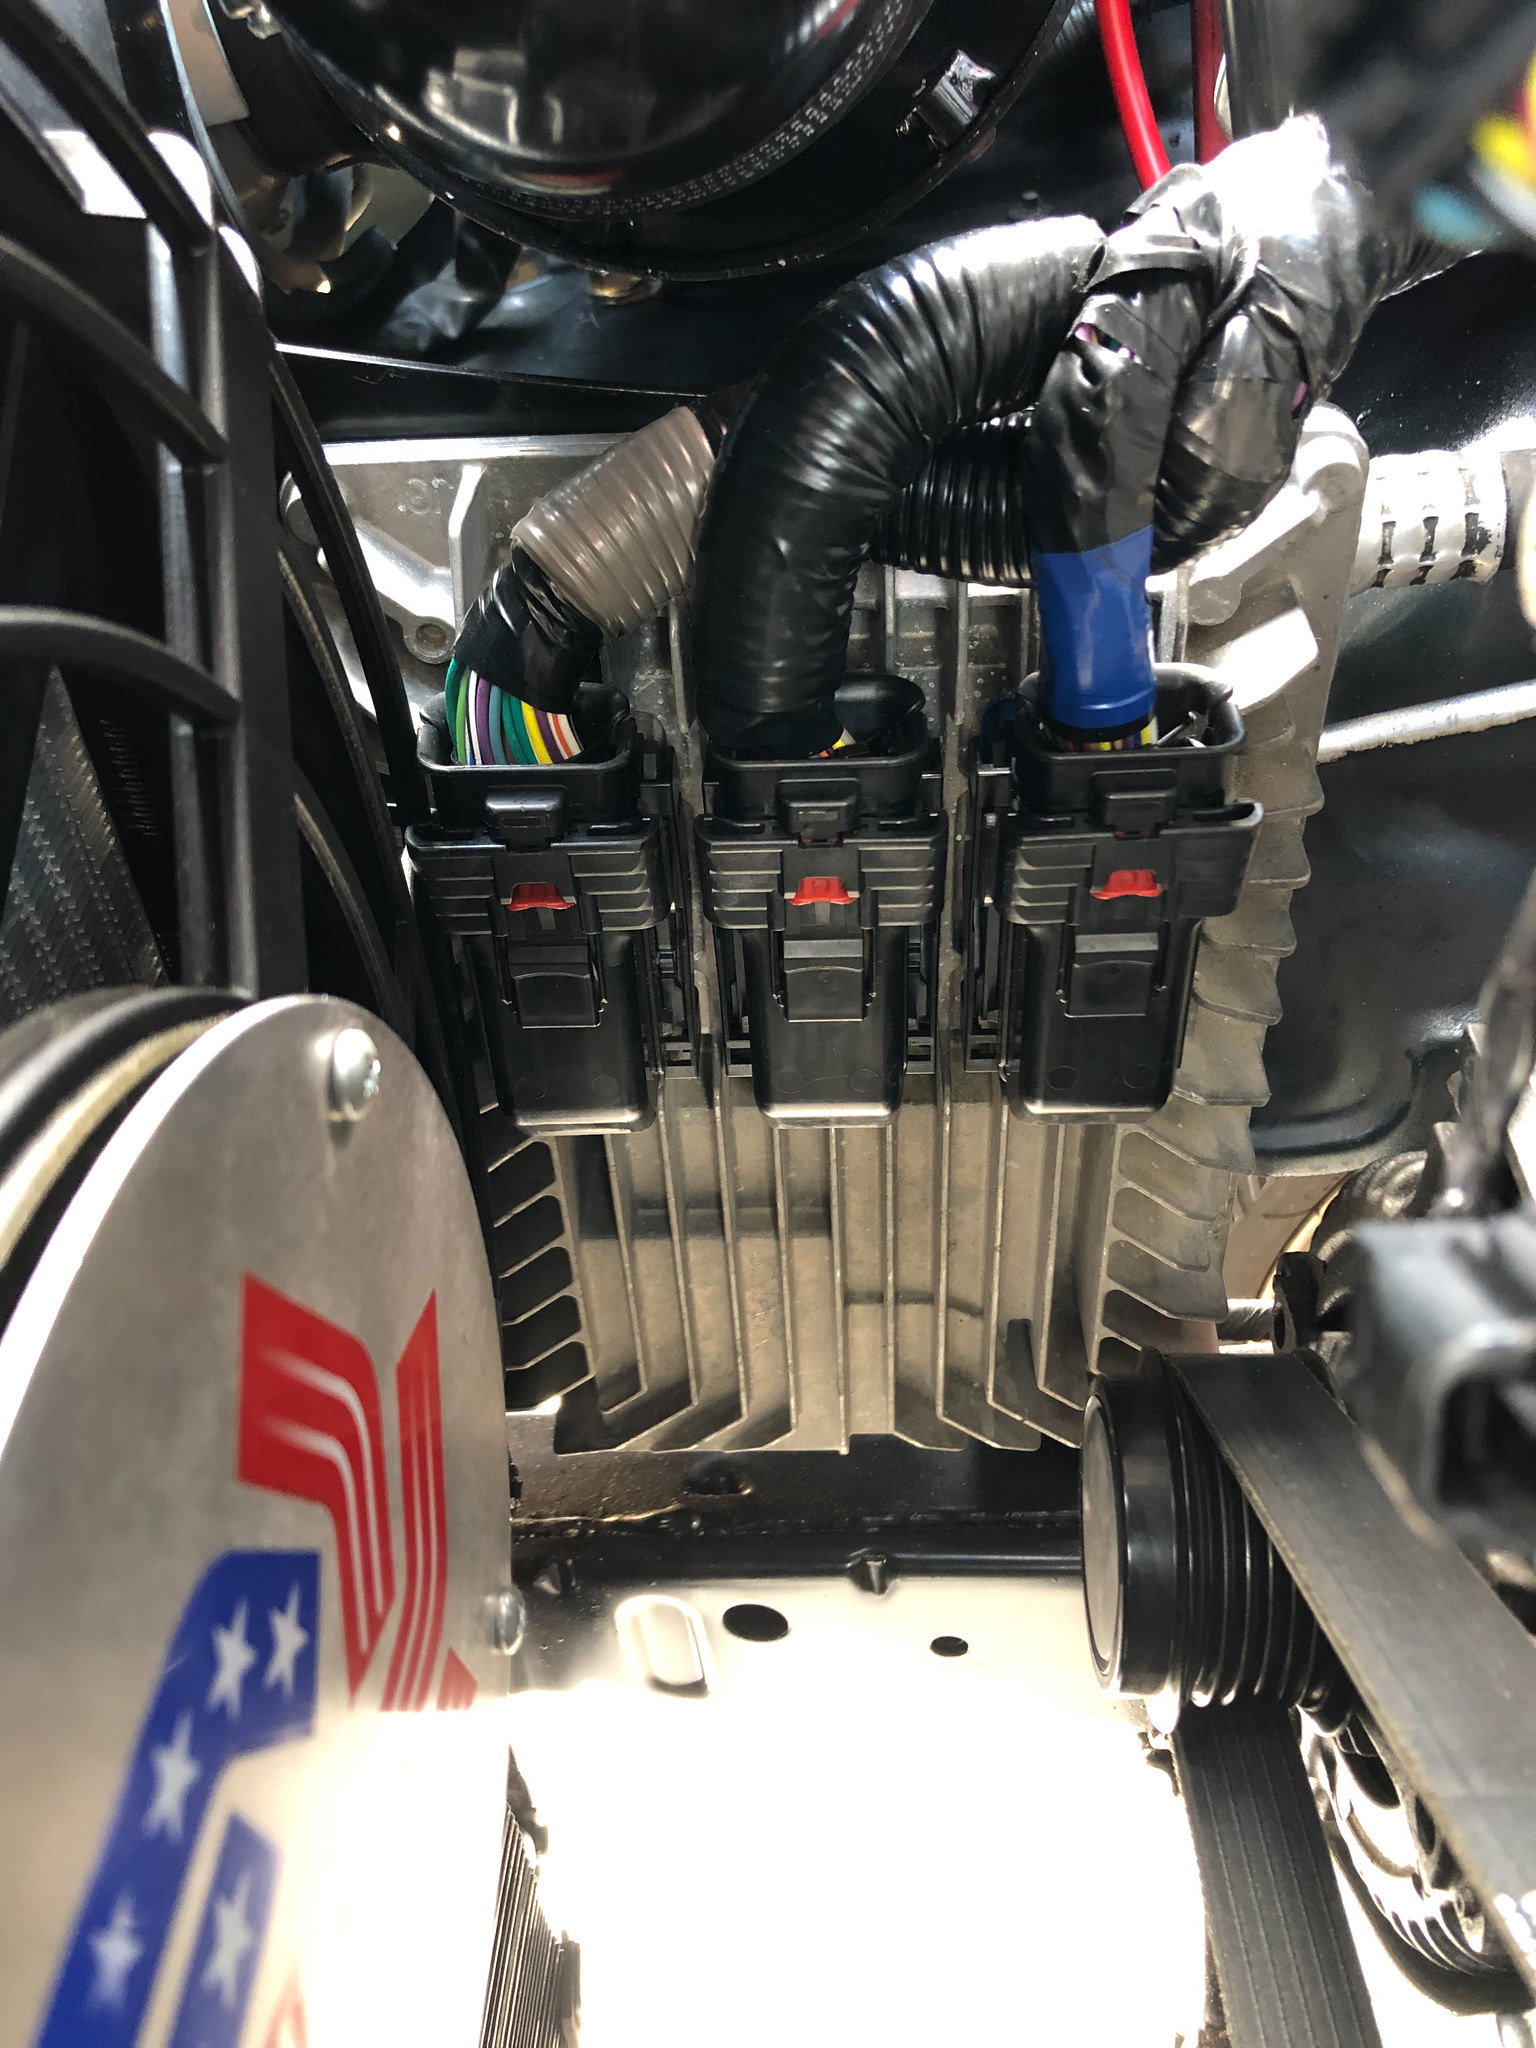
Here's where we mounted the new ECU
 IMG_2494 by LFX T4R, on Flickr
General Build Information/Fabrication Highlights
 IMG_2723 by LFX T4R, on Flickr
Intake assembly
 IMG_2720 by LFX T4R, on Flickr
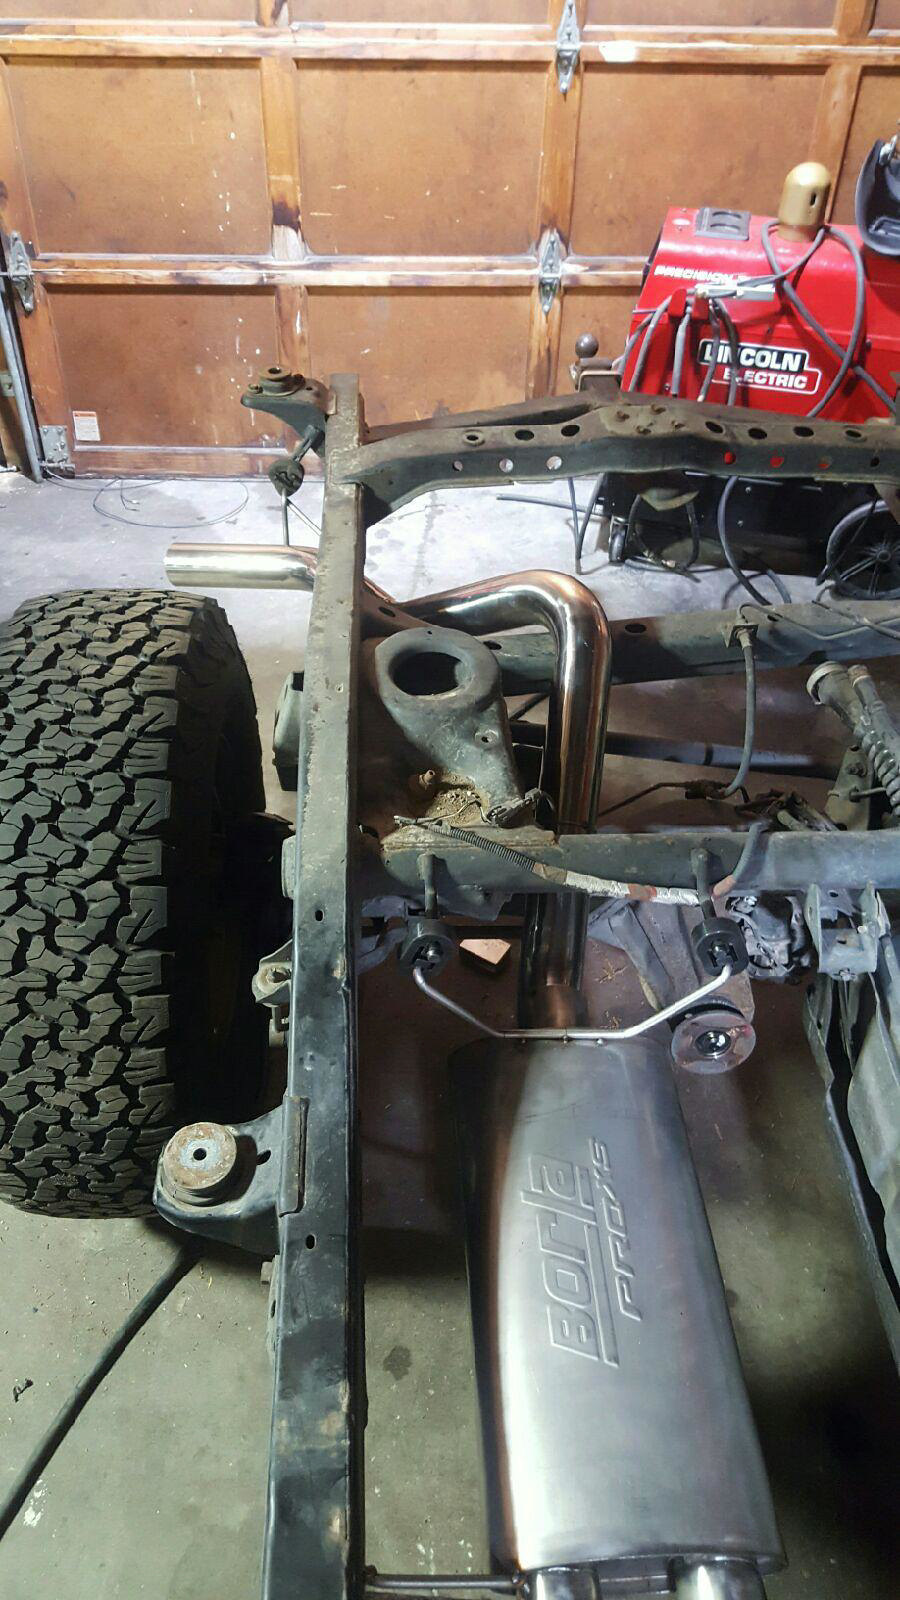
Exhaust mock-up
 IMG_2230 by LFX T4R, on Flickr
More exhaust Mock-up
 IMG_2325 by LFX T4R, on Flickr
Fans/Cooler set up on the rad mount.
 IMG_2345 by LFX T4R, on Flickr
Oil Pan work
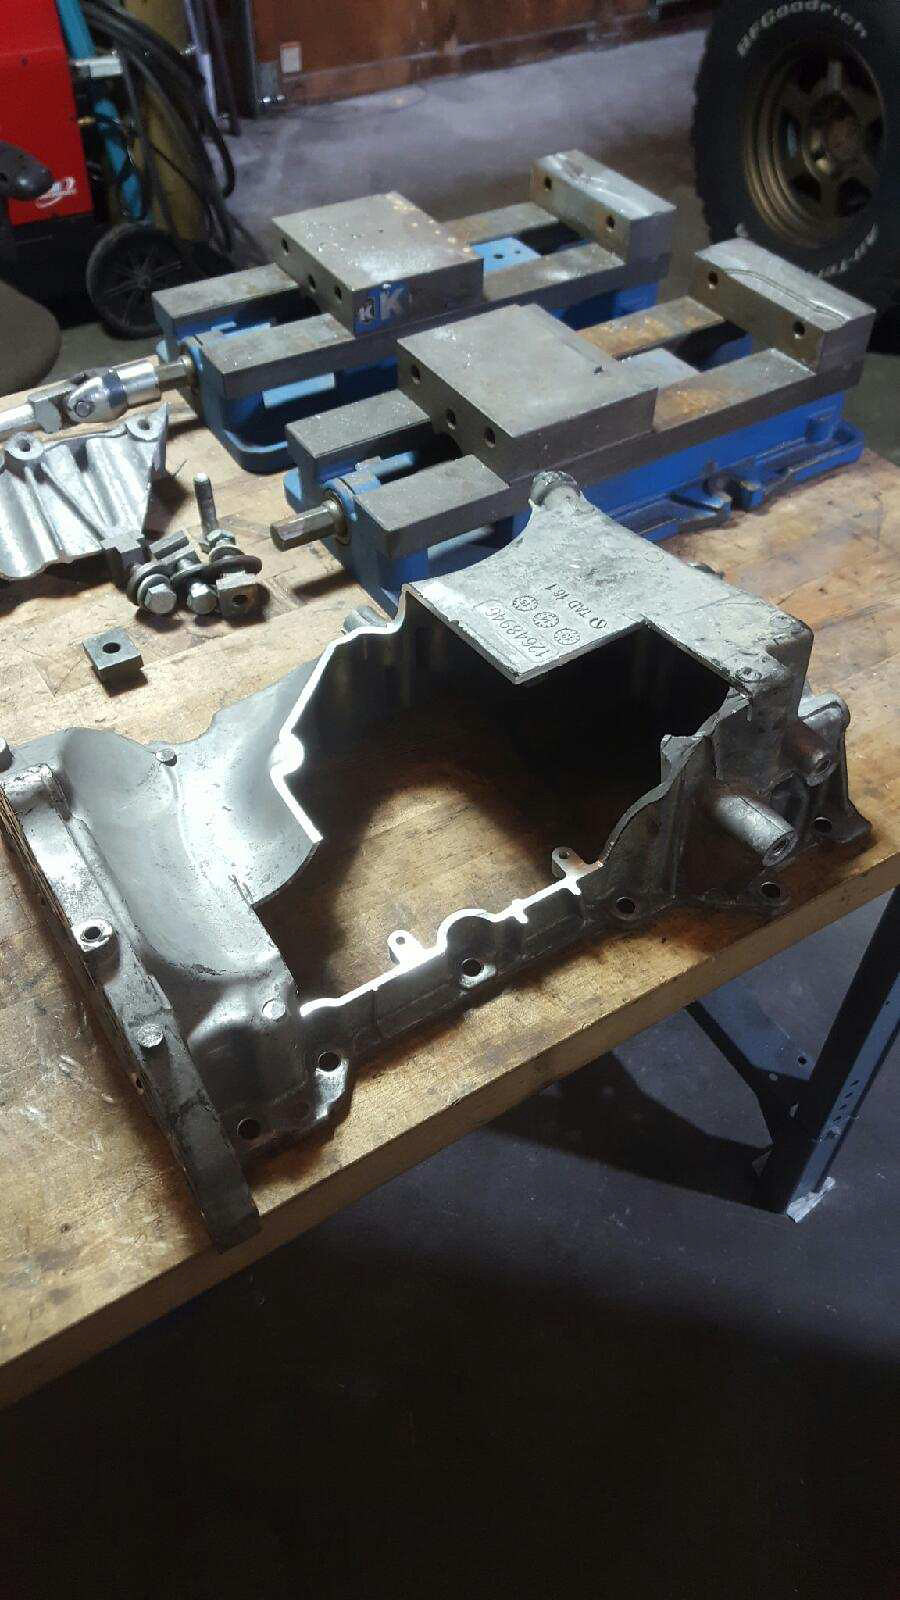 IMG_2315 by LFX T4R, on Flickr
Not welded oilpan work
 IMG_2318 by LFX T4R, on Flickr
Final Thoughts/Progress/Build Continuation
The section that follows this is what I'll be updating from 8/27/20 onwards, except for the main photo in the thread which will always be the "most up to date" version of what I'm working with.
Final Thoughts
I mean, the whole reason I ended up with this thing is because I'm a super systems-oriented guy and it just made sense to me. Also, I chased a phantom coolant loss issue in my original 5vzfe for like a year and then just decided to do this swap. Once I pulled the motor, I realized that the freeze plugs were toast, so that's annoying. Otherwise, she was running like a top (aside from being incredibly slow).
The next phase (probably in the late winter here, so Jan/Feb timeframe) will happen in a garage that I've been working on building. On top of this build, I've made lots and lots of life changes and this project has been last on my list for awhile but is now rising back to the top (like cream always does)! In the next phase, I'll be going with a whole hog LT set up and moving to 35's. All suspension components will be reworked, likely. Dunno what I'll go with yet, probably the MCM Fab kit to start. Lots of research to be done on my end of what will fit my own personal needs best.
Fin
IMG_3716 by LFX T4R, on FlickrOverall Build List:
- Keisler Automation LFX Totality Swap kit (We'll get into these details shortly)
- Sherpa Equipment Co. Matterhorn Rack (shout out to Alex Fleming, and all the guys at Sherpa)
- TaterFab Sliders (Anthony Thorn, you're awesome)
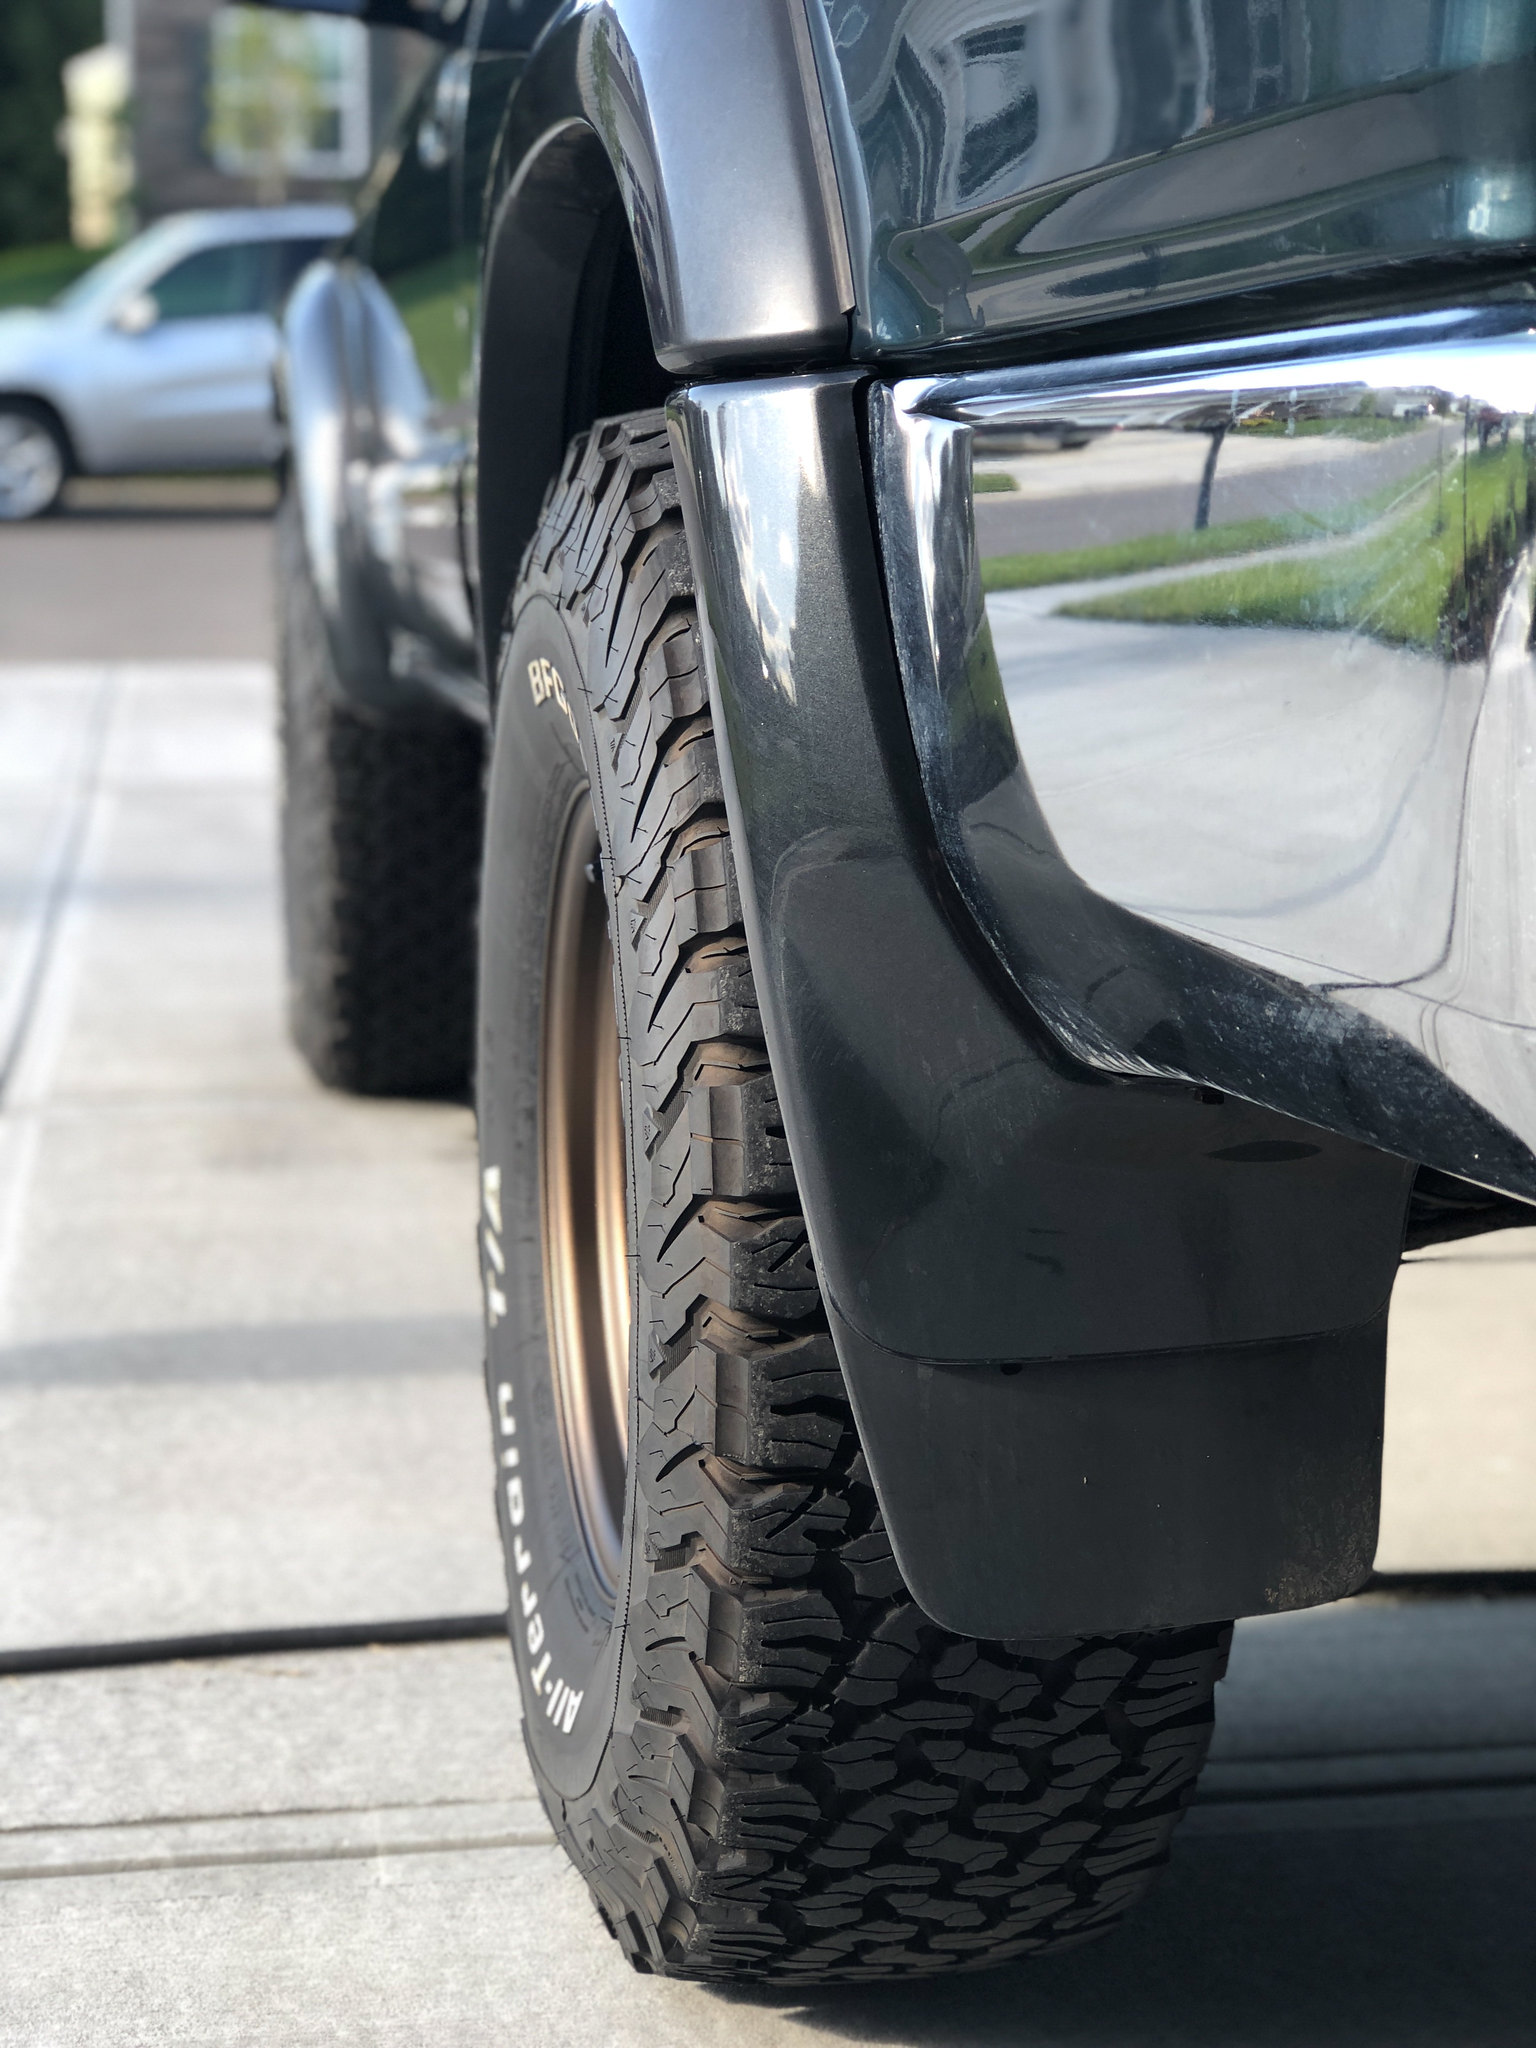
- 285/75/16 BFG K02s
- Rays Engineering Volk TE37X 16x8+0 Finished in Bronze
- JDM Clear Corners
- 20L Nato Jerrys (Wavian)
- Coastal Offroad Rear Bumper/ Dual Swingout w/ Quarter Hoops
- Tepui Ayer Sky 2 is the tent that I'm currently rockin'...although I'm not sure that's a mod? It's been a pretty good tent so far.
- True North Fabrications front bumper
- Warn Zeon 10-S winch (had to mount the solenoids under the passenger headlight, we just used some flatstock and bent it/tacked it on for the Warn bracket to fit snug and secure)
- Bilstein 5100s w/ LC Heavy Duty OMEs (861) Rears and 883 Fronts
- SPC Upper Arms
- Emkeith PCK
- DuroBumps front and rear
- SRQ Satoshi
- sPOD 6 Panel
- National Luna Dual Battery Kit
- Edge Insight CTS2 Cluster Replacement/On-board diag
Now, for the swap. Why would you do that? "It's a toyota, man-- swap the 4.7 in it! Bro, you could have 1 tons or long travel for that kind of money. Bro please bro :cry2: "
Yes-- it's a Toyota. Yes, I could have LT or Danas for that kind of money. I didn't build this for instagram clout or really any other reason than I really wanted to set out a plan to build a platform up enough to "comfortably" overland from Alaska to Argentina. This is not a rock bouncer build, hate to disappoint you guys. I built this to be efficient, easy to maintain, and a very capable (but not something I wanna destroy every weekend at the local offroad park) vehicle. (and it will still get that long travel kit that it wants, just not at this particular COVID moment).
Why would you choose the LFX over the 4.7 UZ?
Well, this answer is actually quite simple. I have Keisler Automation in my corner and when Drew comes to you with a suggestion that might seem odd at first, you listen. He's been swapping the LFX into Rx8's in racing applications as a replacement for the poor performing OE rotaries, so when I asked him "Man, what do you think the best swap for a dedicated overlander would be?" his answer was simple-- the 3.6L General Motors LFX.
Aside from Drew being one of the most hardworking dudes I know, he's completely self-taught which requires a special kind of brilliance (or evil genius) when you're taking on a task like this. Newer swaps (even at a communications protocol level, think CAN vs Modbus etc) are an absolute nightmare if you're merging older standards with new. This is typically the reason that folks stick with the 4.7. However, given the R&D that he's invested in the Rx8 swaps (Mazda to GM in that case) we felt comfortable with our local connections to the GM dealer (this is a must have) to continue down the path.
The main difference between the two, obviously, is that the 4.7L is a V8 and the 3.6L is a high-feature V6. Also, I should probably mention that KA has dyno'd a few similarly set up Rx8s and we estimate that we're somewhere between ~360-70hp/290-300tq. Shoutout to Fastech, the best tuner in TN, for throwing a tune at this contraption
LFX Overview
The 3.6 liter V6 LFX engine is GM's new high-feature V6 engine, replacing the 3.6L direct-injected six-cylinder engine (code LLT). Compared to the LLT it replaces, the LFX is lighter and more powerful, and also features the following features:
- New cylinder head design with integrated exhaust manifold
- Improved intake port design and larger intake valves within the cylinder heads
- Longer-duration intake camshafts
- Composite intake manifold
- New, optimized-flow fuel injectors
- Structural front cover and cylinder block enhancements
- Stronger and lighter-weight connecting rods
- Camshaft cap and throttle body design enhancements
- E85 ethanol capability
- The engine further refines an already well-balanced powerplant. It now uses new, lighter-weight components and enhancements designed to improve performance, efficiency, and durability.
Engine highlights include:
- Aluminum Engine Block & Integral Oil Pan: the 3.6L V6 VVT's engine block is cast from A319 aluminum alloy. This aluminum-intensive construction means less weight and greater efficiency than conventional cast-iron engines and less weight translates to improved vehicle fuel economy. The sand-mold-cast block features strong cast-in iron bore liners, six-bolt main caps, and inter-bay breather vents. A cast aluminum oil pan is stiffened to improve powertrain rigidity and reduce vehicle vibration.
- Rotating Assembly with Oil-Spray Cooled Pistons: the crankshaft is manufactured from forged steel, while the connecting rods are made of powdered metal that features a higher ratio of copper, which makes them stronger and enables them to be lighter.
- The V6 VVT engine family was developed with pressure-actuated oil squirters in all applications. The jets reduce piston temperature, which in turn allows the engine to produce more power without reducing long-term durability.
- Integrated Cylinder Heads/Exhaust Manifolds: the LFX's new cylinder head design has a revised intake port design that enhances airflow to the combustion chambers. Larger-diameter intake valves are used in the heads and work in conjunction with new, longer-duration intake camshafts to provide the engine's boost in horsepower. By using larger valves and holding them open longer, more of the air is pulled into the combustion chamber, for a more powerful combustion. The exhaust manifold is incorporated with the cylinder head, which saves weight, reduces complexity and helps promote a quicker light off of the catalytic converter, which further helps reduce emissions.
- Direct Injection: direct injection moves the point where fuel feeds into an engine closer to the point where it ignites, enabling greater combustion efficiency. It fosters a more complete burn of the fuel in the air-fuel mixture, and it operates at a lower temperature than conventional port injection. That allows the mixture to be leaner (less fuel and more air), so less fuel is required to produce the equivalent horsepower of a conventional, port injection fuel system. Direct injection also delivers reduced emissions, particularly cold-start emissions, which are cut by about 25 percent.
- E85 Flex-Fuel Capability: E85 is a clean-burning, domestically produced alternative fuel composed of 85 percent ethanol alcohol and 15 percent gasoline. Ethanol is renewable and produces fewer greenhouse gas emissions in the combustion process. It can be produced from various feed stocks, including corn and wheat stalks, forestry and agricultural waste and even municipal waste.
- Dual Overhead Cams with Four Valves per Cylinder & Silent Cam Drive: four-valves-per-cylinder with inverted-tooth chain cam drive contributes to the smoothness and high output of the LFX. The engine incorporates a timing chain with an inverted tooth design. These smaller links engage at a lower impact speed, which decreases the noise generated. In conjunction with the smaller pitch chain, the number of teeth on the sprockets are increased, which increases the meshing frequency and further reduces noise and vibration.
- Four valves per cylinder and a silent chain valvetrain contribute to both smoothness and high output. Four-cam phasing changes the timing of valve operation as operating conditions such as rpm and engine load vary.
Variable Valve Timing: variable valve timing (VVT), or cam phasing, helps the LFX deliver optimal performance and efficiency, and reduced emissions. It allows linear delivery of torque, with near-peak levels over a broad rpm range, and high specific output (horsepower per liter of displacement) without sacrificing overall engine response, or driveability. The system changes valve timing on the fly, maximizing engine performance for a variety of operating conditions. At idle, for example, the cam is at the full advanced position, enabling exceptionally smooth idle quality. Under other operating demands, cam phasing adjusts to deliver optimal valve timing for performance, driveability and fuel economy. At high rpm it might retard timing to maximize airflow through the engine and increase horsepower. At low rpm it can advance timing to increase torque. Under light-load driving it can retard timing at all engine speeds to improve fuel economy. - Composite Intake Manifold and Fully Isolated Composite Camshaft Covers: the upper intake manifold for the LFX is made from composite material and provides mass savings over an aluminum manifold, with a carefully designed structure that helps ensure quiet engine operation. The surfaces on the cam covers are shaped to limit the broadcasting of undesirable noise, and the covers use isolating perimeter gaskets, as well as isolating radial lips around the tubes that accommodate the spark plugs. These effectively de-couple the covers from vibration generated in the block and engine during combustion. Acoustic dampening has also been added for additional NVH improvements.
- Refinement, Durability and Maintenance: additional changes incorporated in the LFX deliver greater refinement, quietness and durability, starting with revisions to the front cover. It was redesigned with additional support ribs on the backside and an additional fastener to improve noise and vibration characteristics. The cylinder block is modified slightly to accommodate the front covers additional fastener. In addition, the camshafts feature new saddle-type caps for improved durability. Finally, the throttle body is updated with a new, digital throttle position feature that eliminates a previous mechanical contact for more trouble-free operation.
BONUS REASONS
1.) My fuel economy tests are still on-going but so far I'm averaging 17-19MPG with a full load (tent, recovery gear, armor, people, etc) but haven't gotten on a scale to tell you what my current weight load on a daily basis/trip basis is. I actually have a friend that just bought some corner scales so I might go over there and corner balance it for no other reason than to be a PITA and say I did it.
2.) I saved a ton of room in the engine bay. I can comfortably fit a compressor + my spare battery and winch controller with no problems whatsoever. You do not have this luxury with a 4.7. With the limited space in the cargo area of our smaller, prettier 3rd gens (sorry 5T4Rs, y'all drive tanks) this was a huge factor for me. I didn't want to pick between having to mount a compressor in the rear panel area or throwing a big marine battery back there for my electronics.
3.) Overall weight. Drew and I's initial estimates (with his revamped exhaust manifold design & engine mount set up) were somewhere near 300lbs in weight savings over the front axle. It was enough weight savings that I had to swap front springs twice because I thought I'd need heavy duty due to winch/bumper, but I didn't, and it was sky-jacked lmao.
4.) EXTREMELY HIGH AVAILABILITY AND EXTREMELY LOW MILEAGE RESULTS IN EXTREME SAVINGS: What I mean by this is that GM figured out somewhere along the line that they really nailed the design on this motor, and then they were smart enough to mass produce it and throw it in 13+ different chassis platforms. I got my 20k mile drivetrain (engine and trans) for like 3k total. If I blew this motor up tomorrow, I could walk to the nearest Pull-a-part and find one of those fleet colorados from Advanced Auto with 20-80k miles on it for 500-1300$. I could do this anywhere in the US, because again, this motor is literally everywhere. They even twin turbo'd it in the new Caddy ATS-Vs (the LF4).
Here's some pics of the drivetrain!
IMG_2094 by LFX T4R, on FlickrIMG_2093 by LFX T4R, on FlickrIMG_2098 by LFX T4R, on FlickrIMG_2101 by LFX T4R, on FlickrOkay, I know why you chose that platform now. How did you do it?
Well, as I mentioned before, although this is a new chassis for this powerplant to be thrown on, Keisler Automation (KA for the rest of this thread) has been doing this for awhile on the Mazdas. https://www.keislerautomation.com/ has lots of product guides and photos on specific components, but I'll start by highlighting the things that are required for this swap to perform as advertised.
Wiring Highlights
- Modified LFX Wiring Harness: KA removes the proprietary chassis harness and fuse block plugs and installs universal Delphi lever lock connectors that mate to the KA fuse panel block and interior harness assemblies. The plugs are super nice and waterproof and awesome, which means we could mount our ECU pretty much anywhere.
- Fuse block assembly: As mentioned prior, it mates directly to the modified engine wiring harness. This controls the LFX engine components.
- Interior Harness: This is your throttle control position (obviously we ain't by cable anymore, Dorothy) and check engine light/OBD-II data link connector.
- Flex Fuel Sensor: We opted to do this just for giggles, but you wire it into the engine harness too.
- So, uh, that sounds really easy? Could a caveman do it? No, and here's why it was a huge PITA for everyone involved.
Guess what the E39 ECU that comes in those 2009-2013 GM vehicles relies on for vehicle specific functionality? Hint: It's not simply the old way of just making sure a component (like the transfer case control module) has power and can be powered on and off. No, these new ECUs are "smart"...and GM had the brilliance to realize they could mass-manufacture the same ECU for all of these different chassis platforms by adding an additional sensor feed to "unlock" various functions within the ECU operation catalog. This beautiful idea took lots and lots of hours for Drew and our dealership techs to track down, because it didn't make any sense at first. Our transmission would work fine, the motor would work fine, but the Transfer Case wouldn't activate. What we found out is that the BCM or Body Control Module is the vehicle-specific piece that we need to actually engage the TCCM. You need a BCM out of a vehicle that actually had a transfer case to send that signal over the wire to the ECU for it to unlock the TCCM operation in that ECU unit. So, I ended up with a camaro transmission (with a colorado output shaft to mate to the t-case), camaro ECU, Colorado motor, and Colorado BCM. - Toyota stuff that stayed: KA modified the crank angle, coolant, and oil pressure sensors from OE toyota to mate to the LFX harness, so that all still gets forwarded to the instrument cluster. ABS/other control modules stayed, too, so all of my interior buttons still work (including AC).
- ELECTRONICS EXTRAS!
1.) I wanted to run a dual battery set up for my winch and fridge/compressor, so we went ahead and threw in the national luna kit here.
2.) I used the Edge Insight CTS2 as an onboard diagnostics tool (think scangauge on steroids) but also as a cluster replacement, because that's what all the cool kids do.
3.) I wanted the electric high-output fans to be on their own switch, fuel relay on its own switch, etc etc so I added a sPOD 6 switch panel where the ashtray used to be. It's a pretty neat unit because it has a fuse on every circuit with a low voltage detector in series with each accessory switch independently, so it'll cut the power off if you have it configured correctly.
4.) I run a midland MTX 275 for comms and weather advisories, so that's wired in too.
5.) Apple CarPlay is sick so I threw in a head unit that would interface with waze, etc.
My J-shift went away because the transmission is like 14 inches longer than the factory toyota one, so in order to keep a manual case I would have to cut and create a significantly wider center column. Electronically assisted has worked great so far with no issues. Bobby Patel has a pretty sweet 3D printed cover for that area that I've been nagging him about for awhile so that it looks a little cleaner, so that's probably what I'll do to finish that area up. DoubleDin/Radio pictured with sPOD panel.
IMG_2744 by LFX T4R, on Flickr
Since I kept toyota axles under her, I wanted to make sure that I could still get the vacuum actuated 4L to work so I opted for a factory-esque switch for that.
IMG_2726 by LFX T4R, on FlickrHere's my National Luna solenoid location....
IMG_2725 by LFX T4R, on FlickrAnd my cluster replacement! I need to re-do the background and cut a spot out for mileage, because sometimes when I update my unit the history drops from it.
IMG_2743 by LFX T4R, on FlickrThe KA fuse block that you add to power the LFX is pictured here.
IMG_2719 by LFX T4R, on FlickrHere's where we mounted the new ECU
IMG_2494 by LFX T4R, on FlickrGeneral Build Information/Fabrication Highlights
- LFX Idler Pulley: New steering Pump, so, yeah.
- Custom intake to keep OE Toyota location (for snorkel)
- Custom length PS lines for the factory rack to LFX PS pump
- Custom engine towers/mounts: Energy suspension universal poly motor mounts w/ Camaro engine tower castings and custom chassis engine mount towers to mate.
- Custom transmission brace/mount: custom upper weldment bracket with energy suspension universal poly trans mount and an in-house machined lower brace adapter. NOTE:I actually performed a "diff drop" in this scenario. There's so many misguided people on here talking about the "diff drop" which is literally just some bushing replacements to drop A SOLITARY SIDE of your diff to be more accommodating to a lifted platform and ease CV wear/tear, but you're placing your driveline assembly into a disadvantaged position by only fixing one side of the problem
- Custom Exhaust is 304SS & 2-1 for added clearance-- pictures below.
- Custom designed and printed throttle pedal brackets, hardware, and GM throttle pedal assembly.
- KA spent a bunch of R&D time spec'ing out some casted elbows/downpipes to eliminate the massive integrated exhaust manifold that comes factory on the LFX, so I've essentially got two blast pipes coming straight out of the motor. Pics below.
- Dropped in a toyota Koyorad in factory location (might swap to aluminum soon cause the AN fittings on the oilcooler that is mounted to it are the only thing keeping the oilcooler from dragging the ground lol)
- Aftermarket transcooler (B&M supercooler) and oil cooler (Colorado LFX variant has an oil cooler from the factory, so that was cool)
- Complete Fuel System: Custom lines, quick connect fittings, brass barb to m14 flar fittings, LFX fuel pump and a corvette fuel pressure regulator and filter +E85 flexfuel sensor.
- Oil Pan Modification: This is a pretty big undertaking that KA has to do on all of the Rx8s as well, aside from the TCCM fiasco, this is the most intensive part of the build. I included lots of pics below of how this happens. It's a custom FWD oil pan.
- Custom routing for coolant hoses/bung welded a temp sensor onto the adapted housing so that I'd have coolant temps on my CTS2.
- Had to weld all of the AC lines to the new compressor to keep factory OE replacement for everything else.
- Fab'd up a battery mount bracket for the secondary battery because all of the kits put a ton of pressure on the fender and I was concerned that it would buckle offroad.
- Had to do some custom shifter linkage/cables to make it line up with the GM trans.
- Threw an oil catch can at her, cause it's a racecar.
- Also threw some big ol aluminum radiator fans at it, cause racecar too. Sounds like a spaceshuttle is going to take off in the drivethru, so that's cool.
- Custom Driveshafts: As I mentioned before, I wanted toyota axles still (and the F/D ratio on the Colorado matched my '97 e-locked toyota @ 4.30 so that's cool) but since it's a whole 14 inches longer, you obviously need a shorter rear and a longer front.
IMG_2723 by LFX T4R, on FlickrIntake assembly
IMG_2720 by LFX T4R, on FlickrExhaust mock-up
IMG_2230 by LFX T4R, on FlickrMore exhaust Mock-up
IMG_2325 by LFX T4R, on FlickrFans/Cooler set up on the rad mount.
IMG_2345 by LFX T4R, on FlickrOil Pan work
IMG_2315 by LFX T4R, on FlickrNot welded oilpan work
IMG_2318 by LFX T4R, on FlickrFinal Thoughts/Progress/Build Continuation
The section that follows this is what I'll be updating from 8/27/20 onwards, except for the main photo in the thread which will always be the "most up to date" version of what I'm working with.
Final Thoughts
I mean, the whole reason I ended up with this thing is because I'm a super systems-oriented guy and it just made sense to me. Also, I chased a phantom coolant loss issue in my original 5vzfe for like a year and then just decided to do this swap. Once I pulled the motor, I realized that the freeze plugs were toast, so that's annoying. Otherwise, she was running like a top (aside from being incredibly slow).
The next phase (probably in the late winter here, so Jan/Feb timeframe) will happen in a garage that I've been working on building. On top of this build, I've made lots and lots of life changes and this project has been last on my list for awhile but is now rising back to the top (like cream always does)! In the next phase, I'll be going with a whole hog LT set up and moving to 35's. All suspension components will be reworked, likely. Dunno what I'll go with yet, probably the MCM Fab kit to start. Lots of research to be done on my end of what will fit my own personal needs best.
Fin
Last edited: