Knock Sensors and harness DIY

BlackRustBucket

New member
Having knock sensor issues so my second time in I took some pics to try and make a DIY for replacing these components. I may have missed a detail here or there but hopefully this can help someone see what's involved in this job. I took a picture of almost every step. I wrote as a step by step in order procedure.

Tools needed:

10,12,15mm sockets with various extensions

10mm wrench (preferably gear type)

27mm Crowsfoot (To torque sensors)

Needle nose pliers

Torque Wrench

Screwdrivers

Supplies:

Coolant (I don't know the exact amount, I used 1 gal of concentrated + 1 gal distilled water and it could use a little bit more but is at about the "L" on coolant reservoir

1 or both knock sensor replacements (2 choices of Denso or Matsushita, find out which one you need from dealer If you don’t know I’d recommend Denso. To save money try looking for some used on Ebay as long as they’re OEM)

Knock Sensor Wiring Harness

Upper and Lower Intake Manifold Gaskets

Optional Valve Cover Gaskets

Optional Spark Plugs


Step 1
Drain coolant using the petcock on the bottom of the radiator. Don't do what I did if you can tell and try leaving the skid plate on.


Step 1A
Disconnect battery (In case you remove a fuel line you don't want power to the fuel pump)


Step 2
Start removing the throttle linkages by pushing/pulling the mechanism whichever way it needs to go to add slack to get the cable out.

1


2


Step 3
Remove these 10mm bolts holding the linkage mount but first roll the actuator out of the way to get the bolt all the way out.


Like this and also remove it's linkage cable along with the last one remaining.


Step 4
Remove this mounting bracket by removing this 15mm bolt


Step 5
Remove this hose and throttle cable from these mounts to free it up and move it out of the way


1


2


3


Step 6
Remove all hoses going to the top intake manifold


Remember where this PCV hose goes, I forgot it the first time since it's kind of hidden


Step 7
Unplug black and white plugs from throttle body


Last edited:
Register to hide this ad
Step 8
Remove main intake tube from throttle body


Step 9
Remove upper intake manifold 12mm flange and mounting bolts (I know the air ratchet is not exactly necessary but I just got it and wanted to be lazy with it)


Step 10
Lift intake manifold to access and remove remaining hoses

1


2


3


Step 11
Remove top layer of the manifold and set on your dads rusted beyond repair 1970 Datsun 240z!


Step 12
Remove old gasket and throw away


Step 13
Begin removing bolts holding 2nd layer of manifold


Remove bolt on the side, put this one in first during reassembly to allow everything to line up

 
Last edited:
Step 14
Remove (3) 10mm bolts with grounds/tubing mounts

1


Remove this tube from manifold side mounting bracket now for easier access


2


3


May need to remove everything else to access this last one (#3)


Step 15
Remove this tube, there may be another to pull off on the other end of the fixed tube on the plenum that I didn't get a picture of. I'm sure you will figure it out


and this 10mm bracket holding the plastic wire harness shroud


Layer 2 Removed


Step 16
Remove coolant inlet hose from manifold


Step 17
Unclip these spark plug wire clips from timing belt cover so you can pull the cover back after removing the bolts in the next steps


Step 18
Remove the 4 bolts holding the upper portion of the timing belt cover

1


2


3


4


Step 19
Now it starts getting fun. :juggle:
Remove each fuel injector plug


Step 20
Remove intake pipe from MAF and rotate down out of the way. Probably optional but this is just what I did.


Step 21
Remove the (4) 10mm bolts holding the black plastic wiring harness to the valve cover gasket. There are 2 per side

 
Last edited:
Step 22
Unplug the 2 white connectors near the left side of the timing belt cover. 1 of them is the knock sensor harness


Step 23
Begin finagling the black plastic wiring harness upwards to give you some space to take out the lower intake. This wiggling process is something you must do here and there throughout the next few steps as you need to access hoses or clips. The black plastic is very brittle (I broke the shit out of mine, black plastic was flying everywhere) so I would recommend stuffing paper towels or tape over the intake ports to avoid foreign material from entering the system.
First you’re going to reach in the back and try to find a clip that holds the plastic harness to the engine and push the clip toward the firewall while lifting the harness to get it free. *Caution* as you lift the harness up and free there is a small tan/clear plug that will still be attached (refer to next step) don't rip it apart. Also I have pics of unplugging the coil packs but I don’t remember why. Do these as well if you need more wiggle room.


Step 24
Unclip this small plug and move the harness up and out of the way as much as possible


Step 25
Fuel rail removal. Since the line is pressurized with gas still in it a small amount of gas will come out of the rail when you pop it off until it depressurizes. Some people claim this isn't necessary but I just find it easiest to pop off and move out of the way. There are (4) 12mm bolts and (1) 10mm holding down the solid fuel line going to rail. Once the 4 bolts are out you can wiggle rail around to access the 10mm in the back. Good time to replace o-rings on injectors. I split one of mine so I ran to the hardware store and got 6 real quick.


10mm holding solid fuel line


Step 26
I removed this vacuum T on the very end of the manifold closest to the firewall to get it out of the way. Again not sure it's a totally necessary step but it gets it out of the way for upcoming steps.


Step 27
Move fuel rail out of the way


Remove these black mounts so you don't lose them


Step 28
Remove bolts holding lower intake manifold to the block. There are short and long ones so remember where they go, if not you'll just figure it out when you’re putting them in but it'll save time. On each side there is also a 12mm nut on each end (firewall-front) besides the bolts with the torx.


There is also a bracket on the front end with (2) 12mm going to it.


Step 29
Follow pipes still connected up from intake manifold and disconnect along the firewall


Don't slip while pulling hoses and drag your knuckles across those metal band causing you to bleed on your glove


Step 30
Do a final check that nothings connected and that you'll have room to lift it out and move plug wires out of the way, pull back timing belt cover to clear the coolant inlet nozzle and lift up and out!


Step 31
Locate and remove sensors and harness. Try and remember the path the knock sensor harness takes, if not I don't think it's a big deal. You may need to remove the silver metal coolant return line running down the center to get a torque wrench on the sensors. Also don't do what I did this second time and not plug the intake ports. Posting these pictures I now see some foreign material sitting on top of one of my valves. Great...


Step 32
Replace lower gaskets, sensors, harness. Ohm out your cable to your ECM if you think you may be having more involved issues.


Step 33+
Reassemble in reverse/Do valve cover gaskets/Clean mating surfaces well during each layer of manifold and install new gaskets!

Torques (I hate to say this but take these for what they read, I'm not 100% positive what some of these are referring to. If anyone has some insight?) Becareful torquing! I broke a valve cover bolt trying to go too high to stop leaks!

ALL 18Nm/13ft.lbs
Intake manifold, Intake manifold stay x Cylinder head
Intake air connector x Intake manifold
Air intake chamber x Intake air connector
Air intake chamber stay x Air intake chamber

Air intake chamber stay x LH cylinder head 40Nm/30ft.lb
Timing belt cover bolts x Cylinder head 9Nm/80 in.·lbf
Intake air connector x Intake manifold 18Nm/13ft.lbs
Water bypass pipe x Cylinder block 8.5Nm/75 in.·lbf
Knock sensor x Cylinder block 39Nm/29ft.lbs
Spark plug x Cylinder head 18Nm/13ft.lb
Cylinder head cover x Cylinder head 6Nm/53 in.·lbf (4.42ft.lbs) (Valve Covers, and I would recommend going slightly more due to the trend of leaky valve covers)
 
Last edited:
Rev 1. Will do some editing later and try to find torques for re-installation. Also try and figure out why the pics got so gihugic at the end.
 
Yep, I know that's a lot of work for a knock sensor and harness...I just did that very same job about a year ago. Albeit the supercharger made the job just a sliver easier. at least, the codes lead directly to the problem, replacement of the parts fixed the issue, and the engine remains bulletproof...Volumes more than you can say of most other engines. :cowboy:

Fantastic write up by the way...I know how much work it is on top of the actual repair to make a quality write up...
Thank you:bravo:
 
Last edited:
Good Job on the Documentation

Having knock sensor issues so my second time in I took some pics to try and make a DIY for replacing these components. I may have missed a detail here or there but hopefully this can help someone see what's involved in this job. I took a picture of almost every step. I wrote as a step by step in order procedure.

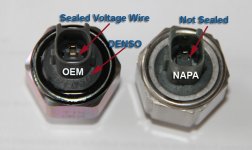
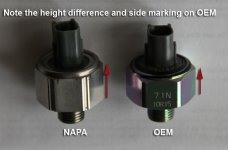
Did you end up changing out the Matsushita for Denso the second time? The last we talked the code came back on. Also, did you replace the sub-harness? The wires on that harness become very brittle due to the heat and are usually the culprit in most KS issues. I hope all the info I gave you was helpful. You did a good job on this write up. I'm glad you took the time to document and share. If you can, take a photo of the Matsushita sensors and compare them to the Denso's like I did a while back with the NAPA brand. Here's the old photo...
 

Attachments

  • knock sensor_2.jpg
    knock sensor_2.jpg
    86.2 KB · Views: 18,588
  • knock sensor_3.jpg
    knock sensor_3.jpg
    76.4 KB · Views: 16,143
Thanks for taking the time to do this. Somewhere down the line I will be in the same boat for sure.

I hope BrianSD_42 sees this and adds it to the DIY thread.

I'd be tempted to replace all those coolant hoses in the rear, but considering the knock sensors and the wire weren't cheap, I can't blame you.

My favorite SO ratchet by the way. Found mine unused at a divorce yard sale for $50.
 
Yep, I know that's a lot of work for a knock sensor and harness...I just did that very same job about a year ago. Albeit the supercharger made the job just a sliver easier. at least, the codes lead directly to the problem, replacement of the parts fixed the issue, and the engine remains bulletproof...Volumes more than you can say of most other engines. :cowboy:

Fantastic write up by the way...I know how much work it is on top of the actual repair to make a quality write up...
Thank you:bravo:

Glad to hear you fixed it with doing that, I have not fixed my problem yet unfortunately. Thanks for the positive feedback! My first write-up so it's nice to hear that
 
Did you end up changing out the Matsushita for Denso the second time? The last we talked the code came back on. Also, did you replace the sub-harness? The wires on that harness become very brittle due to the heat and are usually the culprit in most KS issues. I hope all the info I gave you was helpful. You did a good job on this write up. I'm glad you took the time to document and share. If you can, take a photo of the Matsushita sensors and compare them to the Denso's like I did a while back with the NAPA brand. Here's the old photo...

I actually did the new Matsushita's the second time since I only did the harness the first. I will be doing Denso's on my third time in lol. Your feedback was definitely helpful though about the brand, I wouldn't have thought that and I think that may be the case here. Going to do some easy troubleshooting before though, I'm going to ringout the harness back to the ECM and make sure that's good as well as hook a scope up the the ECM terminals and see what's going on while running. Thanks for the compliments on the write-up, it was more time consuming then I expected.
 
Wow great write-up!

Hope I don't have to do it anytime soon

Thanks! Hope you don't either ha it's super frustrating once you get down to the last layer.

Thanks for taking the time to do this. Somewhere down the line I will be in the same boat for sure.

I hope BrianSD_42 sees this and adds it to the DIY thread.

I'd be tempted to replace all those coolant hoses in the rear, but considering the knock sensors and the wire weren't cheap, I can't blame you.

My favorite SO ratchet by the way. Found mine unused at a divorce yard sale for $50.

Your welcome! I've used enough of everyone else's I figured it was time to contribute lol. Coolant hoses sound like a good idea. I got the truck really cheap in kind of rough shape so I'm not too OCD about the little things yet but I suppose those hoses could turn into a big thing if they crack lol. Good deal on the ratchet, I got mine on black friday on amazon so it was largely discounted but still like 150.00
 
Anyone know a good place to order the denso knock sensor and harness? My local dealership wants 250 for the sensor, like that's gonna happen.
 
I had to replace my knock sensors about 8 months ago. DO NOT go with after market knock sensors. My mechanic had to replace them twice before going with the factory sensors. The aftermarket ones have a different resistance measurement and the ECU throws a CEL because it can't read them properly.
 
My injectors came out of the intake Plenum instead of the fuel rail is that going to be a problem?

No it's ok. For me though after having them out two or three times one or two of the injectors began to leak and bubble gas past the o-rings onto the top of the engine. So if they are all original then I would highly recommend getting an O-ring kit, I got mine from Napa it's not expensive. Maybe even just do the one that popped out but be aware there's a possibility of having to go back and replace some other ones if they are leaking but at least you will have them ready.
 

Members online

Forum statistics

Threads
278,315
Messages
3,554,104
Members
248,016
Latest member
Advally Service

Trending content

Back
Top